[FAQ] GE 3-Way Wiring

I’ve decided to put this FAQ together to help those with questions about installing GE 3-way switches.

Definitions of terms:
Line: The hot wire from the breaker (usually black)
Neutral: The return wire for circuits (usually white)
Load: The wire that will be hot when the circuit is completed to your light (usually black)
Traveler: In existing 3-way wiring, this wire toggles hot between two switches. In a smart switch 3-way configuration, a smaller charge is looped through the add-on switch.

Some things to know:

  1. 3-way wiring for smart switches is different than standard 3 way wiring.
  2. You cannot use dumb 3-way switches with most smart switches (You must purchase the matching GE add-on switch to wire with your GE smart master switch).
  3. If the line is wired into the light fixture, you will not be able to use GE Smart Switches in a 3-way configuration without running additional wires. There are other smart options available listed below.

Recommendations before beginning:

  1. ALWAYS power off your circuit breaker before working with electricity. Only a tenth of an amp can kill.
  2. Please do not use ground as a neutral. You may end up with a current where it does not belong and it is against code.
  3. Take pictures of the existing wiring before starting. Those pictures are a good reference point and can assist those giving advice in the community.
  4. The community is a great place to ask questions or advice.
  5. Purchase a multi-meter or power wand to help determine which wires are line, load, traveler and neutral
  6. Existing wiring configurations can come in all shape and sizes - Usage of colors may not be standard.
  7. If you don’t feel comfortable with any of this - hire a professional.

NOTE: There is now a Z-Wave plus GE Dimmer (model 14299) that does not need neutrals. It will not work with LEDs and is only designed for incandescent loads. This FAQ is for standard models needing neutrals.

There is also a helpful thread about switches and wiring in general:

Wiring Configurations:

line-switch-switch-load
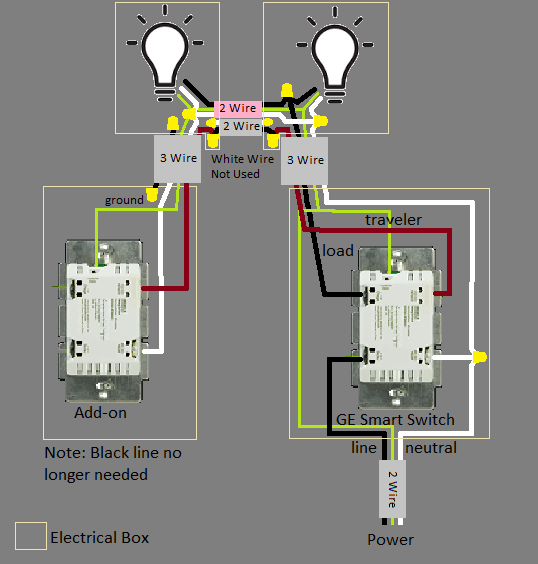
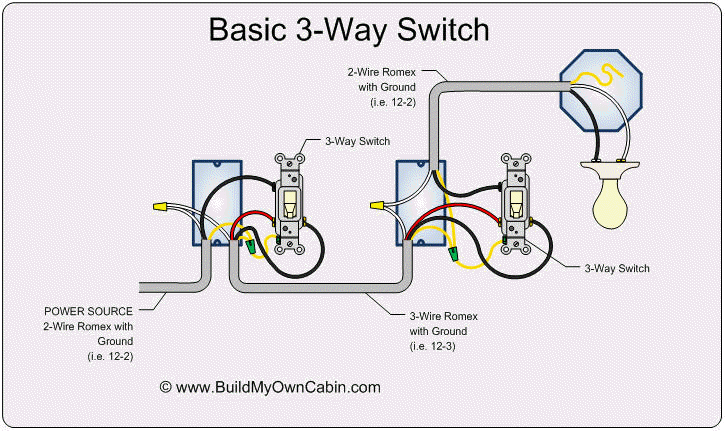
If your wiring is like either diagram below, you can wire your smart switch in either of your two switch boxes. Having multiple lights wired in parallel will not change your wiring. You should only need to change the wiring in each switch box (light box(es) do not need to be touched).


Option 1:

Option 2:

line-switch-load-switch-1
If your wiring is like the diagram below, you can wire your smart switch in the box with line. Having additional lights wired in parallel will not change the wiring below. You should only need to change the wiring in each switch box (light box(es) do not need to be touched).

Only Option:

line-switch-load-switch-2
If your wiring is like the diagram below, you can wire your smart switch in the box with line. You will need to change the wiring in both switch boxes and your light box.

Only Option:

line-switch-load-load-switch
If your wiring is like the diagram below, you can wire your smart switch in the box with line. You will need to change the wiring in both switch boxes and your light boxes.

Only Option:

Other wiring configurations that are not supported with GE 3-way switches:
Unfortunately with either of these configurations you do not have an available neutral for GE smart switches. You can however use other options.


You will need to use a relay installed in the light box or additional wires for the image above. Another option is Lutron Caseta, GE’s 14299 Dimmer, or Leviton’s ZSS10-G0Z switches that do not require neutrals.

For this type of wiring you can use relays or switches by Cooper or Linear which do not require a traveler. Another option is Lutron Caseta, GE’s 14299 Dimmer, or Leviton’s ZSS10-G0Z switches that do not require neutrals.

Another thing to note is that Zooz now makes Z-Wave Plus switches (demarked as version 2.0) which are wired the same as dumb 3-way switches. They are available in paddle and toggle formats.

Obviously, as mentioned above, your wiring may still differ from these common 3-way wiring standards. Feel free to ask any questions.
40 Likes

If anyone has some comments or corrections, please let me know. I will try to continue to add other wiring configurations that pop up and link to those discussions.

1 Like

Thank you for doing this @jhamstead. This will definitely help plenty of folks out there looking to get into smart switches. I was thinking of doing something similar but never seem to have time and I suck at drawing ha!. If you have time, is it possible you can convert all the options on this website and also make in wall relay micro module for the options that won’t work with smart switches?
http://www.easy-do-it-yourself-home-improvements.com/3-way-switch-wiring-diagram.html

1 Like

Also the statement above with “only option” . Maybe also do the drawing with the master and aux swapping places?

Might be better to make a separate FAQ for the different models, like the micros, and keep this thread just for the very popular GE switches.

I think one of the reasons that people who are new to the platform get confused is just because SmartThings does have so many different options. I like the idea of having a GE specific thread. :sunglasses:

I know @anon36505037 has already done a bunch of drawings for the Fibaro dimmer micros, for example. Maybe if he has time he can do an FAQ for just that one individual model, since its wiring is different even from other Fibaro units.

I think it would be great to have that information in an FAQ, I just wouldn’t put it in an FAQ titled “GE 3-Way Wiring.” :wink:

JMO …

3 Likes

The ones I have listed as only option can only be wired that one way unless you run additional wiring.

I’ll also look at those other options.

1 Like

This is great. Not sure if you want to try to expand it to four way switches, or if it would be smarter to do a separate FAQ for that. This would have be very helpful for me about three months ago.

2 Likes

This is so so so helpful.

1 Like

Excellent FAQ! :tada:

The only thing I would add is that because in the US most wire colors are not mandated by code, people can and do use any color, particularly if it’s the end of the day and there’s just one roll of wire left in the toolbox.

If someone opens up a switch box and sees 4 black wires or 2 white wires or whatever and doesn’t know how to map the circuits but wants to learn, many Home Depots offer free classes in how to wire a light switch. It won’t apply directly to networked switches, but you will learn how to use the mapping tools and work safely with switches. And since Home Depot does sell the GE Z-wave switches, sometimes the instructor can get answers to questions about those as well.

Also I know everyone who’s posted so far already knows this, but because this thread will certainly get a lot of readers over time, I did just want underscore again that different models have different wiring requirements. Always read the user manual for the exact switch you are getting ready to install, even if it’s just a different GE model. :sunglasses::level_slider::bulb:

2 Likes

I’ll have to think about it. 4-way has a lot of different wiring options.

1 Like

I’ve seen @Navat604 ask alot about which wire is on the common terminal of the original switch.

Maybe a small section explaining which connection that is(on a dumb switch) and what it’s function in life is. Would help people understand a little better when asked about it. I believe he is looking for the load in the circuit when he’s asking.

Just a thought. Not trying to volunteer you for more work.

1 Like

Never, ever, trust color/ All NEC requires is ground (green or bare). The rest is good practice or common occurrence. Some local codes may be different. Even in a brand new home mistakes are made. Older homes - who knows. Switched neutrals are far from uncommon.

If ANYTHING - Get and learn to use a VOM, or keep your hands out. Get and learn a non-contact voltmeter. Use if just as a first line defense as they can and do give incorrect results. (usually a false positive , but rarely a false negative).

I am not an electrician, and I am not YOUR electrician. However, 40 years of on and off experience and knowing when and what to ask and I trust MY work 100%.

2 Likes

I usually ask this question is because in a 3 ways or 4 ways circuit. 99% of the time. The Line will be on a common terminal of the 3 ways switch #1 and the load will be on the common screw of the opposite 3 ways switch.

I jumped the gone on that statement above. My error for not looking at it carefully enough. Didn’t want to create more extra work for you.

This is also a great idea. and it won’t spam the thread with questions on other circuits.

2 Likes

Thank you for this FAQ.

I’m trying to install these at the moment and I think my configuration is like the one you showed in the image named “3-Way switch (Light between switches #2)” but I’m not sure and was wondering if anyone could help.

I tried to take pictures but none of them really turned out well enough to see anything.

I can describe what it looks like though.

In the main switch there are 4 Romex wire sets.

Wire set 1:
White connected to bundle of whites
Black connected to bundle of blacks
Bare connected to bundle of bares

Wire set 2:
Black connected to common terminal on old light switch
White connected to bundle of whites
Bare connected to bundle of bares

Wire set 3:
Black connected to bundle of blacks
White connected to bundle of whites
Bare connected to bundle of bares

Wire set 4:
Black connected to bundle of blacks
White connected to switch
Red connected to switch

With light turned off only the white wire connected to the switch is hot.

In the other box it is:

Black connected to common terminal on old switch
Red connected to switch
White connected to switch
Bare connected to nothing

Both black and red are hot with the light turned off.

There are four different lights connected to this 3 way switch. Is it necessary to check them as well to see how they are connected? Or does it sound like I have the “3-Way switch (Light between switches #2)” setup?

While I’m at it can I go ahead and connect the bare wire to the ground terminal in the second box? I’m pretty sure it’s just a simple ground wire that can connect to the ground terminal but it seems strange they ran a ground wire there but didn’t connect it to the ground, even though the light switch has a ground terminal on it. I guess the code at the time required a ground wire to be ran to the box but not connected to the switch itself?

So if I’m understanding this correctly, in the main box I would need to remove the black wire from wire set 4 from the bundle of blacks and cap it off, pigtail the bundle of blacks to the line terminal on the new switch, pigtail the bundle of whites to the neutral on the new switch and connect the white wire currently on the old switch to the bundle of neutrals (since it looks like these are the wires that end up in the other box), connect the red wire currently on the old switch to the traveler terminal on the new switch, pigtail the bundle of bare wires to the ground terminal on the new switch, and connect the black wire currently on the old switch to the load terminal on the new switch.

In the other box I would cap off the black wire (since it’s no longer doing anything), connect the white wire to the neutral on the new switch, connect the red wire to the traveler on the new switch, and connect the bare wire to the ground on the new switch.

Does this all sound right?

1 Like

Yes that sounds exactly right.

As you have deduced, it appears that either wire set 1 or 3 is your power from breaker (line and neutral). The other must continue the circuit to power some other device. Wire set 2 is your load, and wire set 4 is your connection to the other switch box.

That worked perfectly. Thank you so much for all of your help.

I’ll probably be back for more questions if the other 3 way switches don’t look quite the same as the one I just did looked.

1 Like

Just wanted to say thanks again for this awesome FAQ. I just installed another 3 way switch and it was easier this time thanks to this FAQ because I was able to understand what to look for and which wires did what.

It was a bit of a pain because it was 3 light switches in the same box and 2 of them I was replacing with these smart switches that are huge compared to the old ones, but I managed to squeeze everything in there.

Should be easy to get the other three 3 way light switches installed.

1 Like

I had a 3 way switch (Light between switches #2) this guide nailed it. Thanks so much for taking the time to do this to help others (like me!)

1 Like

So I may have one of the most unique 3 way configurations I have seen.

In my house both 3 way boxes had a line, ground, traveler and neutral. The old 3 ways had the traveler connect to the common port and each of the two “traveler” spots had the line and the neutral.

I installed the main switch with the line traveler and ground in normal locations the neutral going into the load and a jumper between the load and neutral. The add on has the neutral traveler and ground wired normally with the other line wire being dead headed.

The main switch works ish it actually dims non dimmable LEDs but doesnt shut them off theadd on is non responsive. Any suggestions?