I am new to home automation but have several devices successfully set upwith Alexa. I also have a Samsung SmartThings hub and Samsung SmartThings Multi sensor on my garage door functioning properly. I am using I am using the updated Smartthings app. I have searched extensively but cannot find a resolution to my issue.
During the day my garage door is often open, which is fine. I would like to set up a notification to alert me by turning on a smart light in my bedroom IF the garage door opens or if the garage door “IS” open at certain times (for example 8 PM till 6:00 am). I do not want the have the bedroom light turned on all day if the garage door is open, only to alert me that the door was accidently left open at bedtime or if it opens during the night. Currently, I am able to be alerted if the door “opens” if the door was closed before the specified times, however, if the state of the door was already open before the 8 pm, the smartlight is not triggered. If I close and reopen the door after the set time, the smartlight will turn on/off properly. The only set up options I see in the app are “when the door opens”, but I am trying to get a notification that the door “is open”, but only during during certain hours. Any help is appreciated!
you can try Webcore and try setting up your parameters yourself… IF , THEN
or
use Rboy Apps http://smartthings.rboyapps.com/
there is one smartapp specifically for garage doors and IS what im using. they even just released a new update.
Thanks very much for your response and suggestions. I was hoping there was something I missed like a setting somewhere that I could easily change or a simple workaround. I will look into Webcore. I am unfamiliar with it and not very tech savvy, but it wouldn’t hurt to learn a thing or two. Rboy apps may have something too, and I will look deeper into it as well but I am trying not to spend more to achieve something that seems fairly should have a easy solution.
Adding in a simulated switch and various timers might also work well for you. Compared to the other ideas mentioned (which are also great, no doubt), it may end up being easier for you. To add a simulated switch, you will need to log into your IDE.
Since you are newer (welcome btw!), your IDE will most likely be found here.
From there, log in using your Samsung Account details. Then click on “My Devices” on the top. Next, click on “New Device.” Fill out the following fields:
- Name. This is completely up to you. Naming it by its intention may be helpful if you decide to add more.
- Device Network ID. This is mostly up to you and doesn’t matter terribly, as long as it will not overlap with a real device. I’ve been counting up from “V111” (Ex: “V111”, “V222”, etc.) for mine.
- Type. This is important and you will want it to be a “Simulated Switch” for type.
- Location. Make sure to assign it to your primary Location, Group and Hub are not selections you will need to make. NOTE: you can assign it to a “Room” in the new App later, should you want to.
From there, you could make it such that:
- Open garage door -> turn on simulated switch
- Close garage door -> turn off simulated switch.
- Simulated switch -> on, timeframe = [your preference] -> turn on light (this action can also be delayed, which would make it such that your garage door must’ve been “open” for X minutes. Remember garage closed will turn switch off)
- Simulated switch -> off, timeframe = [your preference] -> turn off light
The above are just examples, I think I understand your use case, but let me know if I’m way off.
Adding a simulated switch or two is a relatively simple way to gain some additional valuable Automation options. Hope this helps!
[Edited 05/21/2020 3:23PM to include @JDRoberts points, I’m still learning myself! Thank you kind sir.]
The URL: https://account.smartthings.com
is the universal sign on URL for the IDE and will work for anyone in any region. It will automatically direct them to the correct shard for their account. 
It’s very important to select a device ID that cannot be used for your other real devices. The smartthings developer documentation has a good example:
Device Network Id Should be a unique ID that identifies your Virtual Device. Make sure this ID doesn’t conflict with any other device Ids. Put in “VIRTDIMMERS01”.
I’m sure you already know this, but plain numbers can be tricky as these might be automatically assigned by Z wave as new Zwave devices are added. Those start with 000 for the hub and can go as high as 0E8, Although there are some higher codes which are used for network processes as well.
Obviously your 111 is fine because it’s above the maximum Z wave assignment, but a plain 011 could be a problem.
Personally, I always put a “V“ at the start of my virtual device IDs so that they are easy to find and don’t conflict with any other protocol. ![]()
Thanks so much for your detailed instructions. Following them made creating a virtual switch very easy! Now, my issue is connecting it all and getting the rest of your steps to work.
In SmartThings I can toggle the switch on/off, and I can see the state of the switch change in Alexa as well.
In Alexa I can toggle the virtual switch on/off and see the state change in SmartThings as well. All good so far!!
Now, I think I need create an Alexa routine to toggle the virtual switch ‘on’ WHENEVER the garage door is open and 'off whenever the door is closed. then, create another routine to only respond to the virtual switch (to trigger the smart bulb on/off) during certain hours? I’ve been banging my head trying to put it all together!
You’re very welcome! There’s definitely more than one way you could do this. I’m a Google Home user myself I’m not as familiar with how you could set it up in Amazon, but the functionality you mention is possible in the Google Home App, so my guess is there is parity in Amazon.
If I understand what you want, you would likely find what you’re looking for by creating an Automation within SmartThings like this:
IF:
Virtual Switch (on)
AND
Time Frame = [your preference]
THEN:
Turn on Light
AND
Delay this action by [however long door needs to be left opened for you to care about it]
Assuming you’ve already set up the other Automations we discussed earlier, this should cover at least that scenario to turn on light if the door is left open. And then there’s the scenario where you set it up how you think you want it to work, and then you realize you hate it! The subtle joys of home automation 
You are definitely on the right track with your thinking, @Local17bri . This is how I got mine to work.
The virtual device I created is called “Door Open Message”.
This is my ST Automation:

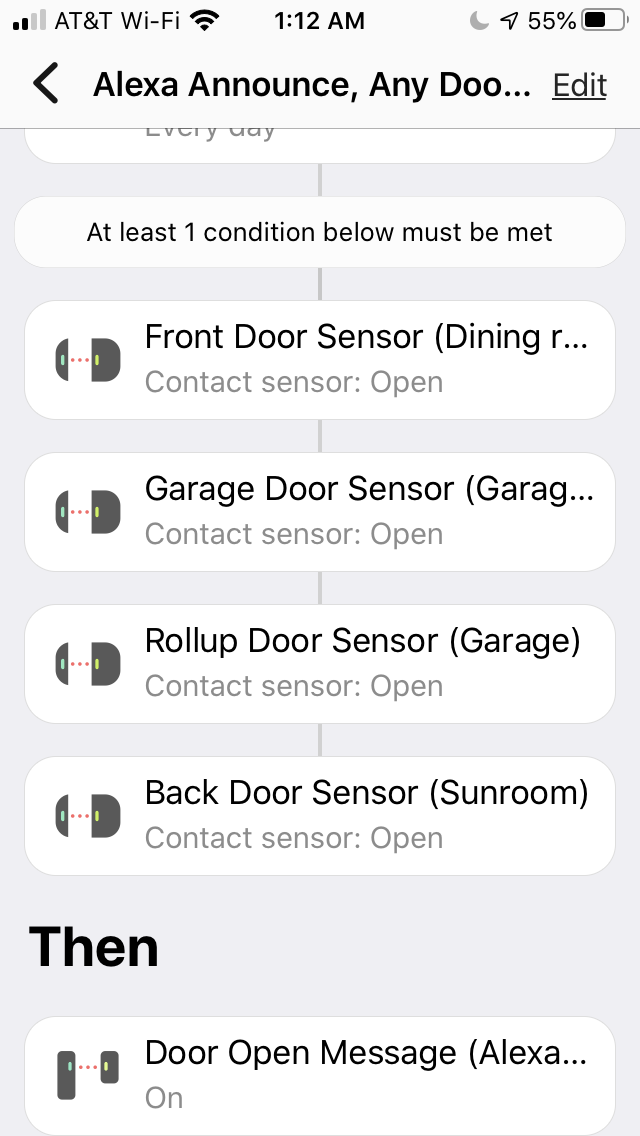
This is my Alexa routine:


So, in my setup, at 8:45 each night, ST checks to see if any of my door sensors are open. If one is, it opens my virtual switch. This triggers the Alexa routine, and she makes an announcement throughout my house letting everyone know that a door is open and needs to be shut. She then turns off the “Door Open Message” virtual switch so it will be ready for the next night.
I chose announcement, but you could choose to to turn lights on or change light colors or send a text message or whatever.
If none of my sensors are open, obviously nothing happens.
Alexa also announces when any of my doors open at night, so if a door gets opened after the 8:45pm time I have set, I hear about it. The nice thing is, I can go in and change that “check” time in ST at any time, which I will likely do soon with summer coming on.
Hope this helped.
Macombweare was referring to this app which not only notify you but also close the doors for you and a do a bunch of other things for your garage doors.
If you’re only looking for notifications then check out this app also which be designed to provide repeat notifications and even announce them:
Hello @Local17bri,
This automation can also be achieved through the Rules API, the example below describes this workflow:
- IF the contact sensor of the garage door is OPEN
- AND the current time is between sunset and sunrise (the time will depend on your location)
- THEN turn ON the light
- ELSE the light will remain OFF
{
 "name": "If Garage door is open between sunset and sunrise, turn on bedroom light",
 "actions": [
   {
     "if": {
       "and": [
         {
           "equals": {
             "left": {
               "device": {
                 "devices": ["Garage-Contact-Sensor-ID"],
                 "component": "main",
                 "capability": "contactSensor",
                 "attribute": "contact"
               }
             },
             "right": {
               "string": "open"
             }
           }
         },
         {
           "between": {
             "value": {
               "time": {
                 "reference": "Now"
               }
             },
             "start": {
               "time": {
                 "reference": "Sunset"
               }
             },
             "end": {
               "time": {
                 "reference": "Sunrise"
               }
             }
           }
         }
       ],
       "then": [
         {
           "command": {
             "devices": ["Smart-light-bulb-ID"],
             "commands": [
               {
                 "component": "main",
                 "capability": "switch",
                 "command": "on"
               }
             ]
           }
         }
       ],
       "else": [
         {
           "command": {
             "devices": ["Same-Smart-light-bulb-ID"],
             "commands": [
               {
                 "component": "main",
                 "capability": "switch",
                 "command": "off"
               }
             ]
           }
         }
       ]
     }
   }
 ]
}
Note: You can check the timezone configured on IDE:
- Log in and click on “My Locations”
- Select the location where your devices are configured.
- See if your timezone and sunset/sunrise info is correct.
Here you can find the Rules API documentation and how to get the devices IDs.
I hope this is useful to you. Let me know if you have any trouble.
Nayely Z.
I know this is an old thread, but I’m trying to accomplish exactly what you have done. Please help me! Lol thank you