[RELEASE] Tasmota (Connect) for Sonoff, Tuya, SmartLife & other ESP8266 devices)

==========================================

Tasmota (Connect) is deprecated.

Please consider using Tasmota Edge.

:arrow_right: [ST Edge] •• Tasmota Edge •• for Sonoff, Tuya & many other ESP WiFi devices - over 2000 Tasmota supported devices

==========================================

Tasmota (Connect) is a SmartApp & Device Type for SmartThings, that allows you to add your Tasmota devices as SmartThings devices.

ESP8266 or ESP8285 Wifi devices from brands like BlitzWolf, Eachen, Moes, Sonoff, Teckin, Tuya & Zemismart can be flashed with Tasmota (instruction).

Works with the Official Tasmota firmware.

If your device works with Tuya Smart or Smart Life app it may be possible to flash it with Tuya-Convert without disassembly or soldering.

Features

  • Support for SmartThings (new) App & SmartThings (Classic) App
  • Real-time device status
  • Pure Tasmota & SmartThings integration (No need for additional MQTT bridge)
  • Virtual Device (for RF / IR devices that can be controlled by a RF / IR bridge)

Requirement

  • Samsung SmartThings Hub v2 or v3
  • Official Tasmota Firmware >=8.10

Supported Tasmota Devices

It should work for most switches, lights (CCT, RGB, RGBW) dimmers, relays, plugs, power strips, sockets, wall outlets, fan controllers, IR bridges and RF bridges listed in the Tasmota Device Templates Repository (more than 1000 supported devices) and remember to apply the template for your device.

If your Tasmota device is not listed below, choose a Generic device that is similar to your Tasmota device.

  • Generic Switch (1,2,3,4,5,6,7,8CH) - No Power Monitoring
  • Generic Metering Switch (1,2,3,4,5,6,7,8CH) - Power Monitoring
  • Generic Dimmer Switch
  • Generic IR Bridge
  • Generic Light / Bulb (CCT)
  • Generic Light / Bulb (RGB)
  • Generic Light / Bulb (RGBW)
  • Sonoff Basic, RF, Mini
  • Sonoff Dual & Dual R2
  • Sonoff Pow & Pow R2
  • Sonoff 4CH & 4CH Pro
  • Sonoff S20, S26, S31
  • Sonoff Touch, T1 (1,2,3CH)
  • Sonoff RF Bridge
  • Sonoff iFan02, iFan03
  • H801 RGBW LED Strip Wifi Controller

Virtual Device

A Virtual Device uses a RF or IR bridge to control your RF / IR devices or receive RF device’s state.

  • Virtual Switch – Add a SmartThings generic switch that can be controlled by a RF / IR bridge (e.g. Sonoff RF Bridge).
  • Virtual Shade – Add a SmartThings shade/blind that can be controlled by a RF / IR bridge (e.g. Sonoff RF Bridge).
  • Virtual Button – Add RF/IR remote controller 1/2/4/6-button as SmartThings remote controller button.
  • Virtual Contact Sensor – Add RF contact sensor as SmartThings contact sensor
  • Virtual Motion Sensor – Add RF motion sensor as SmartThings motion sensor
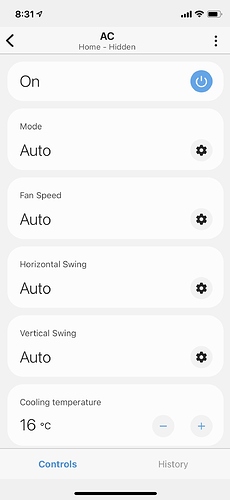
  • Virtual Air Conditioner (HVAC) – Add virtual air conditioner (via IR bridge) [supported AC vendor/brand]

Installation

Please make sure to install the SmartApp and all device handlers, and update the codes regularly for the latest features.

Instructions and links to the SmartApp and Device Handlers are here -

GitHub Install
Owner: hongtat
Name: tasmota-connect
Branch: master

I may not be able to test most of the devices, please leave any issues, comments and feedback here.

Non soldering?

If you don’t solder, you could try using Pin headers + Jumper wires and hold it firmly during flashing.
This is on a Sonoff ifan03.

Sponsor Tasmota (Connect)

If you find Tasmota (Connect) SmartApp useful and would like to support our efforts - this is the donation link via Paypal .

20 Likes

My sonoff pow r2 with tasmota 8.1 works well although the smartthing device type need to change to generic metering 1 ch. Great job done Hongtat!

1 Like

I’m happy to share that if you have a Sonoff RF Bridge and RF 433MHz remote controller/button lying around. It is possible to add the remote controller / button as SmartThings device.

  1. Short-press your remote controller button close to the Sonoff RF Bridge, then read the RF code from the console. Example: the code is 76C03F (see picture below)
  2. Add a new Tasmota device; Virtual 1/2/4/6-button
  3. Select a RF Bridge and input the RF code into the button ‘pushed’ state code field
  4. And you can assign actions or automation to the button

1 Like

Hi Tan,

there is no option to choose Sonoff Touch. How do I connect the Touch switches wtih 3 gangs?

1 Like

Hi.
Thanks.
Finally I got my two tuya/smartlife touch 4 gang and 3 gang working directly with tasmota.

Big Thanks @hongtat ! Thanks to you my hallway lights are now once again so I don’t have trip on the cat when I arrive in the dark. Much appreciated.

The device handler is working nicely for the Sonoff TH10. Any chance of adding in the temp/hum sensor support?

I don’t have a Sonoff TH.

Can you get me a json output of http://<IP ADDRESS>/cm?cmnd=status 0

HI Tan,
Great work on getting Sonoff devices integrated with Smartthings, i’ve managed to setup the following devices with Tasmota Connect and Tasmota 8.1 on the Sonoff devices. Would you be able to help me out on the current issues that i’m experiencing as follows :

  1. Sonoff RF Bridge - while using a pair RF remote with a RF button setup, the response looks to be at least 2 seconds or more before an action can be triggered. (distance is not the issue here as it’s right infront of the device) The poll time has been set to the quickest polling option available on the Tasmota Connect at 1 minute. Also, it’s pretty much often that a RF remote button press do not triggger any action at all but it works again after multiple attempts. Could it be something wrong with my setup or i might be missing any settings which can improve on the response time?

  2. Sonoff Touch - Switch (On/Off) is accesible and works with with manual on and off using the new Smartthings app. However, i’m facing an issue when i add the switch in automation rule where the resulting action does not trigger and resulting action for the swtich to be on/off. I can confirm that the motion detector is working fine as the Smartthing IDE console logs confirms that motion was detected. Coming from the eWelink Sonoff 3.3 app, i’m dearly missing the Inching function available where it will auto off after a specific period of time. Is there anyway that a similiar setting can be done on Tasmota and this DTH?

Many thanks

  1. It is real-time, however response time largely depends on the ST cloud. You can check whether your Wifi/local/RF setup is affecting the response time by checking the RF bridge console (http://<IP ADDRESS>/cs). Press a button, and you should see something similar like this and after #3, it will be ST cloud-execution:

#1 .07:41:47 RSL: tele/tasmota/RESULT = {“Time”:“2020-03-21T07:41:47”,“RfReceived”:{“Sync”:11070,“Low”:380,“High”:1030,“Data”:“76C03F”,“RfKey”:“None”}}
#2 07:41:47 RUL: RFRECEIVED#DATA performs “WebSend [192.168.1.207:39500] /?json={“RfReceived”:{“Data”:“76C03F”}}”
#3 07:41:47 RSL: stat/tasmota/RESULT = {“WebSend”:“Done”}
#1 - RF Bridge received the button RF code
#2 - RF Bridge informs ST hub.
#3 - ST hub acknowledges it

The polling has not effect on the response time.

  1. Try delete and create it again. It probably didn’t register on ST correctly. You can use Automation, Smart Lighting or webcore - on motion stop, off the light.

    If you prefer to do it in Tasmota, use Tasmota rules (see examples: GitHub - arendst/Tasmota: Alternative firmware for ESP8266 and ESP32 based devices with easy configuration using webUI, OTA updates, automation using timers or rules, expandability and entirely local control over MQTT, HTTP, Serial or KNX. Full documentation at). note: do not use rule 1&2, as it is use by Tasmota (connect). Please use rule3.

Here you go:

Status
Module 4
FriendlyName
0 “Tasmota”
Topic “tasmota”
ButtonTopic “0”
Power 0
PowerOnState 3
LedState 1
LedMask “FFFF”
SaveData 1
SaveState 1
SwitchTopic “0”
SwitchMode
0 0
1 0
2 0
3 0
4 0
5 0
6 0
7 0
ButtonRetain 0
SwitchRetain 0
SensorRetain 0
PowerRetain 0
StatusPRM
Baudrate 115200
GroupTopic “tasmotas”
OtaUrl thehackbox.org - This website is for sale! - thehackbox Resources and Information.
RestartReason “Power on”
Uptime “0T00:01:40”
StartupUTC “2020-03-22T00:19:06”
Sleep 50
CfgHolder 4617
BootCount 11
SaveCount 36
SaveAddress “F8000”
StatusFWR
Version “8.1.0(tasmota)”
BuildDateTime “2019-12-25T12:33:25”
Boot 31
Core “2_6_1”
SDK “2.2.2-dev(38a443e)”
Hardware “ESP8266EX”
CR “339/699”
StatusLOG
SerialLog 2
WebLog 2
MqttLog 0
SysLog 0
LogHost “”
LogPort 514
SSId
0 “indigo-priv”
1 “”
TelePeriod 300
Resolution “558180C0”
SetOption
0 “00008009”
1 “2805C8000100060000005A00000000000000”
2 “00000000”
3 “00000000”
StatusMEM
ProgramSize 566
Free 436
Heap 26
ProgramFlashSize 1024
FlashSize 1024
FlashChipId “14405E”
FlashMode 3
Features
0 “00000809”
1 “8FDAE397”
2 “043683A0”
3 “22B617CD”
4 “01001BC0”
5 “00007881”
Drivers “1,2,3,4,5,6,7,8,9,10,12,16,18,19,20,21,22,24,26,29”
Sensors “1,2,3,4,5,6,7,8,9,10,14,15,17,18,20,22,26,34”
StatusNET
Hostname “T01”
IPAddress “192.168.0.120”
Gateway “192.168.0.1”
Subnetmask “255.255.255.0”
DNSServer “192.168.0.1”
Mac “EC:FA:BC:00:CB:6C”
Webserver 2
WifiConfig 4
StatusMQT
MqttHost “”
MqttPort 1883
MqttClientMask “DVES_%06X”
MqttClient “DVES_00CB6C”
MqttUser “DVES_USER”
MqttCount 0
MAX_PACKET_SIZE 1000
KEEPALIVE 30
StatusTIM
UTC “Sun Mar 22 00:20:46 2020”
Local “Sun Mar 22 01:20:46 2020”
StartDST “Sun Mar 29 02:00:00 2020”
EndDST “Sun Oct 25 03:00:00 2020”
Timezone “+01:00”
Sunrise “06:47”
Sunset “19:06”
StatusSNS
Time “2020-03-22T01:20:46”
SI7021
Temperature 21.2
Humidity 29.7
TempUnit “C”
StatusSTS
Time “2020-03-22T01:20:46”
Uptime “0T00:01:40”
UptimeSec 100
Heap 26
SleepMode “Dynamic”
Sleep 50
LoadAvg 19
MqttCount 0
POWER “OFF”
Wifi
AP 1
SSId “indigo-priv”
BSSId “AC:86:74:EC:5C:43”
Channel 6
RSSI 100
Signal -37
LinkCount 1
Downtime “0T00:00:06”

Many thanks for your guidance , i’ve manage to get it working now. I’ve finally manage to get new life of automation using Xiaomi Motion Detector, Door Sensors and Sonoff Touch Swith which works very well.

Status
Module 4
FriendlyName
0 “T00”
Topic “t00”
ButtonTopic “0”
Power 0
PowerOnState 3
LedState 1
LedMask “FFFF”
SaveData 1
SaveState 1
SwitchTopic “0”
SwitchMode
0 0
1 0
2 0
3 0
4 0
5 0
6 0
7 0
ButtonRetain 0
SwitchRetain 0
SensorRetain 0
PowerRetain 0
StatusPRM
Baudrate 115200
GroupTopic “tasmotas”
OtaUrl http://thehackbox.org/tasmota/release/tasmota.bin
RestartReason “Power on”
Uptime “0T00:00:19”
StartupUTC “2020-03-23T20:16:22”
Sleep 50
CfgHolder 4617
BootCount 18
SaveCount 48
SaveAddress “F4000”
StatusFWR
Version “8.1.0(tasmota)”
BuildDateTime “2019-12-25T12:33:25”
Boot 31
Core “2_6_1”
SDK “2.2.2-dev(38a443e)”
Hardware “ESP8266EX”
CR “327/699”
StatusLOG
SerialLog 2
WebLog 2
MqttLog 0
SysLog 0
LogHost “”
LogPort 514
SSId
0 “indigo-priv”
1 “”
TelePeriod 300
Resolution “558180C0”
SetOption
0 “00008009”
1 “2805C8000100060000005A00000000000000”
2 “00000000”
3 “00000000”
StatusMEM
ProgramSize 566
Free 436
Heap 24
ProgramFlashSize 1024
FlashSize 1024
FlashChipId “14405E”
FlashMode 3
Features
0 “00000809”
1 “8FDAE397”
2 “043683A0”
3 “22B617CD”
4 “01001BC0”
5 “00007881”
Drivers “1,2,3,4,5,6,7,8,9,10,12,16,18,19,20,21,22,24,26,29”
Sensors “1,2,3,4,5,6,7,8,9,10,14,15,17,18,20,22,26,34”
StatusNET
Hostname “T01”
IPAddress “192.168.0.120”
Gateway “192.168.0.1”
Subnetmask “255.255.255.0”
DNSServer “192.168.0.1”
Mac “EC:FA:BC:00:CB:6C”
Webserver 2
WifiConfig 4
StatusMQT
MqttHost “192.168.0.6”
MqttPort 1883
MqttClientMask “T00”
MqttClient “T00”
MqttUser “DVES_USER”
MqttCount 1
MAX_PACKET_SIZE 1000
KEEPALIVE 30
StatusTIM
UTC “Mon Mar 23 20:16:41 2020”
Local “Mon Mar 23 21:16:41 2020”
StartDST “Sun Mar 29 02:00:00 2020”
EndDST “Sun Oct 25 03:00:00 2020”
Timezone “+01:00”
Sunrise “06:45”
Sunset “19:07”
StatusSNS
Time “2020-03-23T21:16:41”
SI7021
Temperature 21.9
Humidity 31.5
TempUnit “C”
StatusSTS
Time “2020-03-23T21:16:41”
Uptime “0T00:00:19”
UptimeSec 19
Heap 24
SleepMode “Dynamic”
Sleep 50
LoadAvg 19
MqttCount 1
POWER “OFF”
Wifi
AP 1
SSId “indigo-priv”
BSSId “AC:86:74:EC:5C:43”
Channel 6
RSSI 96
Signal -52
LinkCount 1
Downtime “0T00:00:08”

@Dave_Senior
Can you update the code, delete and recreate it as Sonoff TH?

Let me know whether the TH works for you.

thanks for the update.
Updated smartapp, generic swtich code and added child DH for temp and hum
switching of the th is working fine, however the child temp/hum deivce is showing 0 for both values.
is there any diag/logs i can collect to help?

http://192.168.0.120/cm?cmnd=status%208

StatusSNS
Time “2020-03-26T22:13:31”
SI7021
Temperature 23.1
Humidity 35.5
TempUnit “C”

22:49:21 MQT: tele/t00/SENSOR = {“Time”:“2020-03-26T22:49:21”,“SI7021”:{“Temperature”:22.9,“Humidity”:35.7},“TempUnit”:“C”}

@Dave_Senior Can you update the code and see whether it works for you?

Spot on - temp and hum now reporting correctly - thanks alot.

Thank Hongtat, This is what I have been waiting for. Was considering dropping ST and going to HA. But, It was working great and now when i click on the Tasmota-connect smartapp it gives me a Network or server error. Is they someway I can restore this to working order?