[RELEASE] Heatit Z-TRM2fx / Z-TRM3 Electronic Thermostat Device Handler (Official)

Contact Heatit for integration with SmartThings


Introducing the Heatit Z-TRM2fx / Z-TRM3 electronic thermostat device handler (DTH)

RBoy Apps is the official SmartThings partner for Heatit products

Heatit Z-TRM2fx is a Z-Wave Plus electronic thermostat for electrical floor heating and cooling. The thermostat has a built-in Z-Wave Plus chipset, with two external temperature sensors (Floor Sensor and Room Sensor). Heatit Z-TRM2fx is equipped with a single pole switch and it fits most System 55 frames (Elko RS16, Schneider Exxact, Gira, Jung etc.). The thermostat can withstand a load of max 13A /2900W at 230V.

Heatit Z-TRM3 is a Z-Wave Plus electronic thermostat for electrical floor heating, designed to be mounted in a standard flush box. Heatit Z-TRM3 is equipped with a single-pole switch and fits into System 55 frames. The thermostat can withstand a load of max 16A /3600W at 230V. The thermostat may be used for water based heating if the thermostat is linked to the Heatit Z-Water.

WHERE TO BUY THE THERMOSTAT

Device Handler Screenshots
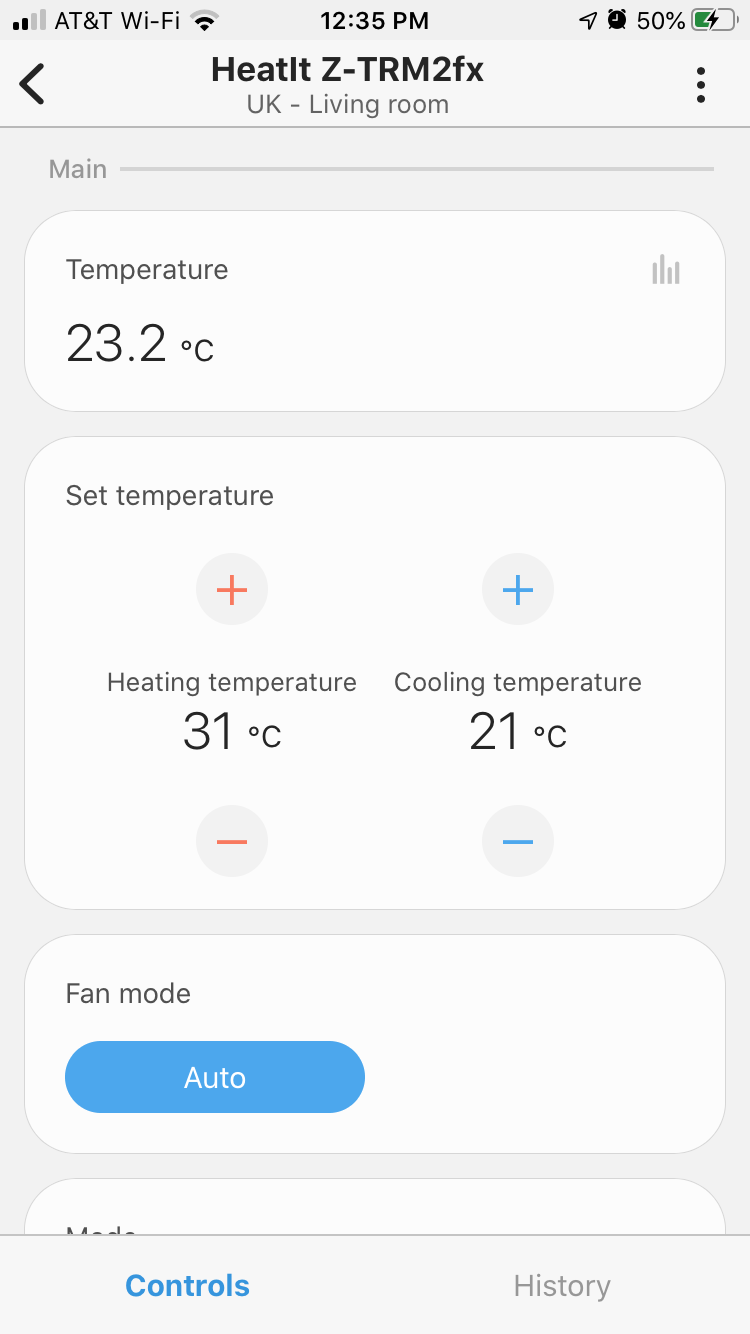
IMG_7043


Classic App

Key Features of the DTH

  • Supports
    • Z-TRM2fx - Eco, Heat and Cool modes
    • Z-TRM3 - Heat mode
  • Reports current thermostat temperature (separately) and:
    • Z-TRM2fx - Floor Sensor, Room/External sensor
    • Z-TRM3 - Internal Sensor, Floor Sensor, Room/External sensor
  • Configure different sensor modes
    • Z-TRM2fx (F, A2 and A2F)
    • Z-TRM3 (F, A, AF, A2 and A2F)
  • Reports load details
    • Power (W)
    • Voltage (V)
    • Consumption (KWh)
  • Setpoints for Eco, Heat and Cool mode
  • Toggle display mode on thermostat (Setpoint or Temperature)
  • Configure display and button brightness
  • Configure temperature sensor offset
  • Configure mix/max operating temperature
  • Support for C and F temperature scales
  • Support for new and Classic ST app

INSTALLATION INSTRUCTIONS

Device handler installation instructions can be found here. Once the device handler is installed, pair the device with the hub:

PAIRING INSTRUCTIONS

  • Make sure the device is within 5ft of the hub and sometimes rebooting the hub helps before pairing and keep the ST mobile app open
  • Press the center button until the thermostat show OFF
  • Press the down arrow button until the screen shows Con
  • Press the center button and the screen will show On
  • Press the center button until ON starts flashing
  • Pair using S2 mode for improved reliability, from the new ST app, click + → Device → Select Generic Z-Wave Device from the list and then follow the instructions. You can find the S2 pairing QR code/DSK key code on the device box or on the rear of the device if required.
  • When it pairs successfully it should say INC on the thermostat screen and within 30 seconds the device should show up on the ST app. If it doesn’t show up, reset the thermostat, reboot the hub, bring the device closer and try again

EXCLUSION INSTRUCTIONS

  • Make sure the device is within 5ft of the hub and sometimes rebooting the hub helps before pairing and keep the ST mobile app open
  • Press the center button until the thermostat show OFF
  • Press the down arrow button until the screen shows Con
  • Press the center button and the screen will show On
  • Press the center button until ON starts flashing
  • Start the device removal or exclusion process on the SmartThings app
  • When it excludes successfully it should say ECL on the thermostat screen. If it doesn’t exclude, try to reset the thermostat

FACTORY RESET

  • Keep the Right and Center buttons on the thermostat pressed simultaneously for about 20 seconds

NOTES

  • When in Cool mode use, the External/Room temperature sensor as the floor sensor displays an incorrect value on the thermostat screen
  • Firmware versions TRM2fx (3.06 and 3.04 ) and TRM3 (4.00) do not support resetting energy consumption over z-wave. This feature has been added for future firmware updates which may support energy resets over z-wave. The only way to reset energy consumption on these firmware is to exclude and re-pair or factory reset the thermostats.

You can also check out the following climate and thermostat management apps

This Device type handler is available on the RBoy Apps Server, http://www.rboyapps.com. Refer to our website or facebook page below for the latest features and to get access to the server.

Visit our Facebook page for updates on new apps and to get Access to ALL our Premium Apps and Server. RBOY APPS SmartThings - Make your Home your Butler

(c) RBoy Apps

2 Likes

< Reserved for updates >

1 Like

Rboy, thank you for this. Heatit is a great product that I had previously integrated with ST using chewing gum and baling wire. Just one clarification: this product, as I understand, is only available @ EU zwave frequency, so by definition the DTH would only work for a ST hub with an EU frequency. Is that correct? Perhaps my understanding is dated.

1 Like

Hi there. Yes that’s correct. Right now Heatit products are using EU z-wave frequencies and mostly on 230v. Some products can run on 110v also and when Heatit releases US z-wave frequencies versions the same DTH will also work for those models. We have more Heatit product integrations in our pipeline.

Are you saying that Heatit is planning to release US z-wave frequency versions of their products? If they are, that’d be amazing.

Suppose I should ask them.

Hi!

Do you need to purchase rboyapps access to get this DTH?

Best regards,

Jone

Hi:)

I’m kind of a SmartThings newbie. I’ve got the ST hub v3, and a couple of Heatit Z-TRM2fx thermostats. Today I downloaded the DH and added the script into the webpage as mentioned in the step-by-step guide.

But how do I connect the thermostats to the hub? I might remember that I need to use the Classic-app? Is that correct? Does the thermostats appear in the app when I push the’+’ button and activate pairing mode on the thermostat?

Hi there. That’s exactly correct. After installing the DTH, you need to activate the pairing mode on the thermostat (press the center button until the thermostat show OFF, press the down arrow button until you get to Con and then press the center button to show On and then press the center button until it starts flashing) and press the + button the SmartThings Classic app to initiate the pairing. When it pairs successfully it should say INC on the thermostat screen for a few seconds. Make sure the device is within 5ft of the hub and sometimes rebooting the hub helps before pairing.

1 Like

Thank you! :relaxed: I will try this when I come back from the office :ok_hand:

Hi again :slight_smile: I’ve successfully paired the termostats to the ST hub, but I’m not able to control them. What’s wrong?

Do I have the wrong type of Heatit thermostat?

Your screenshots don’t look like the images in the first post. Check that you’ve assigned the correct device handler to your thermostat and that your thermostat model is the Z-TRM2fx.
It’s better to install the device handler and then pair the device. It doesn’t pick up the device handler automatically then your thermostat isn’t Z-TRM2fx.

Hi Maddie,

I have one of the original HeatIt Thermostats (product no. 5430499) as seen here.

Are you working on an ‘official’ DTH for that model please?

Thanks
Guy

I have the exact same issue when trying to pair my device. Same view as @horven is showing here. I have double checked and triple check that this is Z-TRM2fx. Do you have any idea on what could be wrong?

One of these 3 things:

  1. Device handler isn’t installed in the same location where the device is paired (see installation instructions, link in the first post, Steps 1-3)
  2. Device handler isn’t published in the IDE (Step 8)
  3. Device handler isn’t assigned to the device (if ST didn’t pick it up automatically, then assign it manually in the IDE - see the installation instructions after Step 9)
1 Like

@Rboy

Have you considered selling just the DH for Heatit thermostats? I don’t feel I need all the other stuff included in the package for $40


2 Likes

I would buy your tools if you support the heatit v1

Hi there. You’ll need to contact HeatIt support to request support for the older models. Since this is an official integration they will need to authorize us to develop an integration for the older models.

Does not seem to be able to control the thermostat, the temperature setpoints are not sent to the device. Also the temperature is not showing in the classic app. And the new app gives “A network or server error occured. Try again Later” when trying to set a temperature.
I can see the voltage, W and kWh, and it updates.

Some logs

b38405f2-188c-4123-a231-5069832ebde1 1:02:30 PM: error java.lang.NullPointerException @line 325 (secure)

b38405f2-188c-4123-a231-5069832ebde1 1:02:30 PM: debug Setting setpoints: [targetCoolingSetpoint:null, targetHeatingSetpoint:23.0]

b38405f2-188c-4123-a231-5069832ebde1 1:02:28 PM: error java.lang.NullPointerException @line 325 (secure)

b38405f2-188c-4123-a231-5069832ebde1 1:02:27 PM: debug Setting setpoints: [targetCoolingSetpoint:null, targetHeatingSetpoint:21.5]

b38405f2-188c-4123-a231-5069832ebde1 1:01:57 PM: trace Enforcing limits in °C for request 23.0 heatingSetpoint. Adjusted Settings -> Heat: 23.0

b38405f2-188c-4123-a231-5069832ebde1 1:01:57 PM: debug Setting heat set point up

b38405f2-188c-4123-a231-5069832ebde1 1:01:57 PM: trace Enforcing limits in °C for request 22.5 heatingSetpoint. Adjusted Settings -> Heat: 22.5

b38405f2-188c-4123-a231-5069832ebde1 1:01:57 PM: debug Setting heat set point up

b38405f2-188c-4123-a231-5069832ebde1 1:01:57 PM: debug Setting heat set point up

b38405f2-188c-4123-a231-5069832ebde1 1:01:57 PM: debug Setting heat set point up

b38405f2-188c-4123-a231-5069832ebde1 1:01:52 PM: trace Enforcing limits in °C for request 21.5 heatingSetpoint. Adjusted Settings -> Heat: 21.5

b38405f2-188c-4123-a231-5069832ebde1 1:01:52 PM: debug Setting heat set point up

b38405f2-188c-4123-a231-5069832ebde1 1:01:52 PM: error java.lang.NullPointerException @line 325 (secure)

b38405f2-188c-4123-a231-5069832ebde1 1:01:52 PM: debug Setting setpoints: [targetCoolingSetpoint:null, targetHeatingSetpoint:5]

b38405f2-188c-4123-a231-5069832ebde1 1:01:52 PM: trace Enforcing limits in °C for request 21.0 heatingSetpoint. Adjusted Settings -> Heat: 21.0

b38405f2-188c-4123-a231-5069832ebde1 1:01:52 PM: debug Setting heat set point up

b38405f2-188c-4123-a231-5069832ebde1 1:01:52 PM: trace Enforcing limits in °C for request 20.5 heatingSetpoint. Adjusted Settings -> Heat: 20.5

b38405f2-188c-4123-a231-5069832ebde1 1:01:52 PM: debug Setting heat set point up

b38405f2-188c-4123-a231-5069832ebde1 1:01:51 PM: trace Enforcing limits in °C for request 20.0 heatingSetpoint. Adjusted Settings -> Heat: 20.0

Hi there. It looks like your thermostat didn’t pair completely or hasn’t completed the initialization since some thermostat appears to be data is missing in those logs.
Can you send our support desk an email with the following:

  • Screenshot of your Classic app and new app
  • Tap the refresh tile in the Classic app and wait to 15 seconds to capture the live logs which includes the debug logs from the DTH that will show your device state