Raspberry Pi with PHP (or Arduino/ESP8266/NodeMCU) to GPIO to Relay to Gate/Garage Trigger

Hi all,

I’m pretty excited to be able to bring this project. It ties together and old Raspberry Pi running latest version of Raspbian with HTTPD and a PHP script. The PHP code runs the gpio command in order to trigger pin 4 of the RPi for a second then turns it off. This triggers a simple 5v relay which in-turn shorts out my gate.

The obvious difference of what I’m sharing here is the fact that I wrote a SmartThings Device Handler which uses a “hubaction” which means it can be triggered from a WAN connection w/o having to put your device out on the web with a public IP. The hub performs a local action on a local IP. The project is essentially a generic HTTP Device Handler for SmartThings. The goal was to keep it as small/simple as possible. So it consists only of a single PHP script and the SmartThings Device code. It depends on no other packages except the stock Raspbian Jessie that I’ve been testing for a while.

This project was tested successfully via an external IP using a custom port. It was also tested with an Amazon Echo/Alexa and Pollster. The PHP has a flag at the top that will require a configurable HTTP username & password to be entered. This offers another level security and completely contained within the PHP code. Arduino code also has a commented out section to enable basic HTTP authentication — uncomment section at about line 80 of the Arduino sketch.

I chose Raspberry Pi for gate trigger because of its wired/reliable LAN connection. Coupled with a Ethernet over Powerline adapter (like my Netgear XAV2001) — gotta already have power in that gate box (or garage motor). I already had a retired Pi 256MB Model B that was super-slow in doing anything else, it only made sense to use it . Add a $3 relay and I can trigger and customize anything about this solution. Hoping the Pi can withstand SoCal heat… I probably need to buy a heatsink ASAP :slight_smile: (UPDATE: RPi 1 kept dying of outside heat so now using RPi 3 which needed one reboot during summer) The code was originally executing a Python script from PHP to trigger the GPIO (turning pins on and off on the Pi). I successfully replaced that Python code with the gpio command instead.


FULL INSTALLATION INSTRUCTIONS FOR RASPBERRY PI:

  • enable SSH in newer Raspbian editions via raspi-config > Interfacing Options > SSH
  • sudo su to start the shell as root then passwd to change the root password to whatever you want
  • sudo vi /etc/ssh/sshd_config — change the line to allow root login: PermitRootLogin yes
  • ssh in as pi/raspberry
  • sudo raspi-config — to expand SD card (done automatically in 2017) and change timezone. Can also modify /etc/defaults/keyboard to be a “us” keyboard and not the default “gb”.
  • sudo apt-get update
  • sudo apt-get -y upgrade
  • sudo apt-get -y install apache2 php5 php5-gd wiringpi raspi-gpio rpi-update --fix-missing
  • sudo rpi-update — this was key step for network stability of the Raspberry Pi. Otherwise constantly received “actively refused” errors from HTTPD & SSHD requiring reboot to fix.
  • sudo visudo — and add the following to the bottom otherwise no sudo functions will work from the PHP code: www-data ALL=NOPASSWD: ALL — more info here.
  • sudo service apache2 restart — to restart Apache

INSTRUCTIONS FOR ARDUINO/NodeMCU/ESP8266:

WIFI:
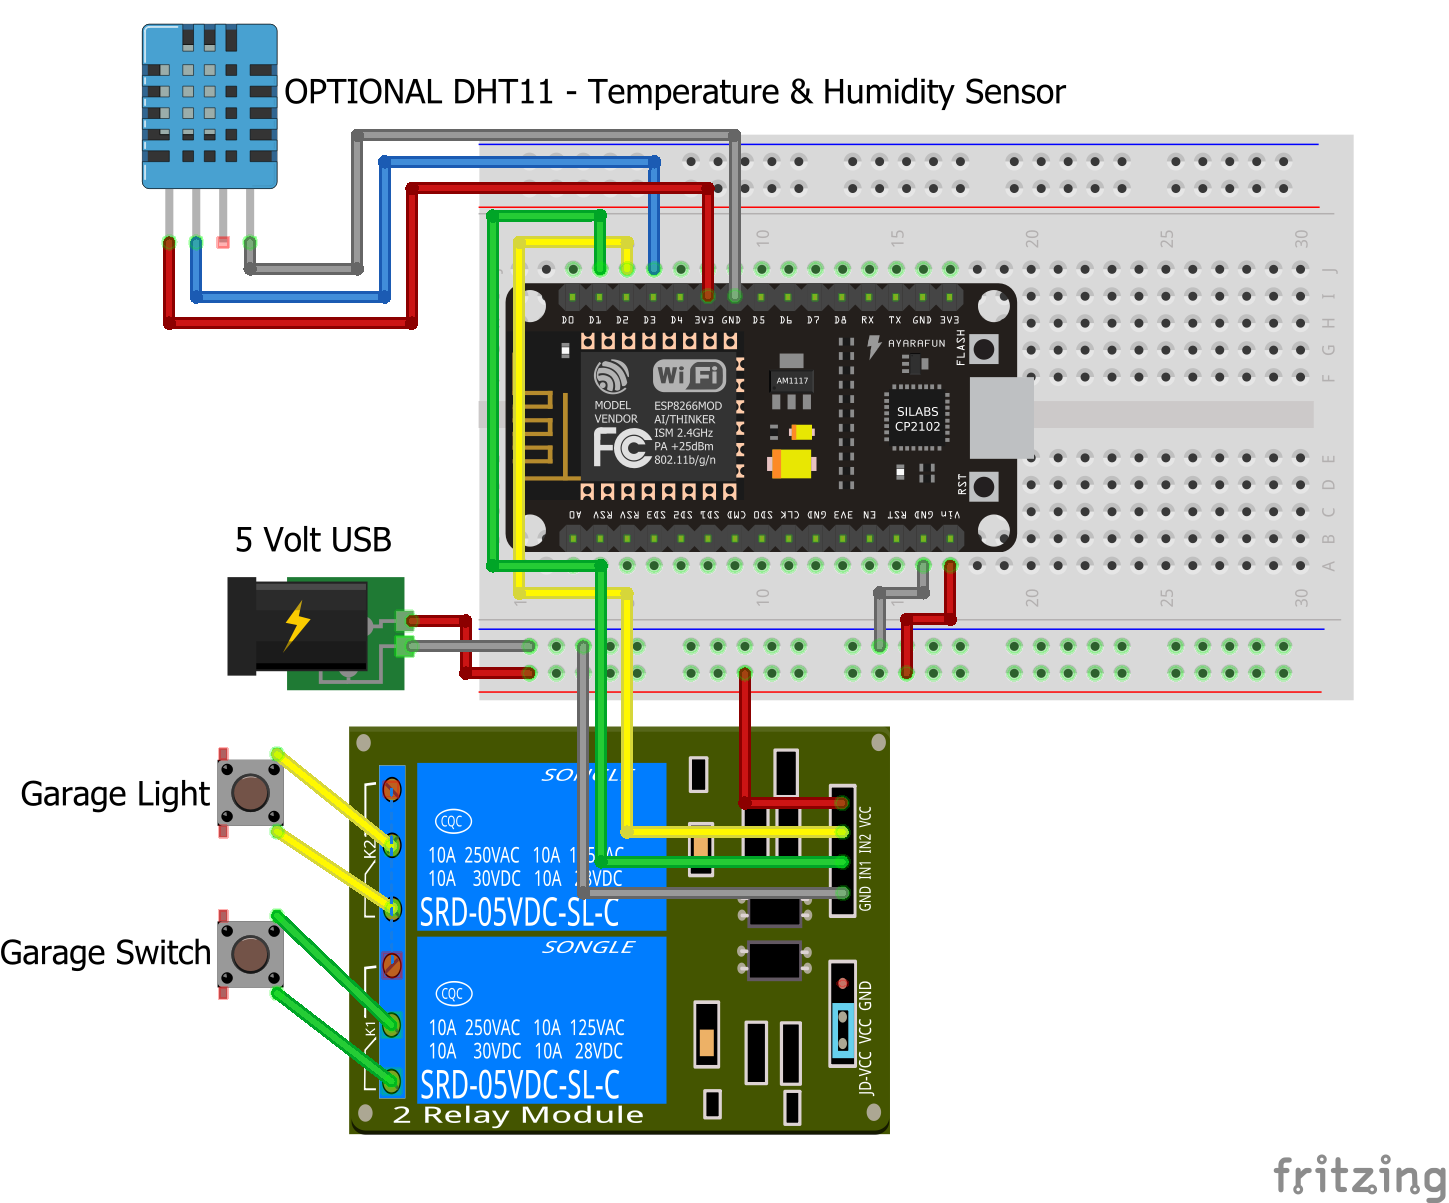
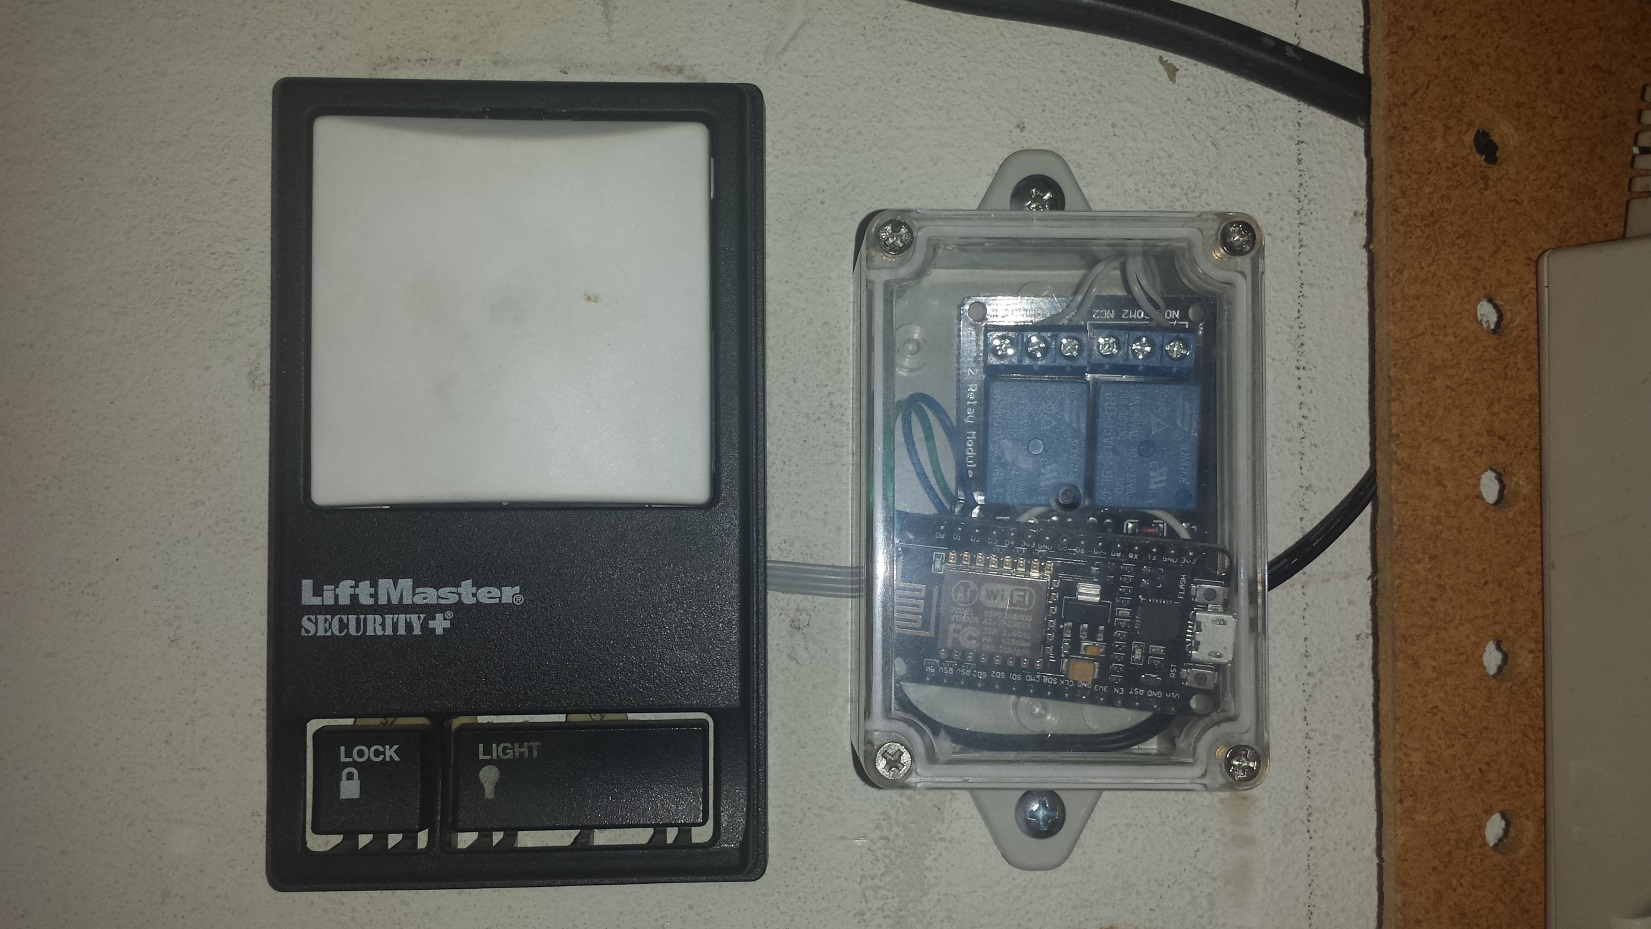
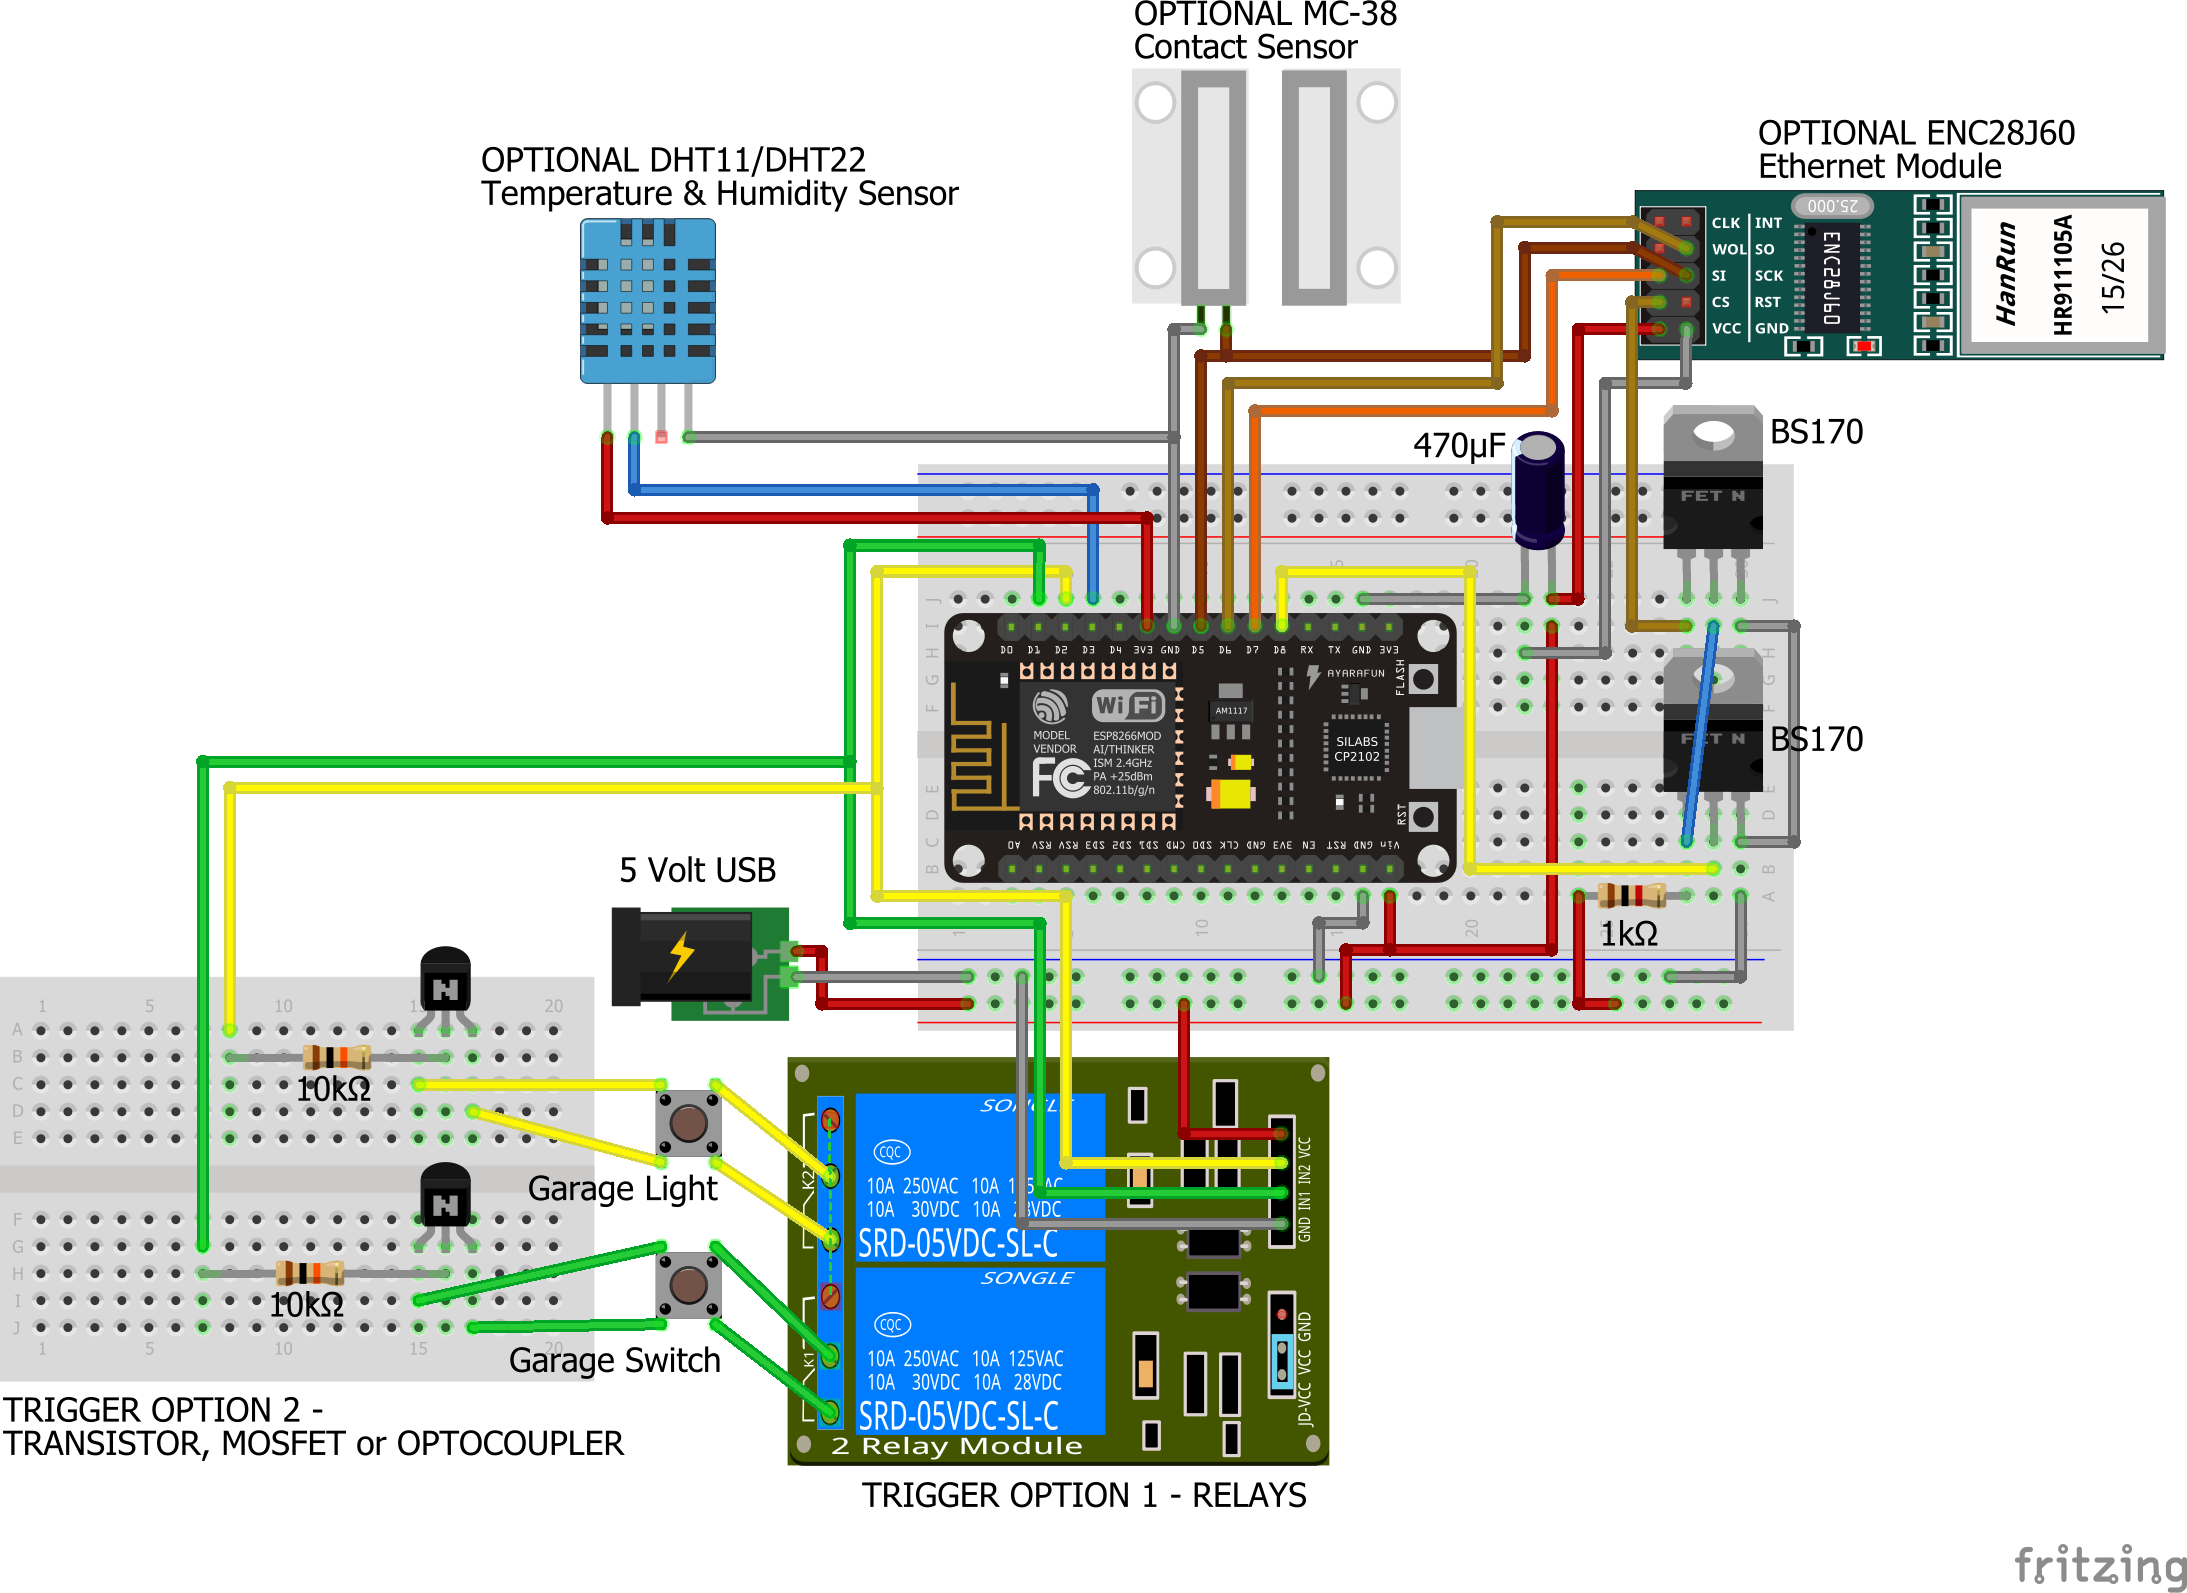
After the RPi, @Casper introduced me to the ESP8266 NodeMCU module which is wireless & extremely efficient with relays, LEDs, etc. and has no OS to maintain like the RPi, I implemented compatibility with the hardware device and my code. In the GitHub source folder for this project you can find NodeMCU.ino file which you simply compile & write the Arduino sketch to the board. I successfully used 3.3v relays and even the 5v relays which grabbed the positive signal directly from a spliced USB cable and the negative signal is what is sent to the GPIO pin.

WIRED RJ45 ETHERNET:
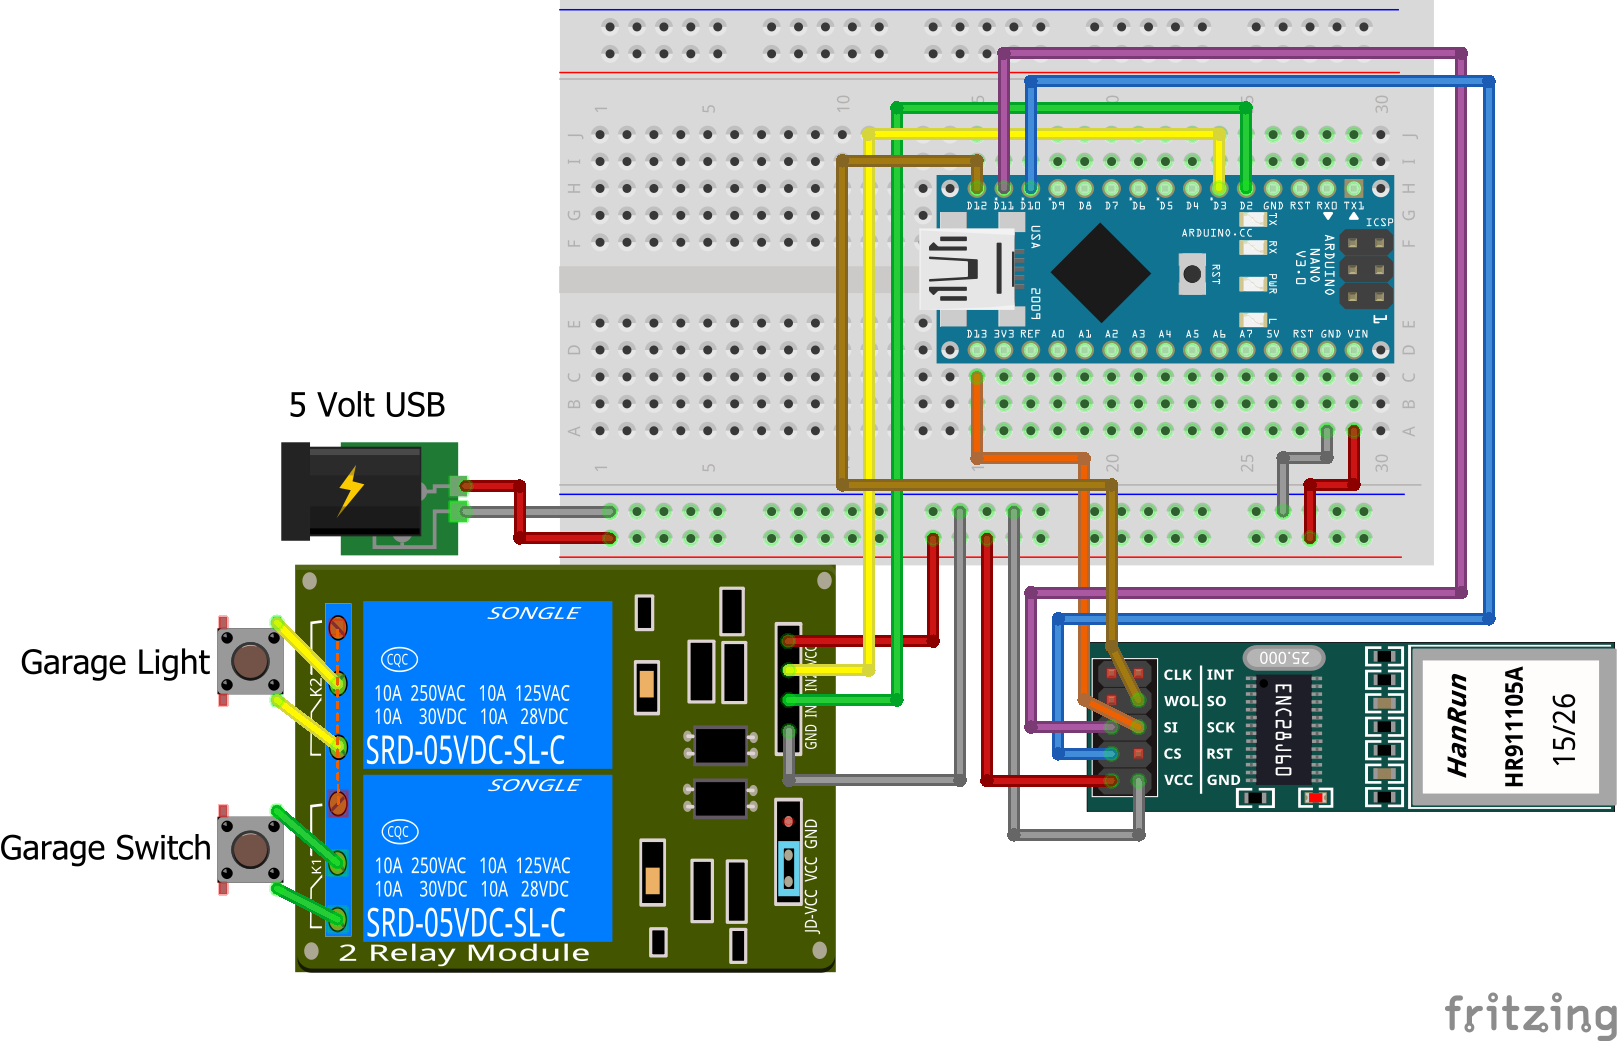
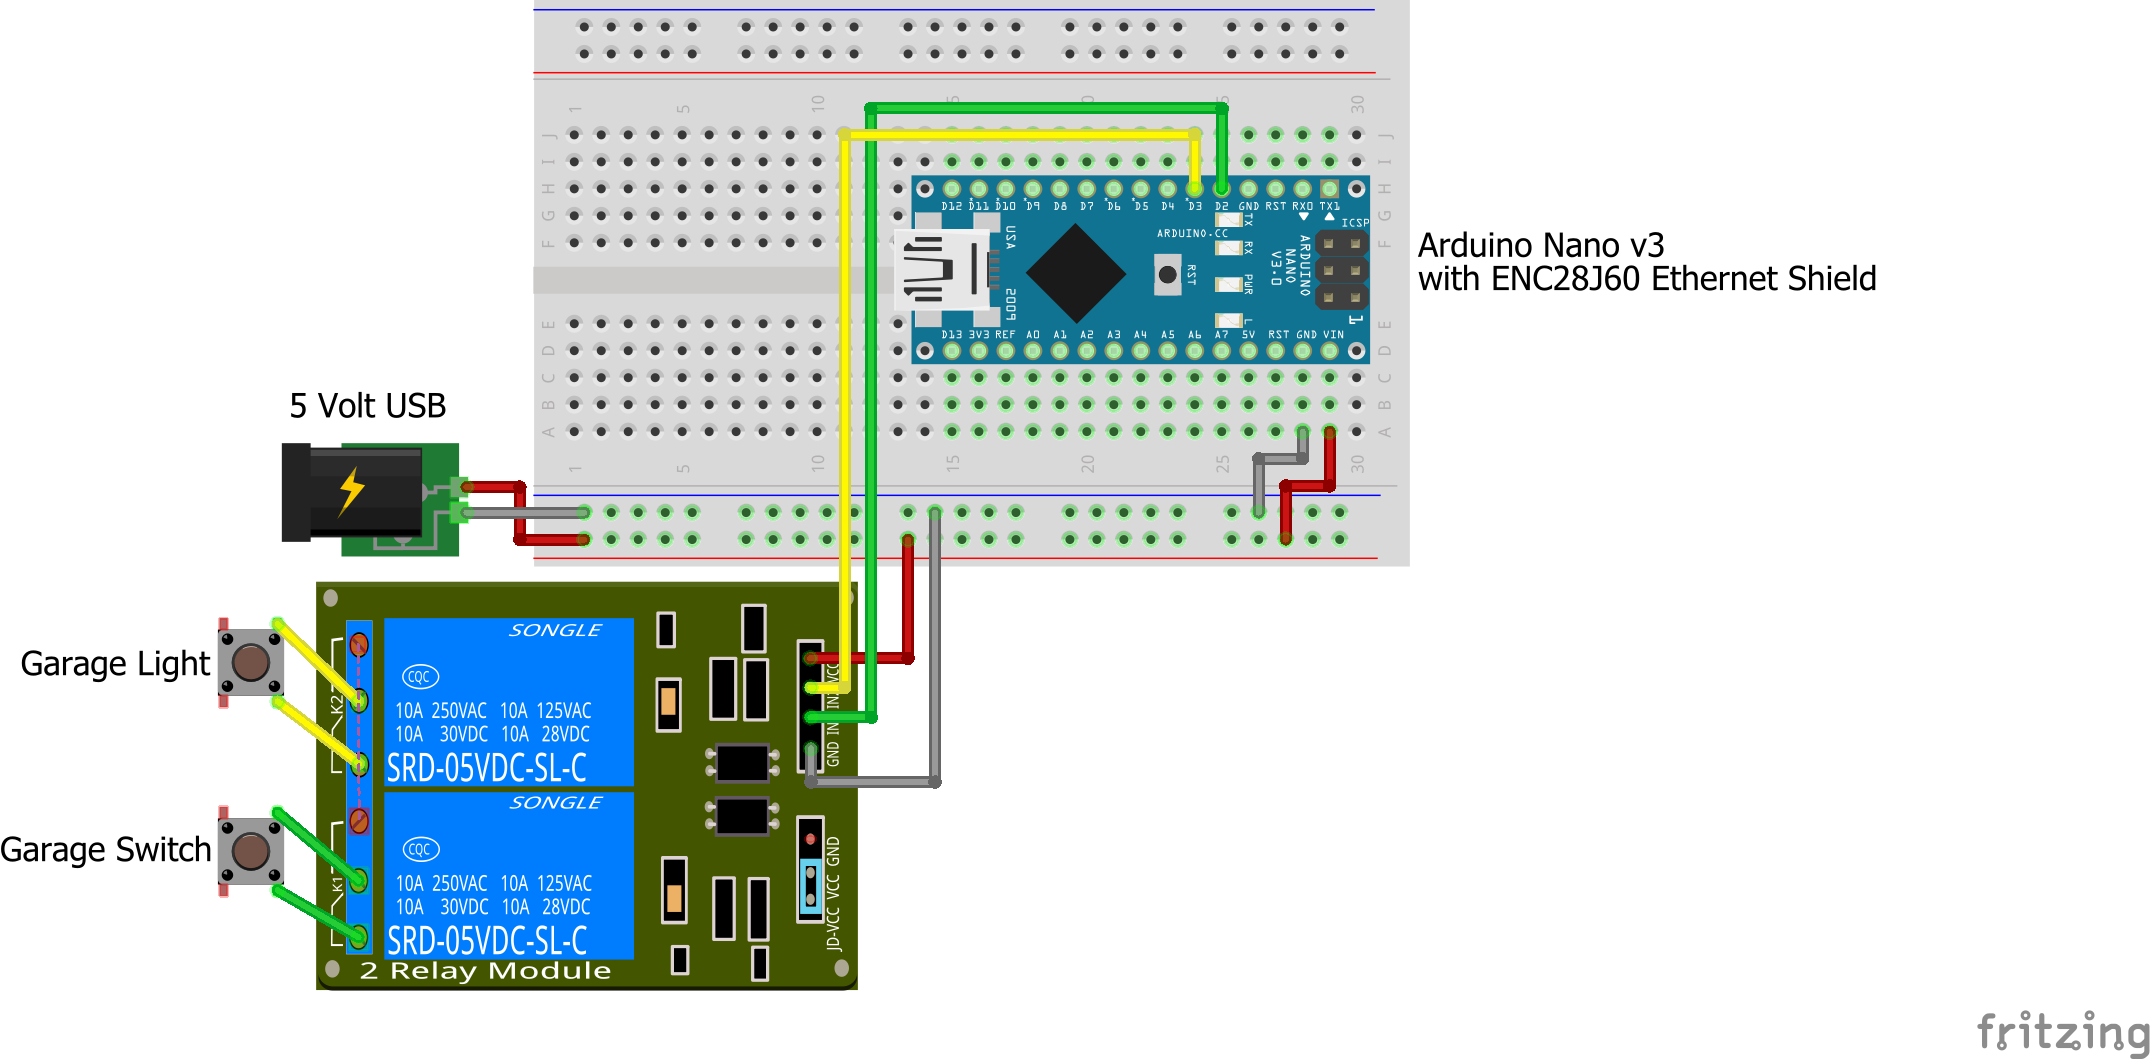
For wired connection (due to reliability) using an Arduino Nano/UNO with an RJ45 ethernet shield (ENC28J60). Nano/UNO is VERY limited in memory so only the relay logic is shared on GitHub in a file called ArduinoNano.ino. For the ethernet shield, I used a library called UIPEthernet.

The ESP8266/NodeMCU are more difficult to work with the ENC28J60. You must use this modified UIPEthernet Library, originally done by @ntruchsess then updated for use with ESP8266 by @cassyarduino on this post. Using the ENC28J60 is unfortunately inconsistent and things like Android/IOS can’t read the web page while a desktop browser can.


SMARTAPP FOR AUTOMATION OF 2nd SWITCH & 2nd CONTACT SWITCH:

I created a SmartApp & TWO Device Type Handlers called Virtual Custom Switch & device. The SmartApp will keep the virtual switch synced up with the Custom Switch of the generic HTTP device. This will help to automate the secondary/custom button.

Grab VirtualCustomSwitch.groovy file from the regular GitHub location. Create a new device in ST API and obviously assign this custom device handler to it: https://github.com/JZ-SmartThings/SmartThings/tree/master/Devices/Generic%20HTTP%20Device

If using the 2nd Contact Switch, do the same using Virtual2ndContactSensor.groovy as the DTH.

Use the new SmartApp to choose the parent switch and the virtual one/two you created in the step above. This will force the CustomTrigger/secondary-switch state to be synced with the new/virtual device and the contact switch will do the same. Get the SmartApp from this folder on GitHub: https://github.com/JZ-SmartThings/SmartThings/tree/master/SmartApps/Virtual%20Custom%20Switch%20Sync%20App

For nerds: some explanation of how/what was done. It was a true pain with the 2nd switch only because I’m trying to use the same device to monitor the parent switch but also react to ON/OFF commands when you press it. Well, not so easy… that’s called an infinite loop because when I would switch the virtual device, it would cause the tile/state to also switch thus it would run the command again — because I’m using momentary toggle (rather than stateful on & off which worked well from the start of writing the SmartApp & DTH) it ended up in an infinite loop. My solution was to store the EPOCH time on the parent device handler of when the last time Custom was triggered. If 3 seconds have not passed, it will NOT run the CustomTrigger/2nd-switch command again. So that’s the only limitation at the moment. In order to avoid an infinite loop, I do the time check which may slow down some lightning-fast folks but it’s all worth it for the sake of automation.


RELATED INFO:

INFRARED INFO: Here’s @Casper’s original project with using IR and mine attempting to automate the TV remote.

Here is one of the videos I used to start me off with the Pi & relays: https://www.youtube.com/watch?v=p2abZ90-eU0

Useful command for checking the Raspberry Pi pin status & value. It’s pretty close to what WebIOPi offers but in text mode: watch -n0.5 gpio readall

Here’s another/related Device Type that reads the GPIO pin states on the Raspberry Pi and serves them back to SmartThings to an image tile. These two projects share the PHP.

SOURCE CODE:

Enjoy!
JZ

14 Likes

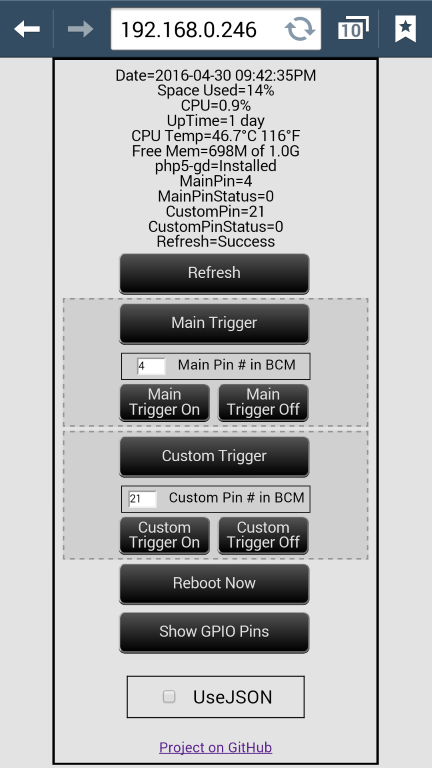
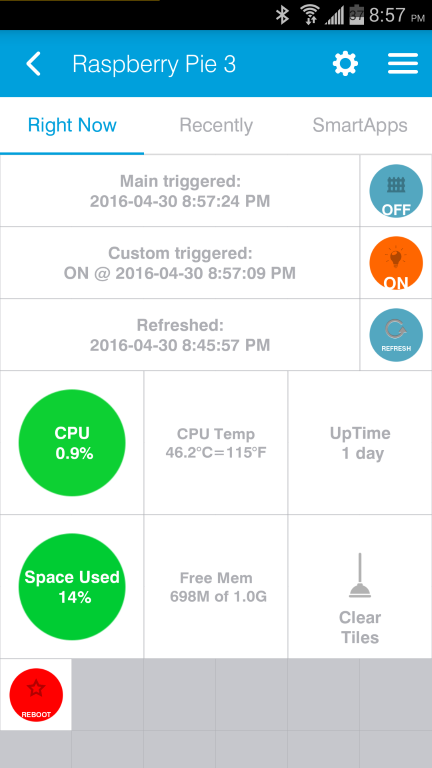
Added CPU temperature tile. Also providing a few screenshots so it’s a bit more obvious as to what this does. I’m also open to suggestions as this has virtually no limits in abilities.

UPDATE: if your Pi does not return the temperature properly, it’s likely because you have an older Pi firmware. See this post which recommends to run the “sudo rpi-update” command and this worked great for me: https://www.raspberrypi.org/forums/viewtopic.php?f=29&t=11579

UPDATE2: I added authentication abilities. Only basic is available and controlled in the PHP script. No need to mess with HTACCESS or Apache config file as I’ve made it all work via PHP. New preferences were added to the SmartThings device.

Thanks!

3 Likes

Sorry for replying to myself. Big changes and fixes so folks that subscribed will get the notification as the code had a major bug in the GPIO order of execution. The code was turning the relay OFF then ON — it needed to be ON then OFF — like a momentary button acts. This was a mistake that I made while migrating from the Python GPIO script over to the gpio executable directly running from PHP.

I made sure that Basic HTTP Authentication works as expected and provides proper warnings and errors. I also added release notes on the GitHub page.

Lastly, I finally have tile states working correctly. What a pain and a bug with ST IMO because they say the following workaround/solution should be automatic. The key was to use IsStateChange: true, on the createEvent and sendEvent methods when changing tile state. The tile will paint dark red while executing and go back to blue once results come back from the HTTP hubaction request.

I’m pretty much finished. I may mess with colors just a bit on the state changes but for now, it’s pretty solid, once I found my GPIO bug :slight_smile: that’s the downside of having a gate box that is closed and can’t see the LED indicators on the relay.

All the best!

UPDATE: new code/version as of 3/28/16. Modified tile background while in “running” states and added free memory tile. No other compelling enhancements at the moment but always open to input.

3 Likes

Brand new Raspberry PI with fresh Raspian install unfortunately didnt do it for me. I think there must be a step or two I missed or need to do for the apache2 server to work. On my first PI, typing http://localhost displays the default web page. On the new PI with fresh install I get “Connection Refused” error. :frowning:

Well you have a generic problem at the moment which probably deserves to be on the RPi forum. I was easily able to bring up the default Apache webpage with a plain-vanilla install of Raspbian (jessie) like 2 weeks ago.

Try the following commands and let’s see the full output from this command:
cat /etc/apache2/sites-enabled/000-default.conf | egrep “:80|Root” ; netstat -an | grep “:80”

Have it working. Had to (re)install apache2. My first PI was created/installed 4 weeks ago. Didnt have to do anything to apache for it. Oh well… Working now :slight_smile:

Let me know how you like it.

1 Like

New version available: v1.0.20160402 - Added JSON support. Modified Reboot tile with states. Added Clear Tiles button.

Updating the screenshots too. I did the JSON support purely for my own learning and in case somebody wants to consume the output with some custom integration. JSON makes that really easy. I’d like to think that it’s way better/faster than parsing the HTML in Groovy but in reality we’re probably talking less than a second difference. I also added a “Clear Tiles” button to the bottom (just off the bottom of the ST screenshot). I did that so I can clear everything and see the full data come back and populate the valueTiles in ST. Otherwise only changed values are sent by ST on sendEvent or createEvent when changing tile states.

In the future releases I may include Wake On Lan capability. I’ve already looked at this WoL project and it’s great but probably too much for my smaller need/desire. I’ve also tested with the etherwake command and it worked great but etherwake did not come with Raspbian Jessie release and had to be installed with “apt-get -y install etherwake” which I guess can be turned into a button/trigger in my app. Let me know if anybody has any ideas for this WoL enhancement. A few things are holding me back like the notion that the MAC address will have to live in the ST Device Preferences and can’t be a multi-line list, etc. but probably can be comma separated. There are several workarounds like keeping a list (that can be updated) on the RPi and writing to that list via the PHP code. Many ways to do things it’s all a matter of scope and time :slight_smile:

Enjoy!

1 Like

Would there be a way to use this as a Servo controller? I would use it as a door Lock / Opening Sensor

Sure, why not? PWM (pulse width modulation) is probably what’s required for servo control but I’m no expert as you see I barely got a relay working right :slight_smile: I’m not sure if the “gpio” command that I’m currently using has ability to do PWM calls but if it does then it’s a really easy change of my PHP script to do whatever custom commands you want to do replacing my sample gpio commands for pin 4. So moral of the story, get a fully functional script (most people use Python for advanced GPIO/PWM control and from what see) or a set of commands like the gpio example you can find in my PHP script. First have the fully functional logic running on the Raspberry Pi — outside of my code. Once you have the “generic” Pi functions working with your servo then you can DEFINITELY call it from my code. I’ve read is there is a single PWM pin on the Pi. You may be in luck but I also see higher power requirements for servos so you may have that extra factor to deal with.

I’m pasting below some useful links below relating to the topic and obviously do more searching on Raspberry Pi servo PWM to get more familiar.


https://projects.drogon.net/raspberry-pi/wiringpi/

All the best!

Meh, worse case scenario is i’ll drive an Arduino from the Rpi, and if I can do serial comm’s that way, even better. I’ll try to wrap my head around how to do that and maybe i’ll be able to get some code to lock / unlock my front door and maybe even get be able to buzz myself in.

I wouldn’t go that far especially if you only need a single servo — just for the maintenance sake. Check this Python example out, pretty damn cool :slight_smile:

http://raspi.tv/2013/rpi-gpio-0-5-2a-now-has-software-pwm-how-to-use-it

and this video: https://www.youtube.com/watch?v=BLtV0Z38S94

Well, I would need to 1 control the servo to unlock the deadbolt, and two monitor 2 switches to have positive feedback on the “locked/unlocked” state.

If I want to buzz myself in, then i would have to add one servo to depress the buzzer button. Would be perfect for my wife who keeps forgetting one of the two key’s :smiley:

Nice, gotta love women :slight_smile: a lot of my automation revolves around the wife & kids.

Just keep in mind you got a bunch of GPIO pins which can trigger MANY relays. A lot of what you’re talking about does have workaround/substitute available. If you for instance have the power/common connected to all of the relays and feed the signal to a servo when needed. Again though, lack of servo/PWM experience on my part is not much to rely on.

Please do let us know what you opt for as this is a very interesting use case you got.

All the best!

Wow, this is awsome. I wish I had this to build off of before I wrote my RPi device a little while ago. With a little bit of code and a couple apt-get’s, you could plug a speaker into your pi and get it to work with “Speaker Notify With Sound”.

Check out my setup here. RaspyThing
I know it’s a little rough around the edges, but I’ve got it working to alert when any door is opened, play the weather forecast in the morning, and announce all three of my kids bedtimes. I wish I could have figured out json like yours.

So glad I found this, though I won’t open my garage but now I can execute my stuff on RPI from Smartthings app, and maybe Amazon Echo

New version released (ONLY PHP File Changed) today due to a small bug with SPACE USED. Now using AWK command instead of CUT and delimiters. Anybody with more than 10GB SD card would probably see this small bug with Space Used. Link to bug on GitHub

@braclark that’s a pretty cool project! While my RPi is in the gate box, I am certain I can’t hear it :slight_smile: However, when I get another RPi, I can definitely think of some uses. My current Garage solution is a WeMo switch to a 12v relay and spliced/soldered into my garage button (multi-function button with resistors so needed soldering and NOT directly wired into the garage motor). That means I can trigger garage and lights too — the project begs for an RPi but for now works reliably with WeMo just no lights. Once I throw that RPi in, I can see a little speaker announcing to me what’s going on in the house while I’m far away in the garage. Definitely useful!

@Casper you can pretty much trigger ANYTHING :slight_smile: on that RPi. In the beginning, it would NOT work with the Echo. Then I had the epiphany of changing my custom function in Groovy to simply be on() instead of somethingelse() and that probably fixed me up. I can easily trigger this from my Echo Dots and in the ST app, you can see the Triggered Time move live. That was a sigh of relief as the Echo integration was kind of important to me given the Echo Dots just arrived at the end of last week.

Enjoy and let me know if there’s any feedback, etc.

1 Like

I’ve been sort of half-following this thread, and had some questions.

First: I’m not a developer, so forgive me if these seem stupid…

Can I use this device type to control all of the GPIO pins on the Pi as individually controllable outputs? If I have 26 outputs, could I potentially address each one of these individually from within SmartThings and various SmartApps? Example: I have 26 garage doors I want to open individually when 26 discreet events happen, whether it be automatic (via RuleMachine, etc), or manual (via a button press within the ST App)… Is it possible to make this device type handle this?

Is it possible to set the Pi up to have push buttons on some GPIO pins for the purposes of manually triggering some events within SmartThings and having button pushes on the Pi reflect within SmartThings as “On” or “Toggled” in a momentary contact pushbutton fashion? Meaning: Is it possible to push a button on one GPIO pin and have SmartThings be aware of this button being pressed, or have a toggle switch on a GPIO pin and be able to turn an object on or off in SmartThings by toggling the switch?

I have access to a full machine shop, and I’m envisioning using a Pi as a brain box for a wall mounted control panel in certain areas of the house, or as a table-top (plugged in to power) control center on the end table in the living room…

The Pi has so much potential for these functions, and I’m fully capable of handling the hardware side, but I can’t code a damned thing.

Thoughts?

Yes you can control everything from RPi (GPIO pins, Infrared, Wifi, anything that you can control from RPi terminal), think of this http device type as a gateway from Smartthings to RPi.

In short, if you can execute something from RPi terminal, you can control it from Smartthings (via this http device handler).

Ok. With that said, can this talk back to SmartThings if I were to push a button on one of the GPIO pins?

Say I want to turn on a Z-Wave switch in my kitchen by pressing a button attached to my RPi in the living room…
Push button on RPi with this device handler, and the kitchen switch turns on or off?