Ideas for turning on my Honeywell Air Purifier

I have a Honeywell HPA200 air purifier that I would like to turn on at times I choose. I attached a picture of the control panel. It has electronic controls so I can’t just turn the outlet on to make it work. I need to activate the power button. Initially I thought a device like a Smartbot would work, but the power button senses heat so that won’t work. If I hold an led flashlight close to the button, it will activate.
I think I need some sort of Smartthings controllable device that will produce a short burst of heat that I can place on the button.
Any ideas?

Thanks, Steve

Hmmm… i’m pretty sure that’s not a heat sensitive button, I think it’s capacitive. But check with the manufacturer to be sure. Once you get the exact specs on what is needed to turn it on, we can figure out what options you might have.

1 Like

Hmmm… i’m pretty sure that’s not a heat sensitive button, I think it’s capacitive. But check with the manufacturer to be sure. Once you get the exact specs on what is needed to turn it on, we can figure out what options you might have.

Yes, after doing some searching around, it appears it is a capacitive switch. I can turn it on with a thin glove on my hand, but not a thick ski glove. And it turns on just by me holding the led flashlight and touching the button when the light is off. Touching it with a pencil eraser doesn’t actuate it.

Now how do I actuate a capacitive switch without cutting off one of my fingers and attaching to the SwitchBot?

Found this on reddit, not straight to ST, but suppose to have IFTTT.

2 Likes

We’ve discussed the push microbots in the forum in the past. It’s a complex situation right now.

These were created by a Korean company, Naran, and have great engineering. I have several of them. And, yes, they do work on capacitive screens.

However… The company never could find a business model. They tried offering a free cloud, then a free host it yourself cloud, then a paid subscription Cloud. But it still wasn’t enough. And their individual Devices were among the most expensive in the category.

A Japanese company, Switchbot, came out with their less expensive (although not as well engineered) competitor and basically ate their lunch. Switchbots don’t have the capacitive function, though.

So Naran discontinued microbots for awhile back in 2018. :disappointed_relieved:

However, an east European company, Keymitt, had been using the push devices in conjunction with their security system and smart locks. They went into negotiations with Naran and ended up buying the whole microbot line. It took them about a year to set up production and support, but they did start offering them for sale again in late 2019. I don’t think they have a subscription fee for their cloud, but to be honest I’m not sure.

And then COVID-19 hit and the factory shut down and they stopped shipping it. They were just always out of stock. :scream:

As of this morning, they do seem to have some microbots in stock through one of their sites, but are still out of stock everywhere else.

So I don’t know what to say about this. I don’t have a lot of confidence that they will stay in business because I’m not sure they’ve solved the cloud support costs issue. I don’t know what their privacy rules are. And I’m just kind of nervous about the whole thing, although I do like the devices.

The only integration would be through webhooks, most easily into IFTTT, and then that’s a subscription cost in itself.

So I am not yet back to recommending this brand yet.

2 Likes

The MicroBot seems like a cool device if it worked. But with shipping, the MicroBot would cost me $66. That is a little too much to determine if their capacitive tip would actually activate my air purifier. Looks like I will have to keep being the controller for this device. At least I can use a smart plug to turn it off.

1 Like

There was another suggestion to use a capacitive stylus’s tip, but I believe that would not really work.

People tried to automate capacitive touch before, what I found, but mostly unsuccessful.

I will tag @ogiewon, maybe has heard about a successful arduino project with capacitive touch.

2 Likes

Just for fun, and to give some ideas where to start.

1 Like

This is another solution, but the comments suggest that it is not perfect:

The MicroBot probably has a solution to imitate the capacitive touch part with the big surface.

@JDRoberts, is there a way to change the tip of the SwitchBot?

Ok, this has a partial answer how it can be done with a SwitchBot…

https://www.reddit.com/r/homeautomation/comments/ijndve/capacitive_touch_intercom/?utm_source=amp&utm_medium=&utm_content=post_body

@plannersteve - otherwise does it have an option for an IR remote? That would be far easier.

And FYI you will need a metering plug as well to check that is the device turned on or off.

2 Likes

OK, I’ve been waiting to answer this until I had enough energy to keep this from being a hugely long post. (Sometimes my most tiring struggles are with myself! LOL!)

capacitance: the absence of charge

Most people think a touchscreen is somehow measuring electricity brought TO the screen. But it isn’t. Instead, a touchscreen responds to interference with the small amounts of current that were already there.

In order to get that block, you have to have something which can conduct electricity AWAY from the screen. And it has to carry enough away that the touchscreen will recognize it as interference.

This is why pretty much anything that is conductive held by a human hand will work, because the electricity gets carried away from the touchscreen and the human body is big enough to absorb enough of it to register as interference.

But just laying a metal coin on the screen, even though that coin is conductive, won’t register because it doesn’t block enough of the current on the screen.

It’s also why a long wire will work better than a short wire, especially if it gets grounded in some way.

OK, that out-of-the-way, now we know what we need: something that can touch the capacitive button and carry away some of the existing electricity.

Real World Applications

There are a lot of these used in manufacturing touchscreen devices: that’s how you test them at the factory. But those are usually $100,000 machines and pretty big. Not practical for home automation. :disappointed_relieved:

There’s a small market for people with varying degrees of paralysis, but to be honest, these days most of those devices, including tablets and smart phones, come with other methods for controlling them, like voice. So this market is smaller than you think.

There’s a fairly significant demand for this among robotics hobbyists, where they are often called “monkeybots,” although that term is also used for other things. But the idea is to have a robot that can use a capacitive button. I’m going to talk more about these in a section a little further down. They are almost all individually built, but you can find a lot of plans for them if you look for “robot that can use a touch panel“ or a similar search.

Then there’s home automation to retrofit exist devices, like your air purifier. The thing is, most home devices that have a touchscreen, as @GSzabados mentioned, also have a remote, and once you have a remote, life is easy. If nothing else, you can just use a Switchbot to push the remote buttons.

Your device is unusual in that it has a capacitive button but no remote control capability. This kind of device was popular in Asia for a few years, which I suspect is why Naran added capacitive touch to microbot Push. But most newer devices offer either a button remote or voice control, which I suspect is why Switchbot didn’t bother, because they were more about “good enough“ engineering at a budget price.

A monkeybot example

Here’s an excellent example of a robot built to use a capacitive tablet. Note that most of the mechanism is there to move the stylus to the correct position on the tablet, so we don’t care about that. Our project would be fixed position.

Also note that while there are multiple batteries and wires and all that kind of stuff none of that has to do with actually activating the tablet. That’s all there to move the stylus around physically.

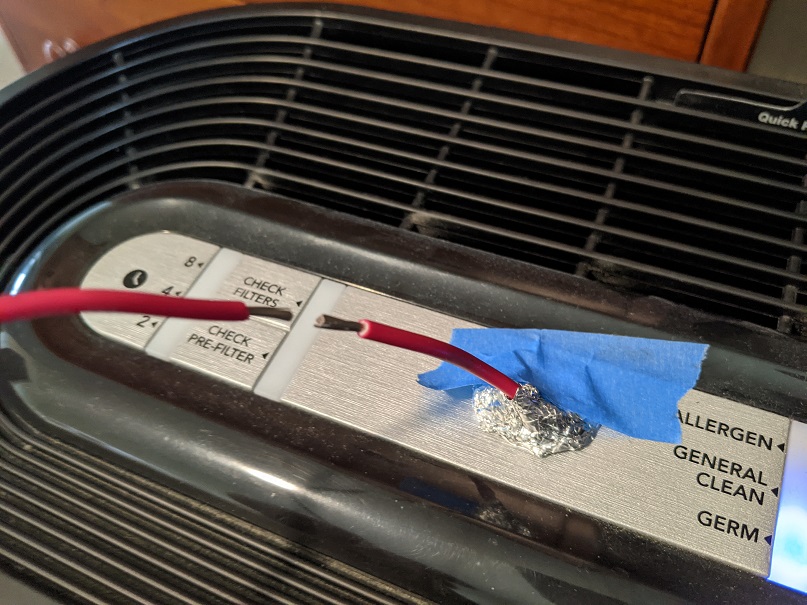
What’s being detected by the capacitive screen is a fairly long stylus with an even longer piece of wire attached to it which is then grounded. They put a nail on the bottom of it, but they didn’t need to. They just needed a conductive tip. They could’ve used aluminum foil, copper foil, or just bought a tablet stylus that already had conductive rubber on the tip.

Modifying a switchbot

OK, now that we know what a capacitive Sensor is detecting, it’s pretty easy to imagine converting a Switchbot to work.

You need a conductive tip, and I would just use copper foil because it looks nice and conducts really well, but you can also use aluminum foil.

You need a long wire, probably 12 to 14 inches, to go inside the foil making contact with it and then running out to the ground. A metal shelf brace would probably be perfect, you want something maybe 6 in.² or around that in order to get enough of a grounding effect. Or you could just ground it to a small metal trashcan. It’s not going to carry enough charge to hurt anybody. I would not ground it to the air purifier itself.

Now when you actuate the Switchbot, the foil touches the screen, the electricity already flowing through the button gets carried away up the wire to the ground, and that should be enough of a block that the button registers it as a “touch.“

The thing is you want to make sure that none of the foil is touching the button except when the Switchbot is extended, so you’re going to have a little bit of trial and error with all of that.

I suspect this is the main reason that most people who have project reports on this have the Switchbot pushing a stylus which then makes contact. It’s just because it’s really hard to get the foil over the tip of the Switchbot itself but keep it isolated when you don’t want to be touching the button.

So, yeah, if it was me, I would probably buy an inexpensive tablet stylus, wrap a wire around the tip and run it up to a ground plate, mount the stylus vertically in a little spring holder, and put a Switchbot at the top to press the stylus down far enough to make contact with the button on the air purifier. But that’s me. It would look really weird, if there are kids in the house they would probably want to play with it, and it’s not the direction a lot of maker type people would take.

My guess is people with stronger aesthetics than me would take a Switchbot, mount it on a little platform, build up the tip, and do it that way. It would look a lot nicer than mine.

But the main point is all you need is a conductive tip, a wire to carry away the electricity for far enough distance, something to attach the wire to to ground it, and a way for the Switchbot to make the tip touch the capacitive button. Switchbot operates on its regular battery in its regular way, and you don’t need any additional power for the project. Your goal is to carry electricity away from the touch panel, not to it.

@ogiewon or @johnconstantelo might have some ideas.

4 Likes

@JDRoberts Thanks for the explanation of how the switch works. And the time you put into this. I concluded the same with too much time on the internet searching the topic.

I’ve been playing around with using a aluminum foil “foot” attached to a wire. See picture. I then touched this wire with a 2 foot length of wire. This is enough to trigger the switch. My initial attempt with the two foot wire attached to foot worked, but I had to physically remove the foil and then place it on the switch again.

Right now I’m thinking some copper foil over the switch connected to a push button that would be activated by the SwitchBot would work. There would also be some length of wire attached to the switch.

2 Likes

@GSzabados
Unfortunately there is no remote. Your posts were helpful in figuring out a conceptual solution. Thanks.

2 Likes

Sounds like you’re on the right track. :sunglasses:

and a way for the Switchbot to make the tip touch the capacitive button

I think you’ll find that most of the successful use case implementations, as opposed to the proof of concept videos, use something rigid in addition to the wire so that when you move it again and again over time it still maintains good contact with the capacitive panel when you are in the “on“ position.

This can be anything really. A pencil, a stylus, a dowel…That piece doesn’t have to itself be conductive as long as you can attach The conductive tip. So aluminum foil works well for the foot. I would also myself probably use a grounding plate because the amount of humidity in the air can affect the success of any given attempt, and you just increase the reliability a little bit when you have a grounding plate. But if you want to try it just with the length of wire, you can as long as it’s long enough for the sensor to trip.

Those are just some random thoughts, thinking about something that will last long enough for practical use. Since I don’t have much use of my hands, I have to pay somebody else to do any little tinkering, even popping the batteries on a sensor, so I tend to design for “set and forget“ as much as I can. :wink:

2 Likes

@JDRoberts
I’m thinking I will make a small square of copper foil which will sit over the switch. I will connect one of the leads from the attached switch to the foil, and make the other as long as needed and run dow the back of the filter. Then I’ll mount the switch right over the foil. The SwitchBot will be positioned on the air purifier to hit the button.
Push-Button-Switch-Leads-300A

Sorry, I’m not following the physics of this.

Are you saying that the switch sits on top of the capacitive panel and the copper foil is on top of that switch? How does that work?

Remember there’s A constant electrical flow across the capacitive panel. You want your device to block that flow as the equivalent of pressing the button. So you want the copper foil to not touch the capacity panel most of the time, and then to be moved to make contact with it when you want to simulate a finger press. I don’t see that happening in this description.

Or are you assuming that the length of wire connected to the copper foil isn’t enough to trigger the capacitive sensor unless the switch is pushed which closes the circuit to the other part of the wire? Basically changing a 2 inch wire to a 14 inch wire or however long your trailing piece is. That’s pretty tricky to calibrate and I still don’t understand what the copper foil is doing in this design. :thinking:

As I previously mentioned, I prefer to go ahead and ground the trailing wire by attaching it to something metal. Preferably something with a lot of area. I definitely wouldn’t just leave it hanging off the back of the purifier, because I think if it grounds itself to the purifier you may end up with some problems.

But maybe I’m misunderstanding what you have in mind.

@JDRoberts
The piece of copper foil would serve the same purpose as the aluminum foil foot in my previous picture, just be more compact. The copper foil would sit on the air purifier switch, then the momentary switch with the red button would sit on top of that foil. And yes, I would only connect a very short piece of wire to the copper foil which would not be itself be long enough to trigger the capacitive switch. The switch with the red button would serve to connect this to the longer piece of wire, the ground, which would trigger the capacitive switch of the air purifier.
I think I’ll get the SwitchBot first. It might be possible to avoid the use of the momentary switch with the red button but I’ll have to play with ways to connect the ground wire.

I see. I was confused by references to “the switch“ in your previous post since I thought you meant on top of the switch in your picture.

Anyway, you can try it and see what happens. As I mentioned, calibrating this kind of device can take some trial and error. :thinking:

I don’t know how much effort are you planning to put into this, but if just connecting a longer wire would work by placing a switch in between, I would advise try to achieve the same with a smart relay, instead of the switch, if the humidifier doesn’t require force for the push.

If it works with a smart relay, like a Sonoff LV (Low Voltage), dry contact, they you can go big, by using a LinkNode R4 or R8 and you can connect 4 or 8 buttons.

And you can ditch the SwitchBot in that case. Really the SwitchBot is only required if you need to add force to press the button.

@GSzabados
I’ll investigate smart relay. That will require some power source for the relay, correct? But I could see how it might wind up being more elegant than the SwitchBot. Thanks.

My concern is that in this design you are leaving the foot on the capacitive panel all the time, right? So the metal foil is constantly in contact?

You’re then trying to automate the simulated press by opening and closing the circuit connection to the much longer piece of wire

My suspicion is that because of the way capacitive sensing works you’re going to get some false triggers from time to time when various environmental conditions change. This is why most people instead design it so that the conductive tip is raised up off the surface and then lowered to make contact when you want to simulate a press.

I also think that opening the circuit may give you some bounce effects so that you end up simulating two or three presses in a row sometimes. So you’re trying to turn it on but you turn it on and then off again immediately.

I could be wrong, and again, it may take trial and error to figure out what works over time. But I would be concerned about potential long-term damage to the humidifier panel if you leave the foil in place at all times.