Philips HUE Dimmer remote – UK Wall light fitting replacement back plate

Hi SmartThings community,

I’m looking to see what the community thinks to my Philips Hue Dimmer remote fitting that will replace an existing UK wall light switch and if there is a need for such a product.

To cut a long story short-ish… I like many people in this community and elsewhere on the web have spent several weeks and a couple of ££’s looking for a viable Z Wave UK sized wall light fitting that is capable of controlling my Philips Hue lights. After reading lots of posts and trying several devices I have come to the conclusion, as per most people in the UK have that there isn’t one! I’m not going to go into details as to why not, other than to say Google is your friend.

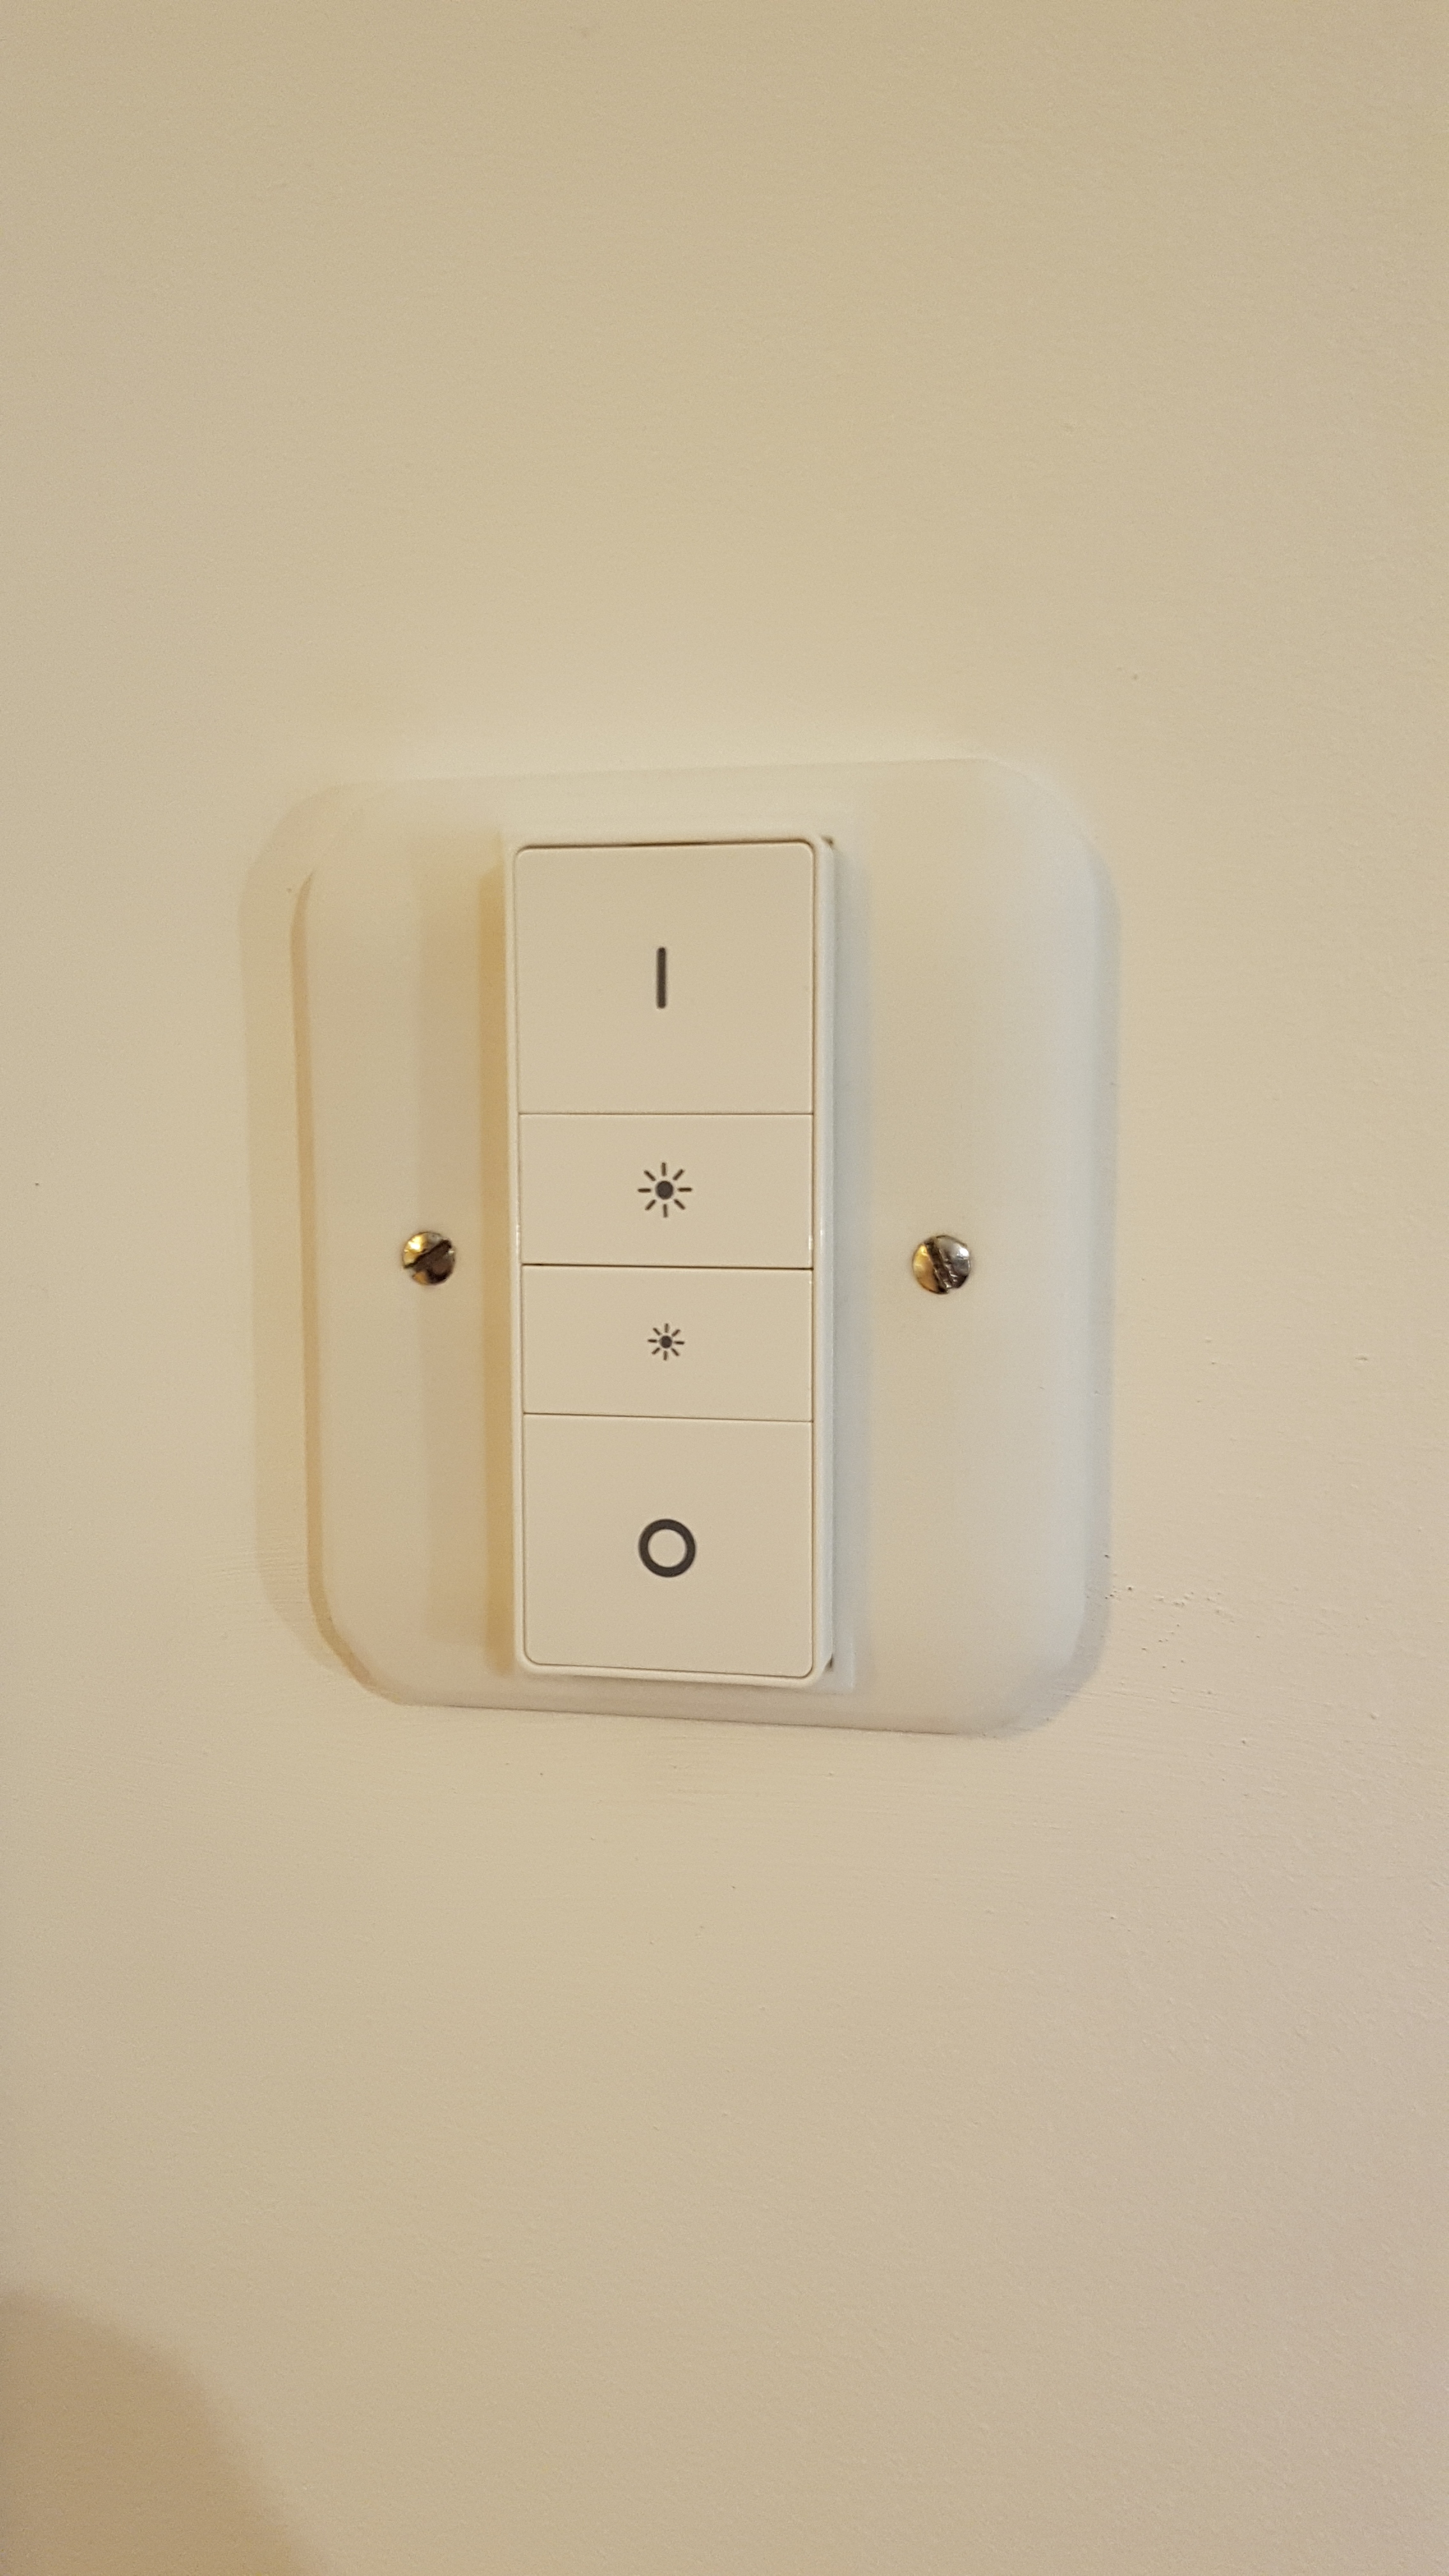
So, moving on… I fired up my CAD software and designed my own wall plate based around the standard size of a UK wall light switch fitting, i.e. 86mm square with two screw holes. I then “adjusted” the height dimension to allow for the Philips HUE Dimmer remote to fit into the wall plate and “tried” to make it as aesthetically pleasing on the eye as I could. As per the original remote housing I will be using two small magnets mounted into the back of the plate to secure the remote when “docked”

This is what I came up …

NOTE… it’s only shown in blue as the colour helps to see contours etc.

I would be interested to see what the community thinks.

Next stage is to get it 3D printed, unfortunately I don’t have my own 3D printer (yet) so it’s off to the Internet to find an online 3D printing service although I imagine it’s not going to be cheap. However it has to be done as no matter how many measurements you take and designs revisions you make there is nothing like having the finished prototype in your hand, although this is a first for me with 3D printing. I’m also interested in seeing what the finish is like on a 3D printed model.

So that got me thinking, I have a requirement for 11 of these in my house and reading the forums of several sites, including this one there seems to be several people out there looking for something similar.

Is there a requirement to have these manufactured, can you do large-ish runs of 3d printing? Would the finish be adequate to use this as a replacement to existing light switches? If the interest is enough could they be injection moulded in plastic or even metal finished like existing wall light switches? So many questions…

Maybe a Kickstarter project could be a good place to start, but what would people want?

What I do know its Home Automation is a very popular subject and something as simple as being able to switch my lights off with a wall light nearly stopped me in my tracks. Hopefully this will give others inspiration.

Anyway…. Any feedback would be greatly appreciated. I’ll keep the post up to date as I move on and get the 3D printed prototype made.

3 Likes

There are a couple of other community members who have done something similar.

I wouldn’t think a kickstarter would be required as there are no electronics to the pieces. Just price it out and offer it for sale. ( make sure your drawings show the same color as the finished piece, though.)

Here’s A project report from about a year ago where you can see there was quite a bit of interest.

Oh, and stay away from metal. It’s going to interfere with the wireless signal from the device itself. :wink:

Hi @JDRoberts, thanks for the feedback. Just a quick note re the comment about the metal finish.
I’m an WiFi engineer by trade and can say that the metal finish to the back plate will have no effect what so ever to the Wireless signal from the remote, if anything it will help to reflect the signal back into the room… now… if the receiver ( bulb ) was behind the metal plate… well thats a different story :wink:

I was a network engineer and worked with both zigbee and zwave prior to ever buying SmartThings.

Zwave and Zigbee are very low energy mesh topologies, and you run into a lot of issues you won’t run into with Wi-Fi.

You can’t be certain what path any particular message is going to take, and many of them are going to go through the back wall rather than forward into the room. And because of the low signal strength, they are much more affected by architectural barriers than Wi-Fi.

Metal plates and back boxes can definitely affect signal – – you will find the cautions in the manufacturer guide for the regular zwave light switches.

Most people buying SmartThings are trying to save money. And that might mean having the nearest repeater one room over.

Once you turn an Omni directional signal into one which has lost one plane, you may be requiring your customers to buy an additional device to restore reliability.

So again, I wouldn’t recommend metal.

Submitted with respect.

Thanks @JDRoberts, i don’t want this thread to turn into a discussion re WiFi or Z Wave / Zigbee architecture. So thanks fort the pointer and its been noted.

1 Like

Just printing them off yourself is obviously more expensive per unit. However the setup cost to have them manufactured with injection mold, you would need to be ordering in the 100s of 1000s.

If you find a friend to print one out, try it out, fix any miscalculations. There are even some people in this forum with access to 3D printer that have made custom brackets for motion or OC sensors. Offered their designs for sale. I’m pretty sure you would have a limited market, sales from posts in Hue/HA forums and Ebay/Amazon marketplaces.
Once you perfect the design with 3d model I would definitely look at patent rights or any infringements on Philips patents before you decide to actually go into having the manufactured in bulk. I’m positive Philips’ legal budget is much lager than yours if you catch their attention.

1 Like

By the way, you can use a metallic finish plastic with good results. The following is a battery operated switch which is quite popular with our UK members. It comes in many different finishes.

A number of community members have just built a thin wooden box to fit over the existing switch and then put this one on top.

One of the advantages of SmartThings is that since it is a multiprotocol platform, you can use a Z wave switch to control zigbee bulbs. This gives you many more device options.

I personally like the Hue switches because I think they’re a bit more intuitive for guests and they will work even if the SmartThings cloud is unavailable. So I’d certainly encourage you to go ahead with your plans. I just wanted to mention that there are other options as well. Choice is good. :sunglasses::level_slider::bulb:

1st prototype printed and delivered. Overall quite happy with it as initial measurements are not that far off. The back needs to be printed a bit thicker as its slightly transparent and the over all internal dimensions need to be increased by around 1.5mm as its a little on the tight side inserting and remove the remote but apart from that i don’t think it looks to bad.

I may change the corners to be rounded rather than the current design.

The finish is raw 3D print with a polish via ceramic stone. The effect is actually very good and it it could be sprayed with filler primer and a top coat to finish it off.

Let me know your thoughts.

2 Likes

Hi there

I’ve regsitered on the forum initially just to repsond to this thread! This looks perfect for what I’m after and I would be interested in helping / testing / purchasing!

Could I ask what you do with the curreny physical switch? I’ve looked at a few option. Do you just leave a perminent connection by choc block or some other kind of switch in the back box?

Hi Jowl,
Glad you liked it, i was starting to think i must be the only person who has an issue with not being to mount the remote as alight switch… after all if Phillips feel there is a market in the US ( hence the back plate shipped ) there must be a similar need in the UK.

As per my last post, there are a couple of minor issues which i am fixing by altering the 3D model but to be fair they are a lot better than i was expecting, especially as everything was done from just measurements. The main alterations needed are, the back of the remote aperture needs to be made thicker as its slightly translucent. At the moment it’s 1.5mm think, i am increasing this to 3mm for rigidity. The other change is the remote aperture needs to be slightly bigger as it quite tight to fit the remote into. When i measured i i used the dimensions of the remote rather than adding a bit extra … DOH… Other than that they are actually really good.

The only other feedback i have had from friends is the corners need to be rounder rather than slightly angular as per the original design… which i actually agree with having now seen it in the flesh so to speak.

I had three prototypes printed due to min order values, printed on good quality industrial machines and then polished to remove the print marks. This has left an excellent surface texture and they can be used as they come out of the polishing machine but it also means they can be finished with a little aerosol spray filler, flattening and then a final coat… if so desired.

Due to the quality and finish they are working out a little more than i expected at around £15.00 each. Once i have a finished model that i’m happy with i will see if i can reduce that by using different print services but ultimately my plan is to have a mold made and go large… injection molding because unlike most of the forum i do believe there is a market for these if the price is right.

As for the existing connection used by the original light switch, i just terminated it with a connection block and tucked it back into the hole in the wall. In order for the Phillips remote to work properly the light needs permanent power and the on / off function is controlled by the remote / mobile app.

Once i have resigned the 3d model again and had new models printed i’ll update the post again… won’t be a few weeks though.

Thanks for the reply - and so quickly.

The prototypes look great - I can see the slight issues you’ve mentioned but what a great start! I know myself, brother and Mum would be looking at these at least - so thats a market of 3 plus yourselft at least! I agree with you though - there must be a market for them.

Cheers for the tip re terminal block. That was a thought but I wasn’t sure if that was ok. I also like the idea of having a ‘reset’ switch but the attempts so far at fitting a small switch I can hid in the backbox have failed - just need a decent mini switch I think.

Look forward to the updates

Thanks

J

Hi guys,
Just a quick note to say youre idea is a good one and my first thought was "right how do i put that on the wall where the old switch is or do i have to plaster over the old switch.

I would be interested in a couple of these at least.
Cheers
jon

Hi @Jon.ep,

Thanks for the feedback. The width dimensions and screw holes are exactly the same as a standard light switch, the only difference being the length to accommodate the remote.

Therefore you simply take off the existing light switch and screw this into its place. As the width is the same but length is longer any unpainted areas would simply be hidden or matched.

I have had a busy start to the year so far so haven’t managed to put any time into the project just yet and re design the 3d model with the amended dimensions. I’m hoping to jump back on it next week so watch this space.

I would love to see a US version! Especially a dual gang! I’ve had decent luck installing the back plate over single gang boxes. Dual gang boxes, however, is a nightmare! Nice work!

My Current solution in the UK is an ‘emergency lighting’ fish key plate - which is flush to the plate. Im going to use magetic tape to allow the remote to fix to it.

The key works well in that 99% of the time I don’t need to physically switch off power to the lights. But in case I need to reset or anything, I can do

@pigsfoot this looks brilliant! When you do offer them for sale I would be interested in at least 3

@Jowl great tip re the fish key plate!

1 Like

Hi Everyone,

As promised, revised 3D model with the amendments made. Will be uploading it to have 3D printed in the next couple of days.

The dimension changes will mean the remote will fit better into the cavity, the back has been made thicker so its no longer transparent and i personally think the corners look much better with a full radius. I have also added a small area to fit a Neodymium 15mm Dia x 2mm magnet into the back plus a couple of other minor changes to make printing it easier.

Let me know what you think. Will post more photos when i get the printed model back which usually takes a around a week due to polishing etc.

2 Likes

Love it! It does look better with the rounded corners - and a little different to ‘normal’ switches too

Depth / thickness is also an improvemnt. I’d be happy with that

(I’m off to google the magnets. I bought some magnetic tape and it doesn’t work!)

Thanks for the feedback, They are currently being printed but will take 7 - 10 days as its very expensive to have them done any quicker.

This is where i ordered my magnets from - http://www.first4magnets.com/circular-disc-rod-magnets-c34/15mm-dia-x-2mm-thick-n42-neodymium-magnet-2-2kg-pull-p2842#ps_1-991

2 Likes