Here is a guide on integrating smartthings and homeassistant (hassbian)
I tried many guides that just didn’t work, so after a lot off time trying to get this to work i figured i can save someone else all that hassle i hade.
1: grab your raspberry pi 3b and install Hassbian using Etcher
Link: https://www.home-assistant.io/docs/installation/hassbian/installation/
Link:https://etcher.io/
2: download a ssh: Putty
Link:https://www.putty.org/
3: check what ip that your raspberry have: You can do this by entering your router or use
your phone and Fing app, or use: https://www.advanced-ip-scanner.com/
4: start putty, enter the ip of your raspberry pi: exempel: 192.168.1.33
5: in the console window: enter: pi as user
and: raspberry as password
6: now type: passwd and enter the default password: raspberry
then enter a password you like, this need to be typed 2 times
7: update software using this comands, one at the time
sudo apt-get update
then when its fincht type:
sudo apt-get upgrade
(you need to enter Y when you get the questone)
8: then when its finicht type: sudo reboot
the device will reboot and you need to connect using putty again:
dont forget that you changed the password above so now its: user pi password: what you entered
ok time to install some stuff.
9:first: install mqtt broker using this command.
sudo apt-get install mosquitto mosquitto-clients
10:
now we adding as password to protect it, observe that you need to enter a name after /pwfile
exempel:sudo mosquitto_passwd -c /etc/mosquitto/pwfile YOUR NAME
sudo mosquitto_passwd -c /etc/mosquitto/pwfile
then enter a password when your prompt:
11: Modifying homeassistant .yaml:
typ: cd /home/homeassistant/.homeassistant
then: sudo nano configuration.yaml
this have now opened the config file for home assistant:
i added my config after line:“customize: !include customize.yaml”
enter the config so it looks like this:
“customize: !include customize.yaml”
mqtt:
broker: localhost
port: 1883
protocol: 3.1
keepalive: 60
client_id: smartthings
username: username you entered in stage:10
password: Password you entered in stage : 10
12: now press ctrl X then press Y and Enter to save the file
Observe that spacing does matter in homeassistant,
so for example: mqtt: needs o be to the left and the next line
needs to be 2 spaces from the left, otherwise homeassistant wont start.
13: Install npm:
sudo apt-get install nodejs nodejs-legacy npm
14: install pm2:
sudo npm -g install pm2
(dont worry if you get some errors, and the installation takes some time)
15: Install the mqtt-bridge
sudo npm -g install smartthings-mqtt-bridge
16: Configure the bridge by doing this, one line at the time:
cd /opt
sudo mkdir mqtt-bridge
sudo chown pi:pi mqtt-bridge
cd mqtt-bridge
pm2 start smartthings-mqtt-bridge
17: after starting mp2 above, it will create a file we need to modify
sudo nano config.yml
Modify the file as following:
on the line host: host: mqtt://localhost
on the lines username and password: remover # so it looks like this (remember the spacing rules)
Other optional settings (dont touch this line)
username: USERNAME FROM STEPP: 10
password: UR PASSWORD FROM STEPP:10
18: now save this file by pressing: ctrl x the y and enter
19: restart mp2:
pm2 restart smartthings-mqtt-bridge
29: then run this 3 lines one at the time:
sudo systemctl restart mosquitto.service
pm2 restart smartthings-mqtt-bridge
sudo systemctl restart home-assistant@homeassistant.service
ok, now the are a big risk that you have gotten a error after installing pm2 that states that you need to run:
sudo systemctl daemon-reload
and the ui for home assistant isn’t loading. if so just do this steps:
first run: sudo systemctl daemon-reload
then do a reboot by doing: sudo reboot
connect again using ssl (putty) login and follow this guide:
only use the text inside " "
First, cd to system by doing:
1:“cd /etc/systemd/system”
then:
2:“sudo nano home-assistant@homeassistant.service”
this opens a empty fil: past this lines, all text inside inside " "
3:
"[Unit]
Description=Home Assistant
After=network.target
[Service]
Type=simple
User=%i
ExecStart=/srv/homeassistant/bin/hass -c “/home/homeassistant/.homeassistant”
[Install]
WantedBy=multi-user.target"
4: then press “ctrl+x” and then pres “y” and “enter”
after this do:
5: “sudo systemctl --system daemon-reload”
6: Now use: “sudo systemctl start home-assistant@homeassistant”
and your home assistant should work again.
ok you have now installed mqtt-bridge on your raspberry pi, but you need to do some more stuff.
We need to install a device handler in smartthings, and a smart app,
and you also need to manually enter al devices from smartthings that you like to use in homeassistant.
Let’s get started:
30:first: gå to: https://account.smartthings.com/login?redirect=https%3A%2F%2Fgraph-eu01-euwest1.api.smartthings.com%2Flocation%2Flist
if you haven’t got a developer account you need to create one, its just to sign up for one.
31:when you logged in: go to “device handler” and click on “create new device handler”
then click on “from code”
and paste all lines from this link:
stjohnjohnson/smartthings-mqtt-bridge/blob/master/devicetypes/stj/mqtt-bridge.src/mqtt-bridge.groovy
/**
- MQTT Bridge
- Authors
- Copyright 2016
- Licensed under the Apache License, Version 2.0 (the “License”); you may not use this file except
- in compliance with the License. You may obtain a copy of the License at:
-
http://www.apache.org/licenses/LICENSE-2.0 - Unless required by applicable law or agreed to in writing, software distributed under the License is distributed
- on an “AS IS” BASIS, WITHOUT WARRANTIES OR CONDITIONS OF ANY KIND, either express or implied. See the License
- for the specific language governing permissions and limitations under the License.
*/
import groovy.json.JsonSlurper
This file has been truncated. show original
32: then click “save” and then “publish” for me
33: then click on: “my smart apps”
34: then click on “new smartapp”
35:then click on “from code” and paste al lines from this link:
stjohnjohnson/smartthings-mqtt-bridge/blob/master/smartapps/stj/mqtt-bridge.src/mqtt-bridge.groovy
/**
- MQTT Bridge
- Authors
- Copyright 2016
- Licensed under the Apache License, Version 2.0 (the “License”); you may not use this file except
- in compliance with the License. You may obtain a copy of the License at:
-
http://www.apache.org/licenses/LICENSE-2.0 - Unless required by applicable law or agreed to in writing, software distributed under the License is distributed
- on an “AS IS” BASIS, WITHOUT WARRANTIES OR CONDITIONS OF ANY KIND, either express or implied. See the License
- for the specific language governing permissions and limitations under the License.
*/
import groovy.json.JsonSlurper
import groovy.json.JsonOutput
This file has been truncated. show original
36: click on, “my devices” and look for “MQTT BRIDGE”
37: klick on it
38: klick “edit” and enter as foling:
1:NAME. MQTT Bridge
2:Label: MQTT Bridge
3:Device network id: ENTER YOUR RASPBERRY PI MAC ADDRESS: exempel:
B827EBFE100C (you can find it the same way you found the ip address in step: 3
4:TYPE: MQTT Bridge
5:Vertion: Publish
6: Hub: your hub
39: klick update
40: now klick back in the browser
41: click: Preferences (edit)
42: enter your info in the fields:
1: Ip adress of your raspberry pi: exempel: 192.168.1.33
2: port number of the broker: 8080
3: mac adress of the raspberry pi: exempel: B8:27:EB:FE:10:0C
43: klick save.
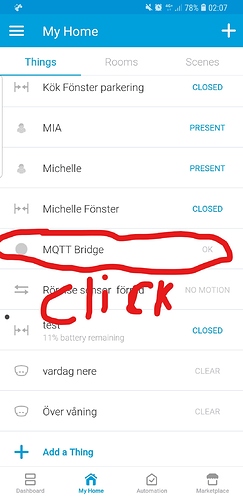
44: now open smartthings classic app on your phone.
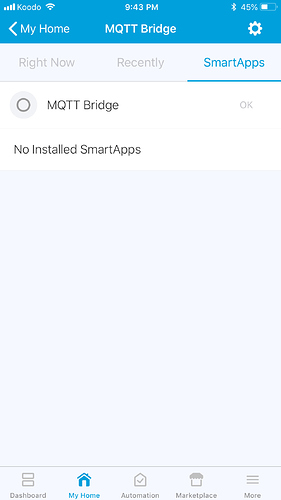
and click on “Things” you should see MQTT Bridge now.
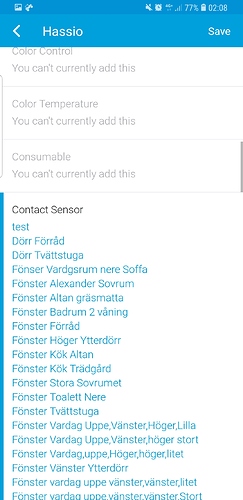
klick on it and go to “smartapps” you should see 2 lines: MQTT Bridge and the name off your smart app, for exempel “hass” , klick on “hass” scroll to the bottom and klick on “notify this bridge”
klick on, your bride. then click on one switch you like to use (using switch in the exempel)
45:klick save and then back,
46: klick on the small wheel on top right
47: check so your info is corekt:
for exempel:
Give your device a name: MQTT Bridge
MQTT Bridge Ip Adress: 192.168.1.33 (ip to your raspberry pi)
MQTT Bridge Port: 8080
MQTT Bridge MAC ADDRESS: B8:27:EB:FE:10:0C (your mac address)
klick save:
Ok, we are now going to ad the switch you shoes in the app:
in ssh: type: cd /home/homeassistant/.homeassistant
then: sudo nano configuration.yaml
now we are back in the config file for homeassistant and we can now ad the switch:
this is a exempel below, you need to ad your switch, so check the exact name
and path to your device: i added my switch after mqtt service as exempel:
mqtt:
broker: localhost
port: 1883
protocol: 3.1
keepalive: 60
client_id: smartthings
username: YOUR USERNAME
password: YOUR PASSWORD
switch:
platform: mqtt
name: “Byro Stora Sovrummet”
state_topic: “smartthings/2:Byro Stora Sovrummet/switch”
command_topic: “smartthings/2:Byro Stora Sovrummet/switch”
payload_on: “on”
payload_off: “off”
retain: true
after this is done: klick ctrl x and then y and enter to save the file
then do
1:sudo systemctl restart mosquitto.service
2:pm2 restart smartthings-mqtt-bridge
3:sudo systemctl restart home-assistant@homeassistant.service
now open your browser and go to homeassistant ui, and test the switch,
if homeassistant doesn’t start, you have done a typo in the config file,
remember, every space matters.
EDIT: After updating homeassistant, the mqtt-bridge stopped working. this is how i fixed it.
if you followed the guide above just do this steps
1: connect using ssh: och login using your user and password
2: sudo apt-get update
3: sudo apt-get upgrade
4: curl -sL https://deb.nodesource.com/setup_6.x | sudo -E bash -
5: sudo apt-get install nodejs
6: sudo nano /config.yml
this opens a file, enter the same things in this file, as you did in stepp: 17 &18 above. (on the lines: host, user, and password)
after you saved the file using ctrl x y enter
1:sudo systemctl restart mosquitto.service
2:pm2 restart smartthings-mqtt-bridge
3:sudo systemctl restart home-assistant@homeassistant.service
and now it should be back to normal.
//Regards
Ps: sorry for the bad grammar,


