Hey guys! Today I would like to release my implementation of controlling my desktop status with SmartThings. This is entirely achieved with software and no extra hardware or servers are required. Hope this helps you guys out! If you need any help at all, feel free to PM me or post on this thread. I made a short video as a demo and I also made a basic tutorial.
Although “IFTTT” is used often in this guide, no interaction is made with the IFTTT service. This is just the friendly name for webhooks.
Make sure to install webCoRE/Send Events to EventGhost and EventGhost/cURL before starting!
I am affiliated with webCoRE in that I am a wiki editor, though I am simply using it because it has all of the tools neccesary to complete this project.
FIX: If you have issues starting the webserver, try this fix.
Requirements
WebCoRE: This is what handles the logic and SmartThings side of this integration. Installation tutorials are available at wiki.webcore.co
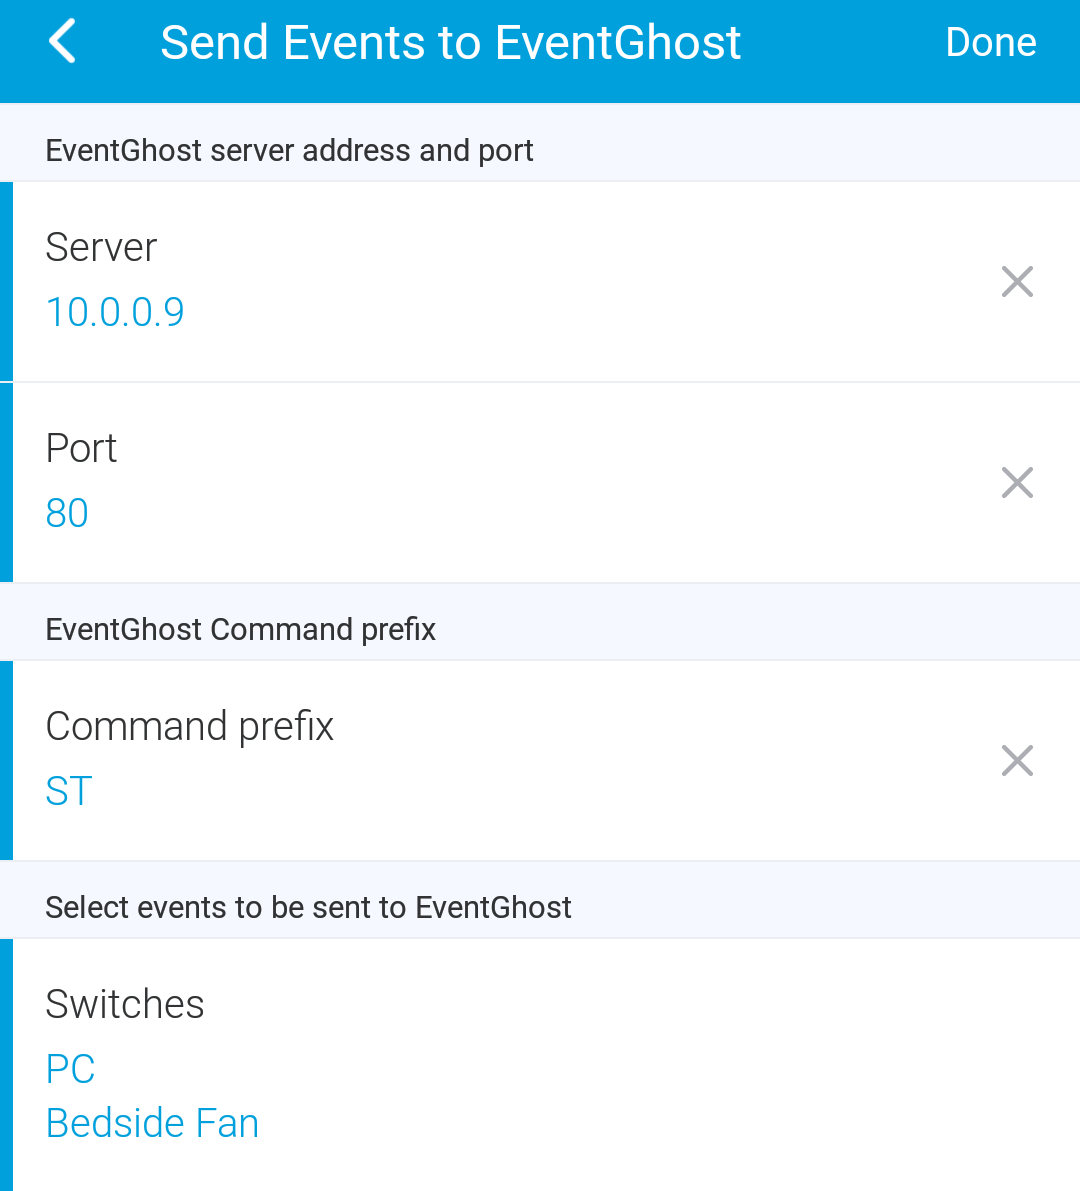
On your smartphone, set up “Send Events to EventGhost.” Enter your PCs IP and make sure that Port = 80 and Command Prefix = ST. Then, check the PC switch.
Open WebCoRE and create a new piston. Copy over the contents of the piston below, and replace “YOUR_MACADDRESS_HERE” with your PCs MAC Address. Also, when you create the IFTTT triggers, copy down the URLs in the parameters box to a text file.
For example, in the “IFTTT executes ‘pc_started’” menu, there will be a URL at the bottom. (Like this) Copy this URL to a text file.
Make sure that the “HTTP.ST.PC.switch.off”-command contains the exact same reference/name as what you had named your Virtual Switch, i.e. the part in bold is a reference to you Virtual Device name. I.e. if the Virtual Switch created for your PC is called “Media Server PC”, the command would look like this: "HTTP.ST.Media Server PC.switch.off.
Wait until you have created the Virtual Switch and installed Event Ghost on the PC before creating the Event Ghost Smart app in the Mobile App. (I installed this on 5 PC’s and with 3 of them, it only started working after deleting and re-creating the Mobile app. With the last PC, I created the Mobile App last and it immediately worked.
Restart the PC after installing Event Ghost.
Create separate instances of the Event Ghost Smart app for each PC’s.
This is genius! The problem I had was that the switch would get out of sync. This is why I used Host Pinger as a means to keep the switch in sync no matter if you turn on/off the PC manually or programatically. Awesome Job in finding a way around that issue!
Will cook up yours to see how well the switches stay in sync! This is much simpler to my now, outdated method.
Hey no problem man! I had the out of sync issue too until I did some investigation and got the EventGhost trigger to run BEFORE the PC went to sleep. Once I got that figured out though, it’s been working well. Also, if you want, you can link this post on your own.
I would love to build project this using this PC: https://www.amazon.com/gp/product/B01LXP5JZC/ but I need to make sure it supports WoL. I asked the question on the Amazon page to make sure the hardware is compatible. Among other uses, I want to boot up a Win10 PC connected to a projector to play content which sometimes requires my VPN software to be utilized if the content is not available in my geographic area. I am also curious if one day this idea can be expanded upon to run start-up scripts on the PC, i.e., start Netflix or Outlook to check email etc., via triggers from ST.
With EventGhost, you can pretty much run any program or script that you like. I have Virtual Switches to start Kodi, WMC, Chrome, Youtube and a couple more useful programs. I actually have 10 PCs hooked up over the house and all of them are totally controllable via ST and EventGhost.
It is also super useful to use this integration as PC Activity(Motion) Sensor via Virtual Switches. So when I am on the computer, EventGhost registers the system as Active, the event is sent to ST and a Virtual Switch turns on. When the system goes idle, again it sends that information to ST and the Virtual Switch turns off.
Using this, I can create a rule restriction that says:
If PC Activity Switch is Off or On
Then This or That i.e. Shutdown PC, Dim Lights, Turn On Computer Speakers, etc.
Hey there! This is absolutely able to be expanded. Using the “Send Events to EventGhost” SmartApp alone, you can trigger actions such as shell scripts, websites, programs, and much more.
As for your PC you linked to, it looks like it will work. The MSI Cubi 2 uses a proprietary motherboard as far as I can tell, though this forum post on the MSI forums shows that previous Cubi boxes have had Wake-on-LAN.
Still doesn’t work. In event Ghost I get “error: [Errno 10013] An attempt was made to access a socket in a way forbidden by its access permissions”. Is there some setting on my PC I have to change?
Make sure the permissions for the HTML documents root is set to allow access for Eventghost based on the context Evengthost is running under (current user or as a system service). There are several ways to do this (ie different levels of permission) that I won’t get into here. But that’s one possible culprit.
Also, why is your HTML documents root set to a folder on your desktop? In general you should probably move that to another folder, personally I’d prefer a folder off the root, that will 1) not be tied to a Windows account (such as by having it in “HTPC\Desktop” is tied to the user HTPC) and 2) will not cause issues if you are running Eventghost as a system service (assuming you can, I’m not sure).
Mine is just empty and works fine. Also, does EventGhost have permission to bypass the firewall? Try this: (Start Menu -> Search “Firewall” -> Allow an app or feature through Windows Firewall -> EventGhost)
Hey I just wanted to say thank you so much for this. I have been looking for a good solution to ensure my computer is off or turn it on when I need it. I really appreciate you sharing this.
I do have one issue, which may be because I messed something up I am not sure, but when I turn the PC on or off manually it doesn’t update the switch in ST. Any idea why that might be? I played around a little bit, but I am not all that familiar with Event Ghost so I wasn’t sure what exactly is happening.
I did but maybe I missed it up. If I put the URL into my browser it works and triggers WebCoRE but it doesn’t seem like event ghost is calling it. I’ll play with it now when I get home and report back. Thanks!
Yep, I did. In fact I have found that if I right click on the IFTT action in EG and execute it there it works. I also found that if I go to sleep manually it does work. It is only the wake up that does not update correctly even though the EG log shows the IFTT action running. This makes me think that either it is running too soon after resume and the call fails or perhaps it isn’t able to actually run the action because it is at the log-in screen? Any thoughts? Thanks!
Guess I should have tested my theories before I posted. So I added a 5s wait after system.resume before the IFTT call fires and that fixed it. I could probably shorten the delay but I just wanted to see if it worked. My guess is networking goes to sleep and then takes a ms or so to turn back on when the system is resumed. I guess if nothing else this is good for others if they experience a similar issue in the future.
Thanks again for this great and useful project. I appreciate it!


 Thanks!