Home Theater build with automation

I’ve always wanted a home theater. I’m not talking a home theater system. I’m talking a home THEATER… Tiered seating, giant screen, surround sound and fresh buttered pop corn smell wafting through the air.

I wanted the theater experience without the issues that come with the theater experience.
Enter SmartThings, Kodi, and a really big projection screen.

The Location

In May of 2013 my then fiancee and I closed on a multi-level home in Suburbia, MN just outside of the Twin Cities area of MN. (Note for you Googlers, this is not a real town.) We married less than 10 days after we purchased our home, and then a week after that had some friends move into our lower basement level to help them get back on their feet.
The house offered privacy for them and us with the lower level being one of four distinct floors. Ground level featured laundry and the “Office”, the basement sits four feet lower than ground level, the main level sits above the basement and the bedrooms sit above the laundry/Office.

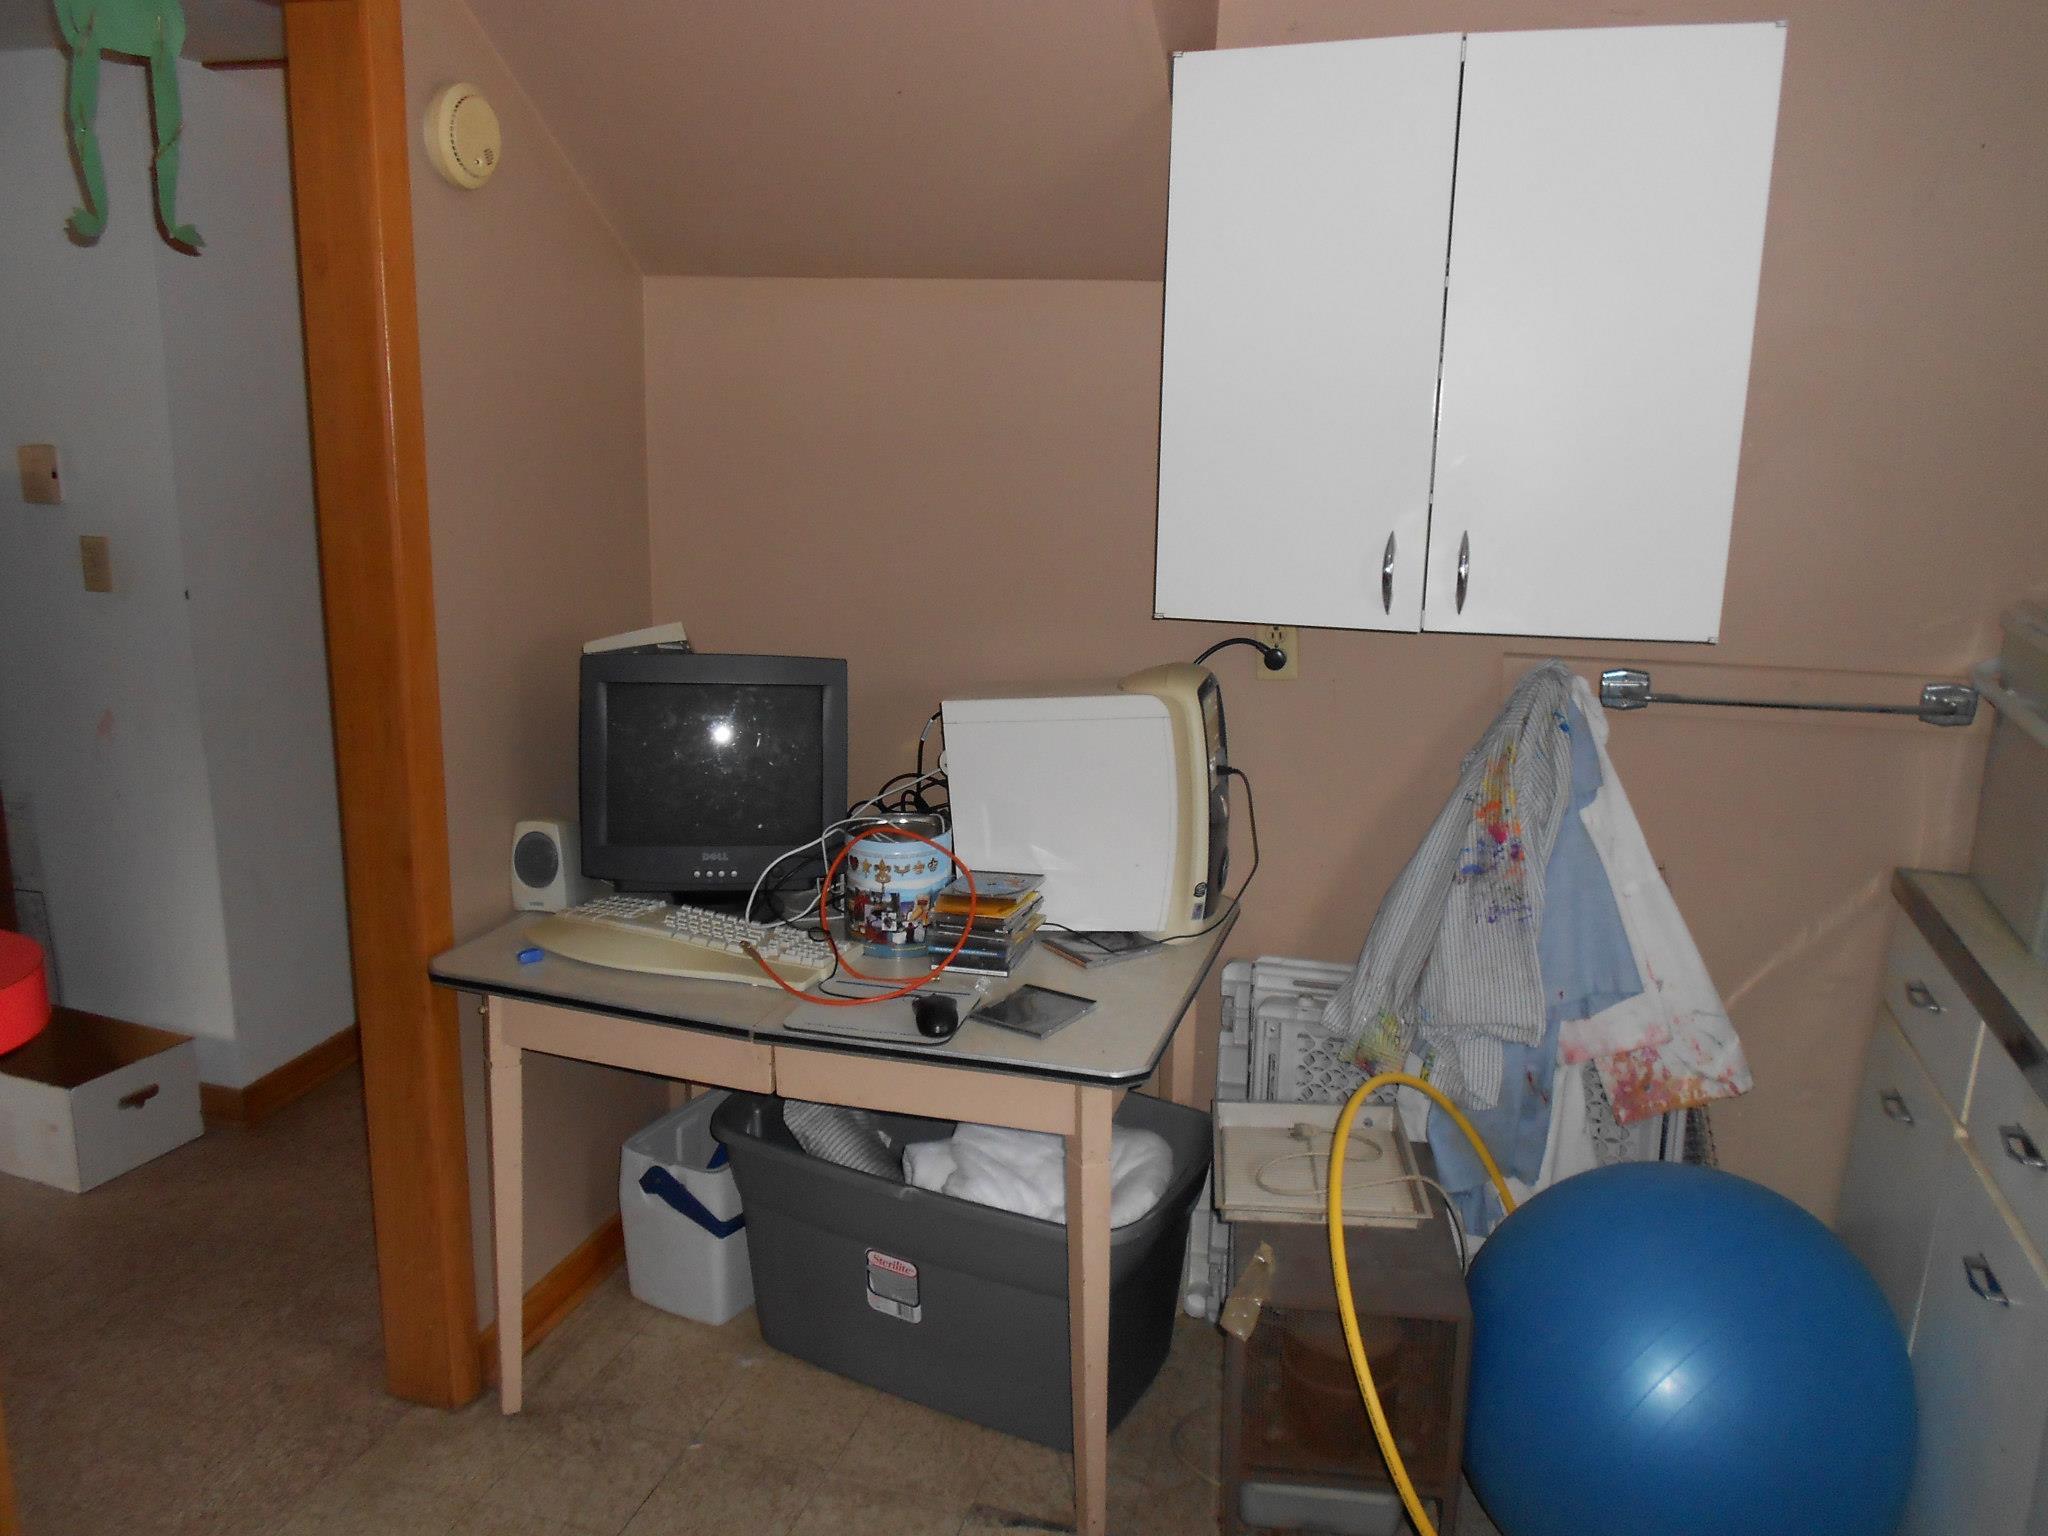
My original plan for the basement was to turn it into a standard living area. It looked and felt like a “Church basement”, with a dedicated kitchenette and bar/counter area, stove and fridge, and shuffleboard tiles built into the floor. When our friends moved in, this got delayed until they moved out after eighteen months (the time limit we agreed on for them to get some savings established and get their feet under them).

After they left, it ended up becoming storage and a short term woodworking shop for me to tinker around in, and only now, three years later am I finally able to make it into what I want.

Here’s some shots of the basement from when we viewed the house the day we made the offer.


The Gear

I got into SmartThings somewhere around a year and a half ago with my first hub and a couple of GE Z-Wave switches from Lowe’s. I’ve steadily expanded the system, and now have 60+ devices throughout the home (much to the detriment of my Lowe’s credit card and my wife’s furious looks as I bring more stuff home).

I picked up a Harmony Home Hub kit with the remote from Craigslist for super cheap, and have been piecing my sound system together for the last several years from various sources and doing so on a limited budget. We have an older Denon AVR-790 receiver that I purchased new in 2009 to replace a lightning damaged Kenwood. I also purchased one of the first Samsung ultra-thin LED televisions at this time (thank you Insurance!) to replace my first HDTV which was a Samsung tube widescreen that was hit in the same lightning strike. While the TV is a SmartTV, it doesn’t support any kind of power functions via Network connection, and the receiver does not have network connectivity, so bringing those into the automation fold would require the aforementioned Harmony Hub, and integration into SmartThings.

The speakers are an amalgam of Craigslist finds (12" Cerwin Vega floor standing speakers for the front, custom home-brew dual 5.25" center channel with crossover networks, NanoSat side channels and Infinity RS-8 powered rear towers with 8" subs, and finally a standalone JBL 10" powered sub), but I’ve worked to alleviate tonal differences by tweaking the receiver crossover, distance, and channel timing settings to balance the imaging and sound. I used to install home theaters for million+ dollar homes for a living, so doing this on a medium level receiver was a bit difficult, but not impossible.

The center point of the system is an Intel Core i5 mini-ITX system running Kodi 15 and the CinemaVision addon.
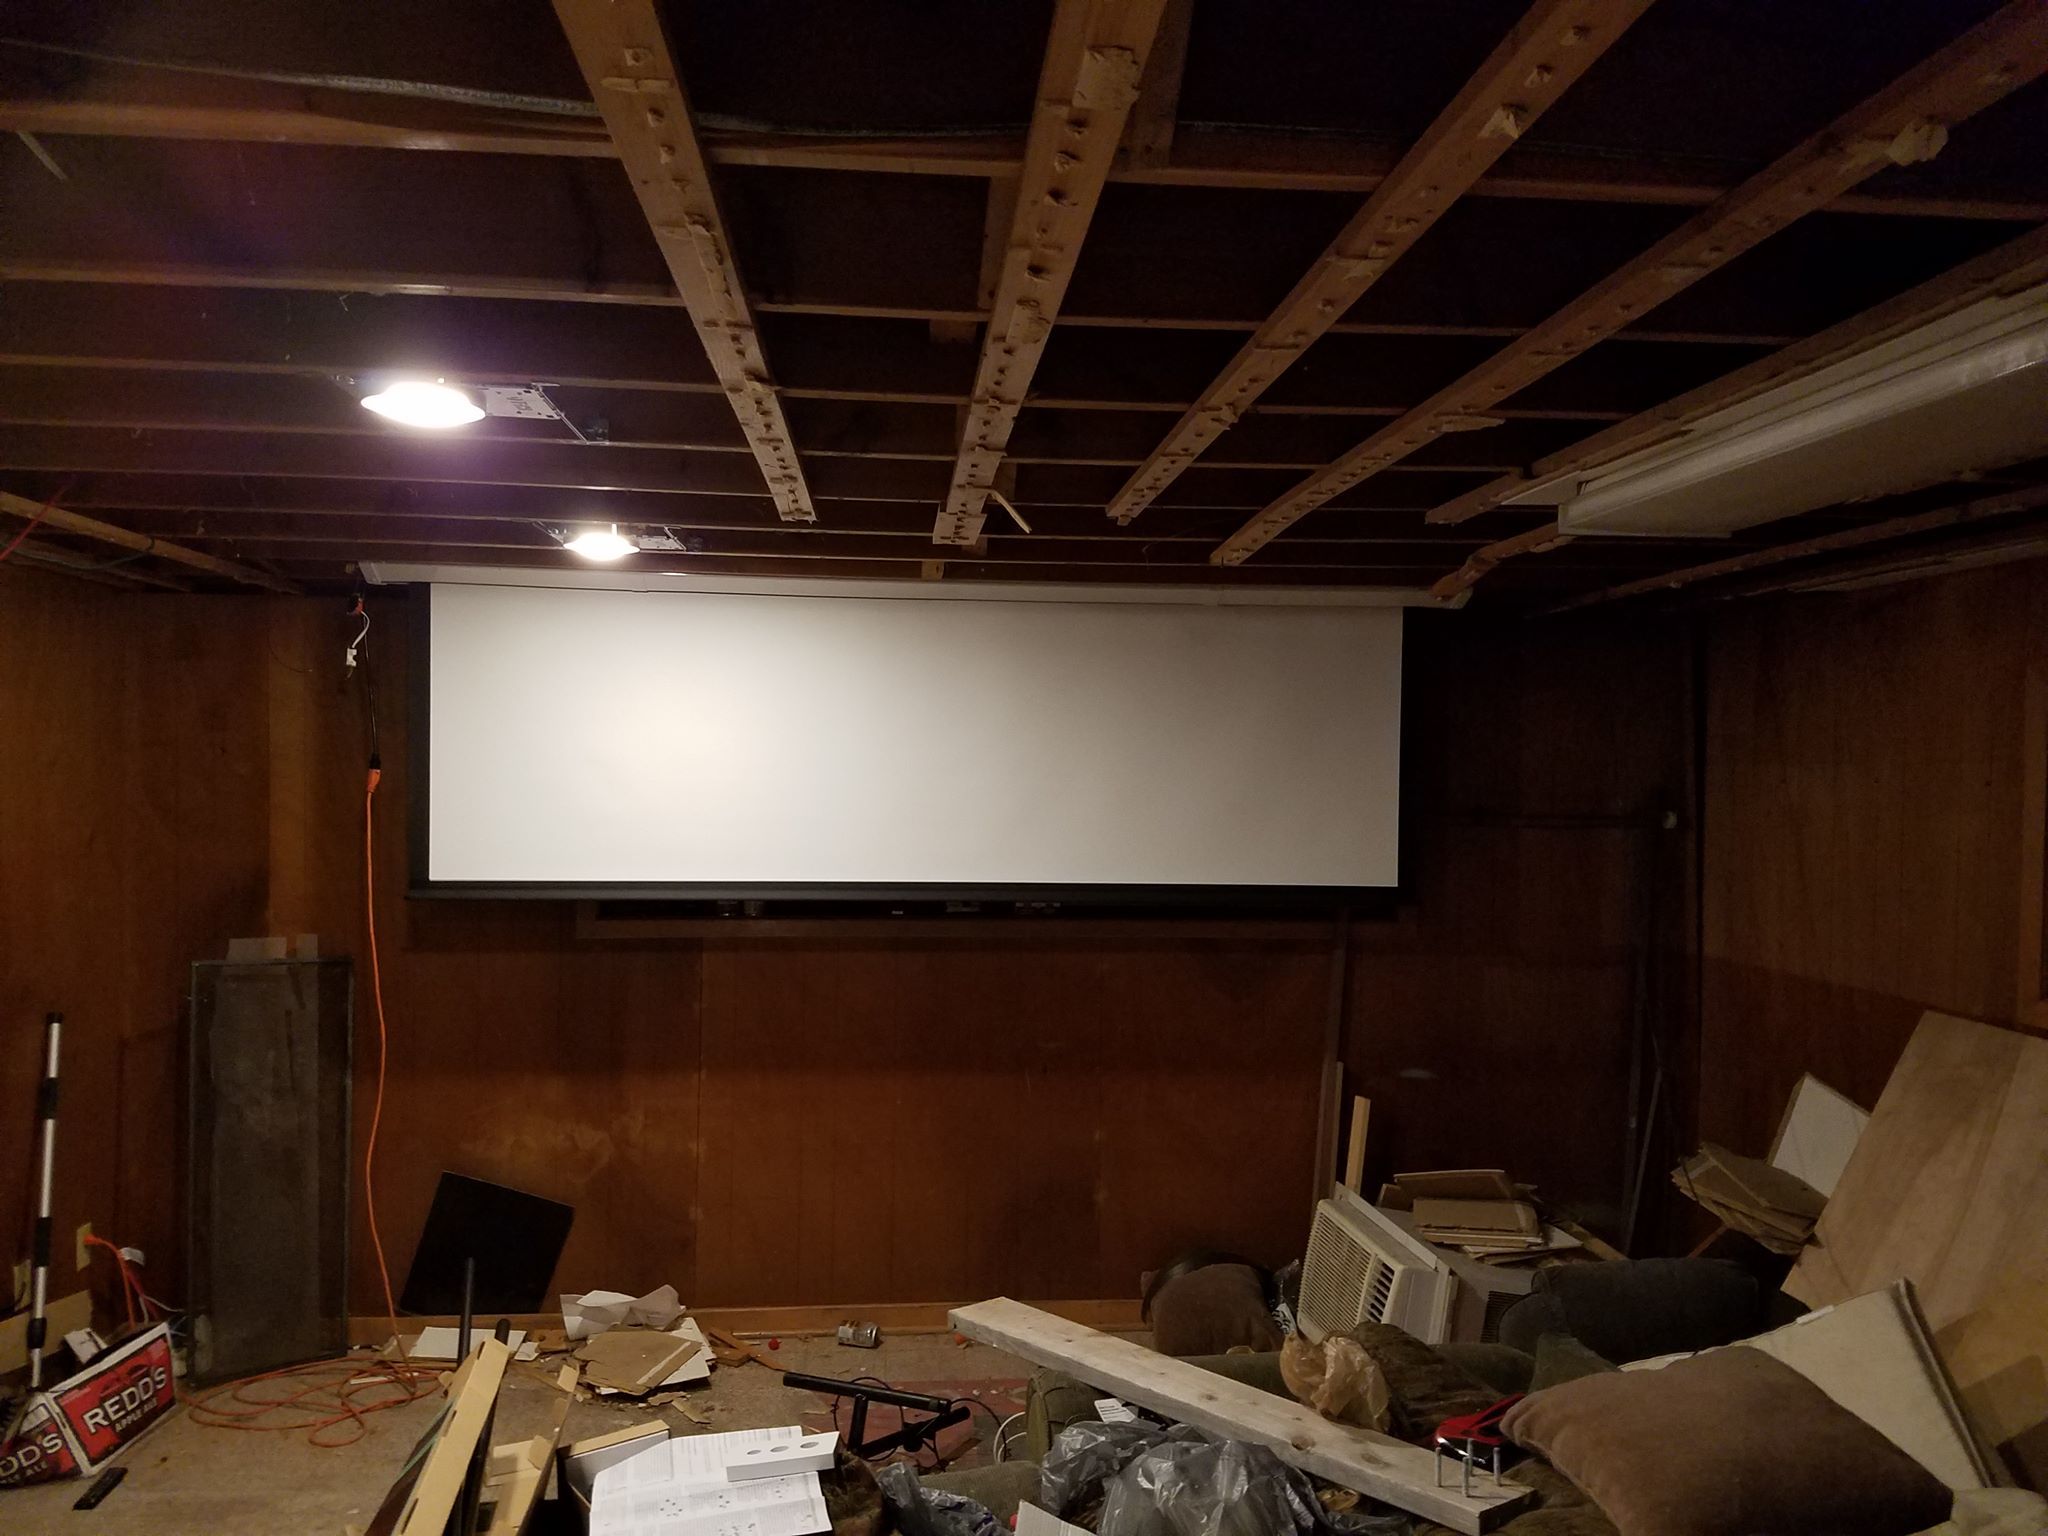
Recently, I picked up a 129" projection screen along with a business grade DLP projector capable of pumping out 4500 lumens at the high setting for a song. The screen is a motorized unit with low voltage switching control support 5-12v input to the control unit to engage the screen control. This is what led to the entire project finally coming to fruition.

The Build - Electrical

The Church Basement, as we called it, featured staple up ceiling tiles on furring strips nailed to the bottom of the joists.

I ripped the entire ceiling out over a period of several weeks, working intermittently.

Cat6 Ethernet was run throughout the walls between the main level and basement, with plans to run cables vertically through the main level and into the attic so that I could run it to the bedrooms. This is the only way I can run Ethernet to these rooms without ripping plaster from the walls in the process.

The cabling all runs into the mechanical room which is also located in the basement. I acquired a wall mount two-post swingout rack for free, so I mounted that in the mechanical room behind where the door swings in. The Cat6 runs in just above this, and then drops down into the rack into two 24 port keystone patch panels. Some of these Cat6 runs are to the projector location for HDMI over Ethernet, Ethernet for the port on the projector, and Serial over Ethernet so that I can tie a Raspberry Pi into the serial port and issue commands remotely. More about this later.

Some of the other runs (eight in total) run to the location where the television will be. Four are for HDMI over Ethernet. One of these will be for the video to the television, the other will be for connecting a game console back into the receiver. Two are Ethernet for the telvision and the game console, one is for audio over Ethernet for the Echo Dot I have in the basement, and one is a spare (for now).

Finally, all of my in-wall speaker wire runs drop down behind this rack, so that my receiver will connect to everything using short banana plug patch cables I built using 12 gauge OFC speaker wire.

During the demo stage, I ran into some electrical wiring issues that a previous owner had “fixed”. Surprisingly the house didn’t burn down when they used 24 gauge thermostat wiring to run power to two four foot length flourescent tube fixtures, though the copper had been hot enough to have deformed and even scorched the insulation.

I installed a 20 amp circuit breaker in the electrical panel and routed 12-2 wiring up through the joists and into position on one end of the room for installing the projection screen, and then continued the circuit over to the opposite end where the projector would be located.

I’ve also routed wiring down the wall to an outlet located behind where the projection screen is mounted, so that the Samsung television can be put in place. The screen will lower in front of the television.

We’ll be able to switch between the television and the projector on a whim, as the output from the receiver is connected to a 4k capable HDMI splitter.

The Build - Lighting

Removing the fluorescent lights and the dated three globe fixtures, I wired in eight recessed fixtures rated for insulation contact, and then repurposed a circuit that went to a light directly over the hideous orange bar. This light was removed and the circuit was rerouted to a recessed wall mount LED stair light to illuminate the stairs leading into the basement. The switch for this circuit was replaced with a GE Z-Wave switch.

The recessed lights used the same circuit that originally fed the fluorescent fixtures, so I installed a Z-Wave dimmer for these, and then installed LED BR30 bulbs. I installed a second Z-Wave switch which controls an outlet located in the joists above the switches, and a 12v LED power brick. This brick will run the 1 Watt recessed LED lights around the perimeter of the room, once I get them installed. I also hung the screen at this time.

The Build - Structure

My plan for the ceiling included a two level design. I needed the joists to be accessible on either side of the room so that I could run additional ethernet or work on the baseboard heater plumbing lines as needed, so the outer perimeter would have to be a suspended ceiling design, with the center being drywall direct against the joists.

I started by insulating the entire ceiling with Roxul sound insulation, and then using my Kreg jig, I ran 1x4 white pine boards in a ring spaced two feet from the wall. I pocket screwed these boards up on edge, which would give about four inches of drop from the drywall to the lower section of the ceiling. This would also allow me to install RGBWW LED Strips in aluminum channel with diffusers up and around the inner perimeter to provide colored lighting accents in the new living area. These will be controlled by SmartThings when all is said and done.

After the boards were up, I hung drywall in the entire center area, and then installed an identical ring of 1x4 white pine around the outer wall.


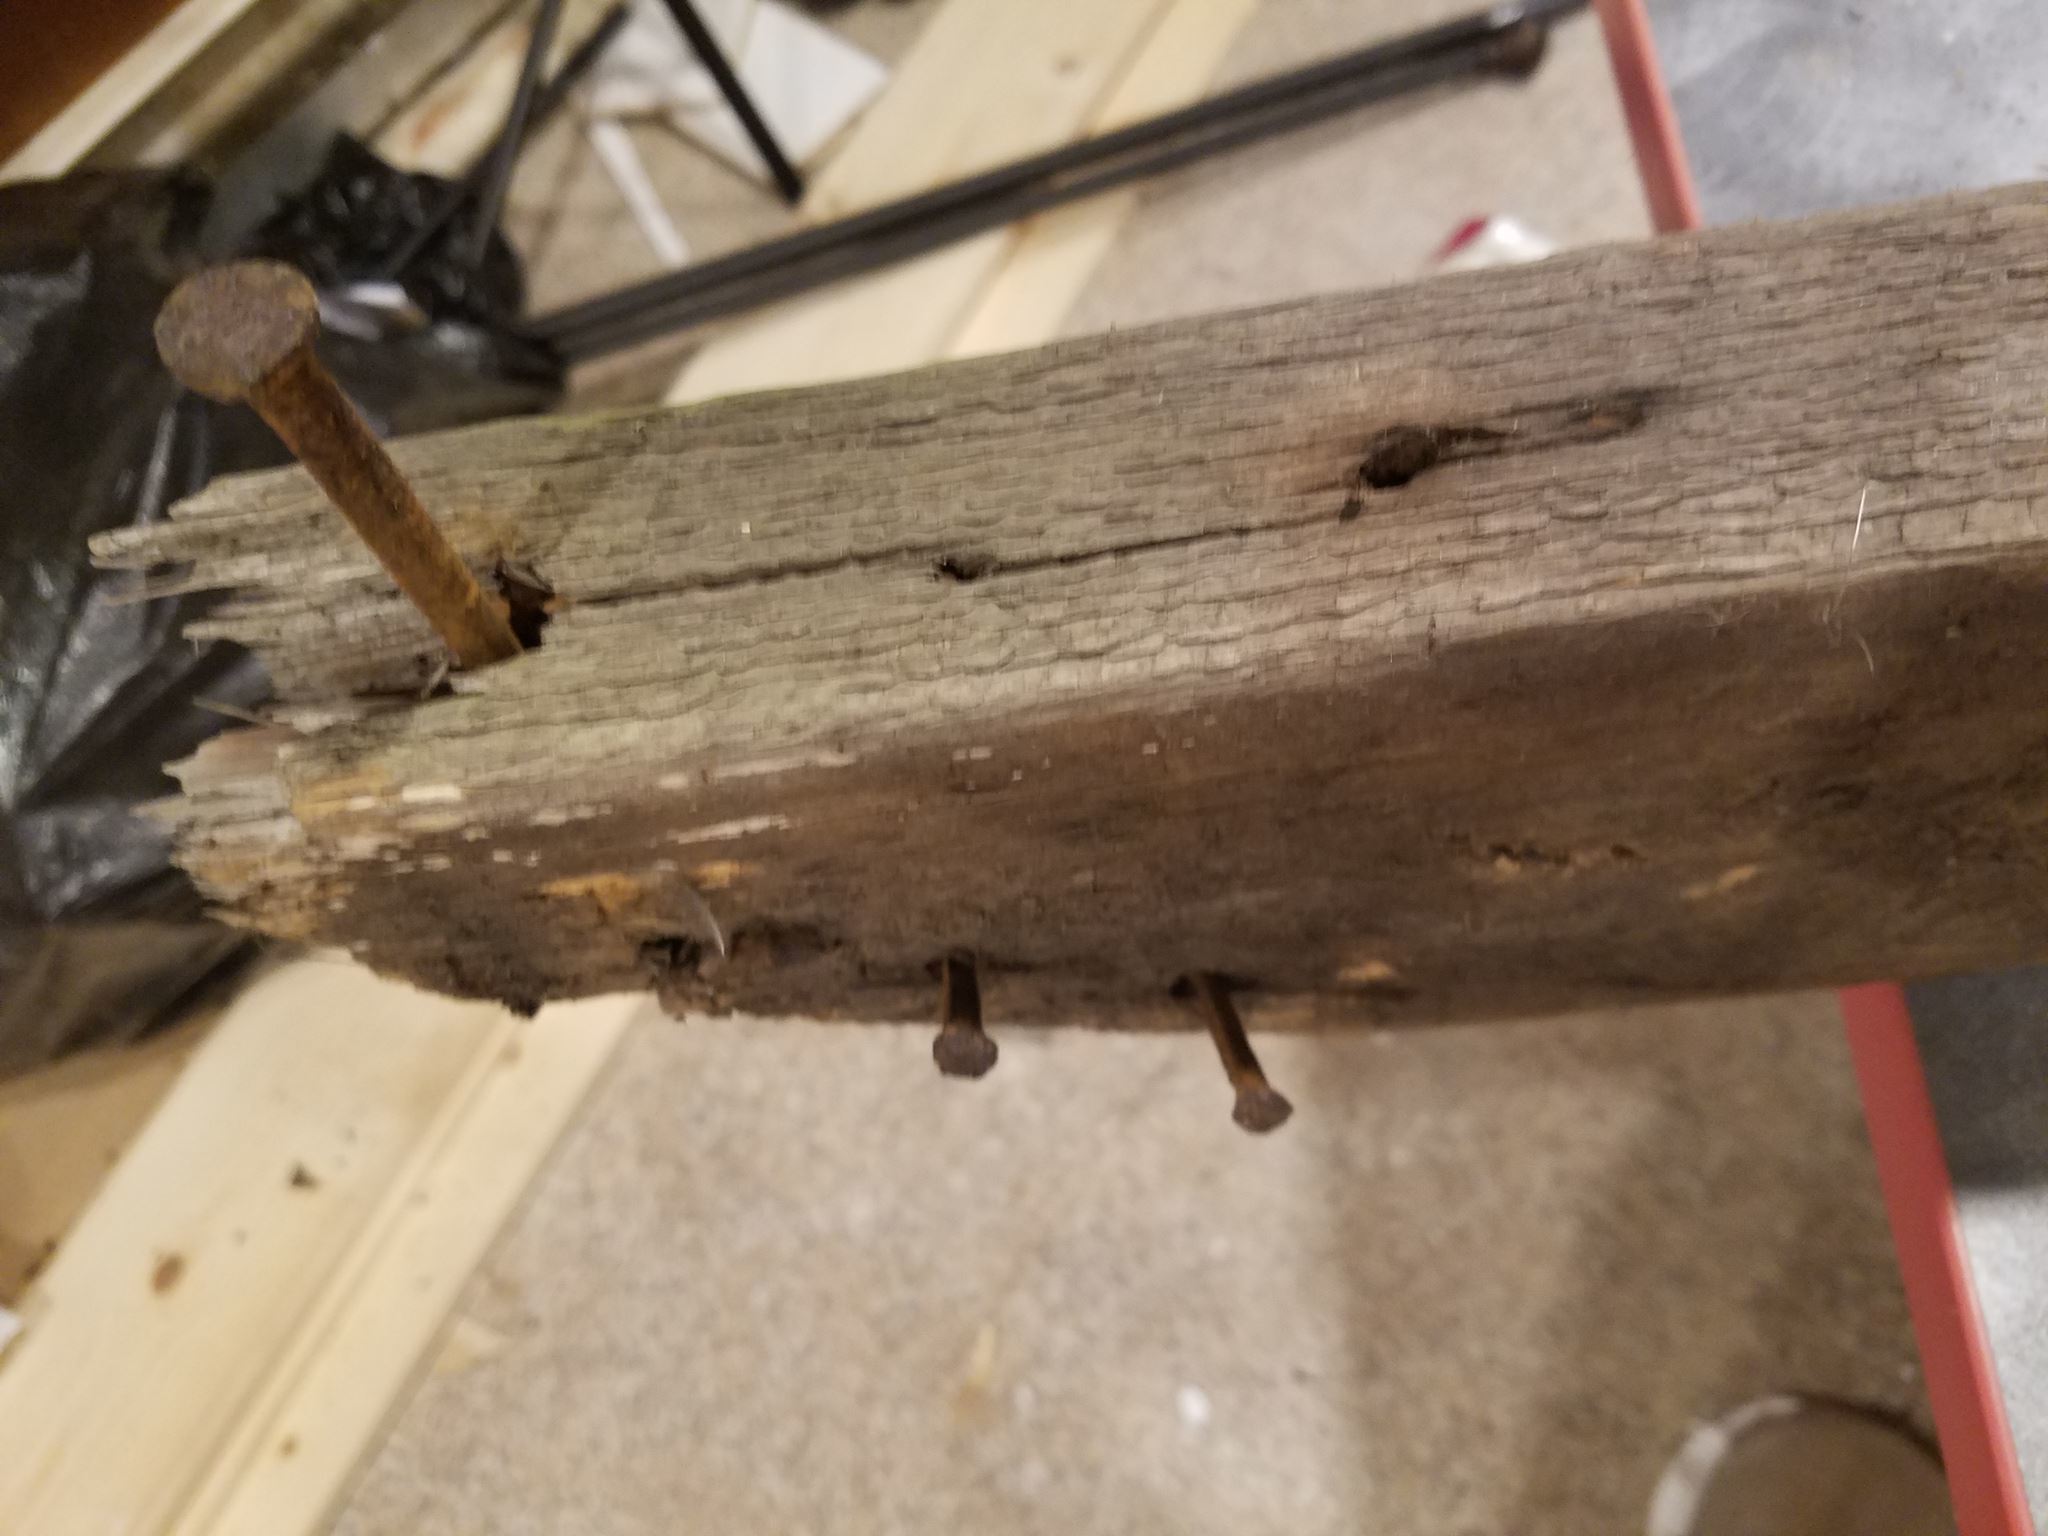
To support a suspended ceiling, I planned to attach trim underneath both rings of boards so that I could lift panels up and into place. The trim would consist of reclaimed barn wood from a barn that was built in the 1870’s that I received via the barter system from a friend who works with the stuff for a living. It had a couple dozen hand-forged square nails in the boards.

I spent nearly nine hours removing visible nails and then ripping these boards down to size. What a pain in the backside, but the work was completely worth it.


The Control System

SmartThings controls all of the lighting in the room directly, and integrates with the Harmony Home Hub to control the receiver, HTPC and Projector. The Hub is located in the mechanical room across from the equipment rack and can fire directly at the receiver and the HTPC which are on shelves in the rack.

The audio connections are in a low voltage dual gang box behind the rack, and the HDMI over Ethernet is located in the patch panel in the rack.

A friend of mine is building a Pi API for my projector (I’ll be testing it this evening) which will eventually allow SmartThings to lower and raise the screen, control the projector power, query status, and change settings using the Pi as a Web to Serial bridge. Once this is tested and any bugs worked out, we’ll also be able to build a device handler. That’s a short ways away right now. Currently, the Harmony remote is what turns the projector on and off when the activity starts and ends. Alexa is integrated with this, so both voice commands and button pushes work to activate.
I can switch between the television and projector by simply changing the activity. They both utilize the same settings for the receiver and HTPC, but one uses the television and the other uses the projector.

The HTPC uses the CinemaVision addon and controls the lighting in the theater for various stages of the cinema experience using the Kodi Callback Endpoint SmartApp. The lights dim down at various points before the movie starts and eventually shut off. When the RGBWW strip is installed, I’ll have these mitigate the darkness a bit by turning a very dim red.
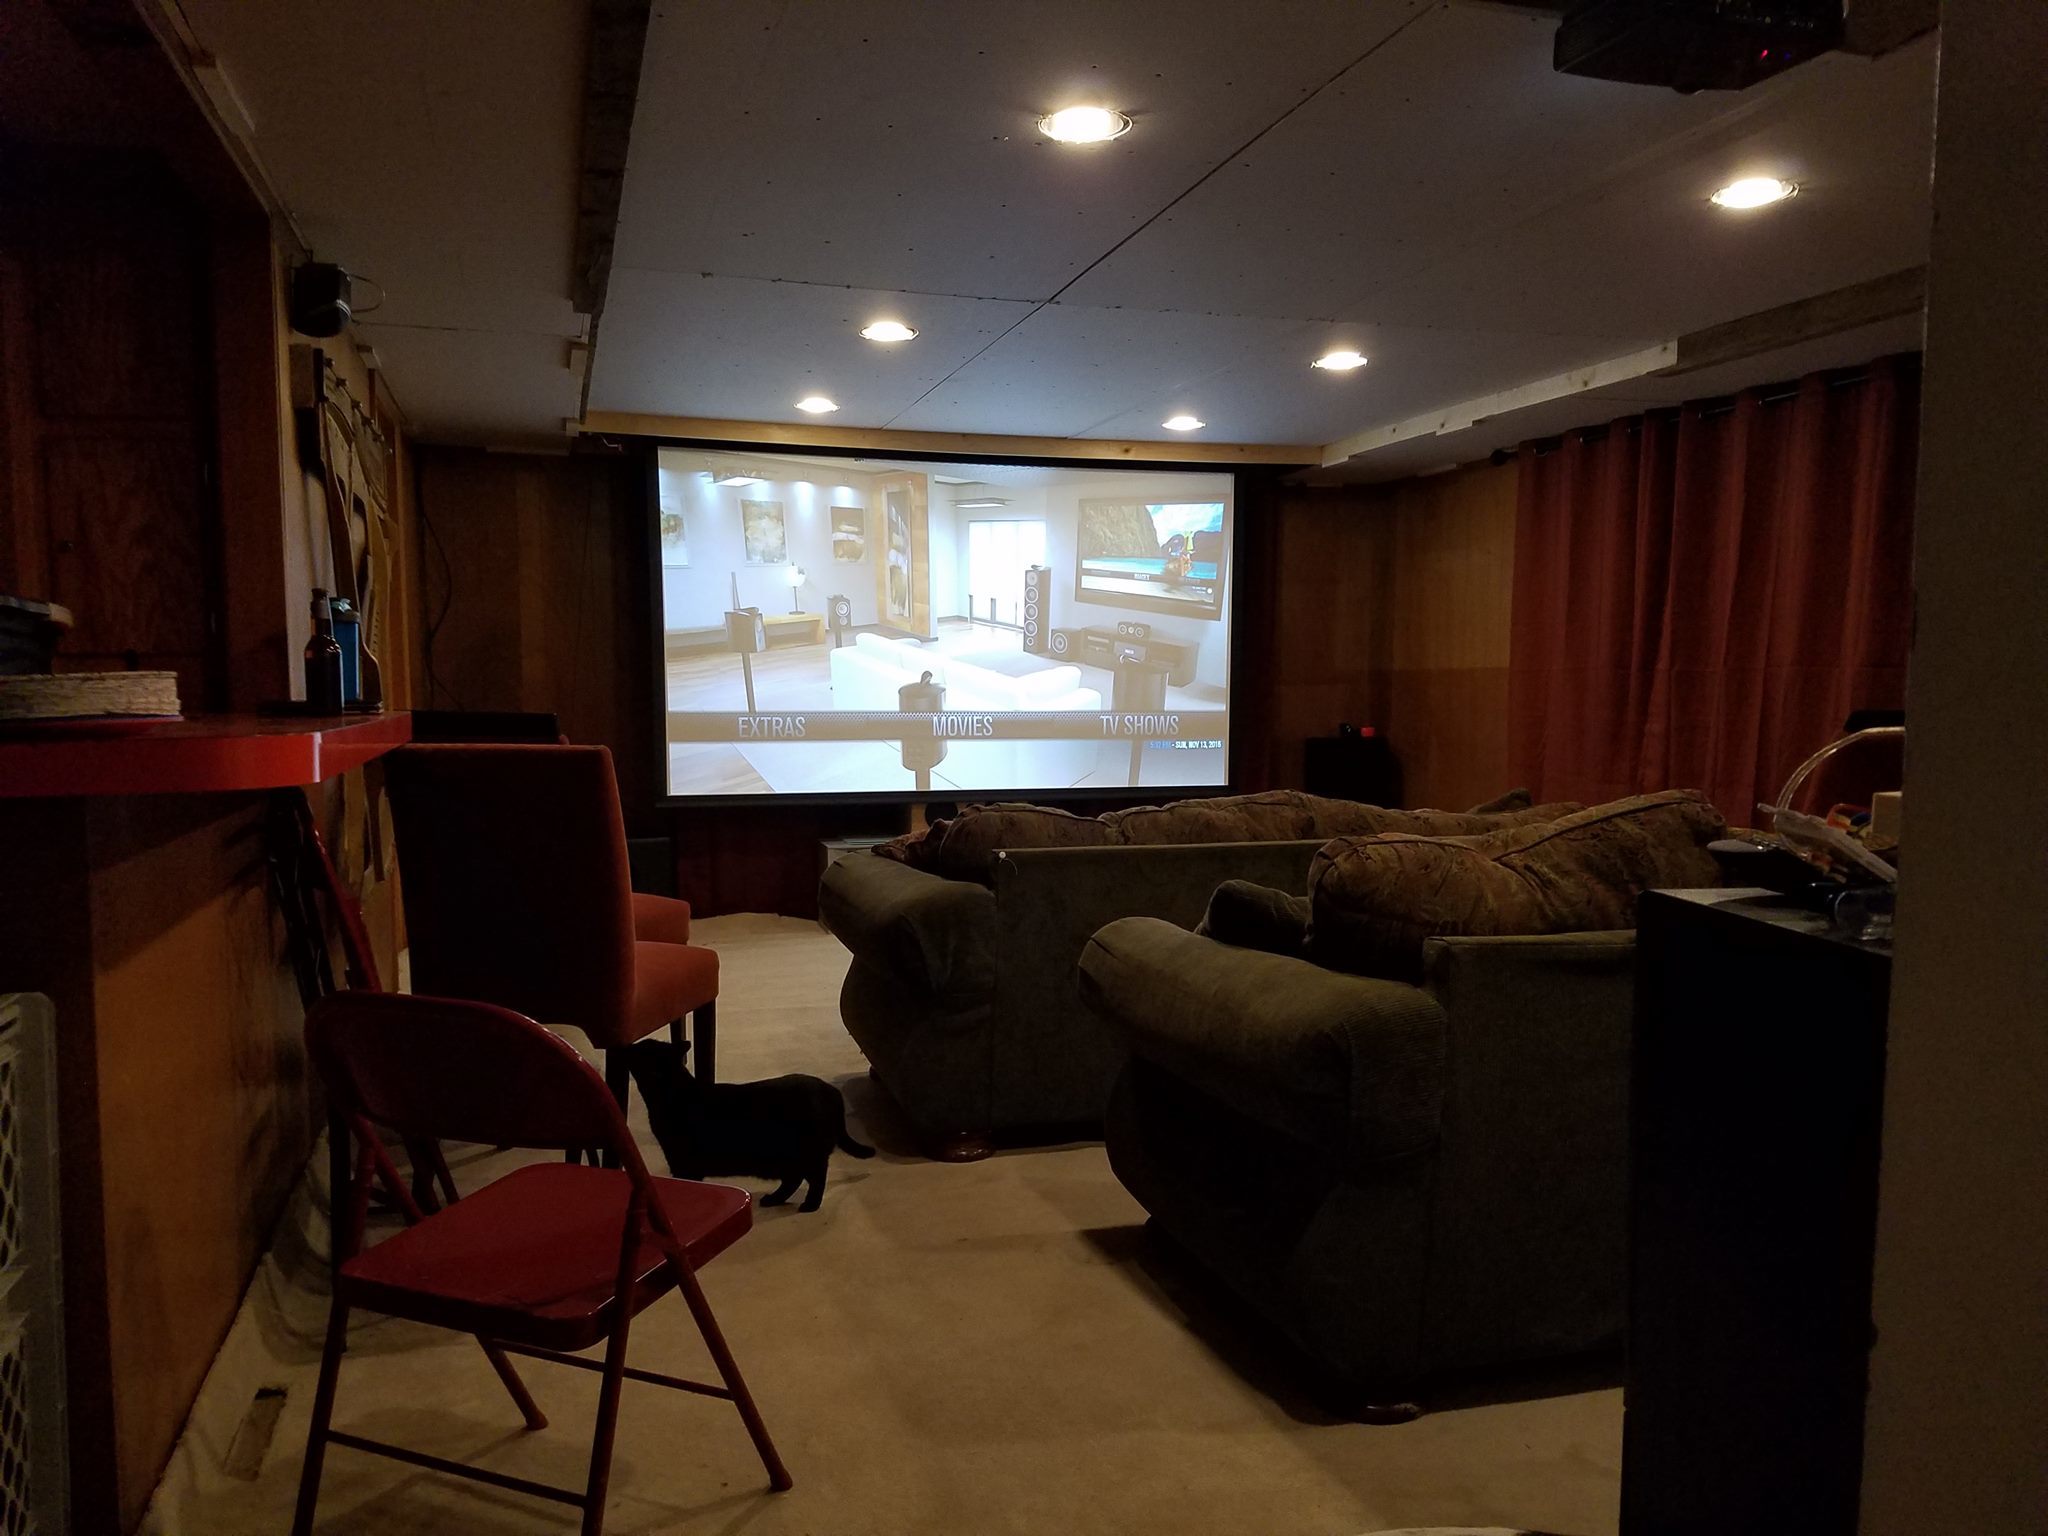
The Bottom Line

I’m not finished yet, but I’ll let this picture do all of the talking.

I just have trim to install, and I need to replace the paneling on the walls with drywall. I’ve already taken this into account with my drop ceiling design, so I’m able to make these changes at any time down the road.

13 Likes

We put the home theater to the ultimate test last night by inviting friends over for the premiere of The Grand Tour on Amazon Prime.
Streaming in 5.1 at 1080p worked beautifully on the big screen, and the automation went off flawlessly.

When the screen lowered, the lights in the room dimmed down from full to about 40%. The LEDs in the recessed fixtures only seem to show a noticeable difference between levels below about 60%, so anything from 60 to 100% is pretty much identical.

I also added a Hue LED strip behind the Piano sound board I have mounted on the wall, and it worked wonderfully as an accent light while watching the show. It is now tied in so that it comes on and turns red whenever the main lights drop below about 30% of full brightness when the house is in “Movie” mode.

We finished the night out with some classic Mel Brooks and Blazing Saddles, and the light automation worked amazing here as well with the lights dimming in stages throughout the CinemaVision program.


3 Likes

I really envy you, this is something I always wanted to do. I even have six refurbished theater chairs stored in my garage. But alas, living in So California makes it pricey to have such space.

Thanks for posting up your build details :slight_smile: I’m just staring a very similar build, but in a smaller space, about 11x18ft with a low ceiling.

How are you feeling about the screen over panel design? I’m contemplating eliminating the flat panel screen and using only the 125" acoustically transparent screen I have sourced. It’s a 12V triggered unit which will be automated via the projector 12v output…controlled by a harmony Hub and ST. I had not heard of the cinema vision plugin but will be researching that after reading this.

I’m using a few Nexus streaming units loaded with Kodi, but will likely revert back to a mini-itx htpc for the theater.

Any updates, particularly things you’d do differently (or really like!) would be great to hear/see.

I haven’t yet finished my cabling to get the television fully operational. We got sidetracked by the HTC Vive my wife impulse bought about two weeks ago… We couldn’t afford it, but she’s in love with it. I need to rip down the wall paneling to finish the wiring for the television (both power and Ethernet), but that’s going to be later in the spring. To be honest, we haven’t done much with it now that it’s livable. I do have to do some things this week as we are hosting a VR/Superbowl party on Sunday… Any Minnesotan ST users are welcome. :wink:

The theater space is perfect for VR, allowing up to a 11x15 space for impact free gaming, though I tend to bump into the ceiling when defending myself from aerial attack drones in Raw Data.

The remainder of my Cat6 Keystones will be in this week and I’ll be able to get the television up and running as the focal point for non-MOVIE activities that involve media. The projection screen lowers down in front of it leaving about four inches between the television and the back of the screen which is non-transparent, acoustically speaking. All of my video runs are HDMI over Ethernet, with some creative splitters. All Ethernet jacks can be used for normal Ethernet data from a switch in the rack, or can be used for other purposes depending on which dongles I add to either end.

We’re happy with the idea of the television being in the basement. It lowers use of the projector bulb. We haven’t put this to test yet… So we’ll see what happens this week. The TV will be our primary VR video display for when we’re gaming as a family, so that others can see what’s happening.

With the VR setup, I moved my PC down into the basement, setting it between the rear surrounds for now. Eventually it will move into the kitchenette area as we remodel that (next year sometime) to provide a more efficient use of the space. It will serve double duty as the entertainment snack bar and home resource center for tools, work surfaces, etc.

I did source a wall switch control for the screen, allowing me to manually lower/raise the screen with a press of the Decora sized switch plate. This wall switch also has buttons on the backside to allow fine tuning of the end positions of the screen, both up and down. I haven’t installed it yet, but it’s low voltage and uses a standard 4 pin phone cable to link to the control module in the screen. The projector can still cycle it on and off, but I can also do that with the switch now.

Things we really like: It’s comfortable. It’s nice to have the room to use and we find ourselves spending a lot of time down there lately. My main PC being down there also allows us to spend time together in the room without necessarily having to focus on each other. We all need “me” time, but sometimes it’s nice to just share a space with someone, even if you are doing your own thing. Originally it was isolated in our office room, and that room quickly became a catch all. If we didn’t know where to put something, it ended up in there… It’s the shame of our home and we don’t allow anyone to see it. LOL

Things we’d do differently: Spend less money that we don’t have. This project was expensive… It isn’t done yet, there’s more work that we have to do that we can’t really afford… Counting everything up, we probably have 1700 into it, smart features, lights, drywall, etc. I already owned the theater stuff with the exception of the screen and control switch and projector, and I got those for sub-200 (YAY WORK CONNECTIONS!). Other than that, we LOVE the space, even in its unfinished state.

Some pictures are below.

My gaming system as I got it set up… Rear wall of the theater… Still has “exploratory” holes in the wall when we originally mounted the television on this wall.

A view of the theater are with most things crammed to the side and some construction debris. The coffee table/end table set I picked up on the local Facebook page for twenty bucks. Gives our theater a nice “80’s Garage Sale” feel.

My wife playing some VR games when I had set the gaming PC up and plugged directly into the television.

Some good friends playing VR on Sunday night… Ritchie’s Plank Experience is a fun game, and I set up a strip of laminate to act as the plank for her to walk on… She’s deathly afraid of heights and couldn’t complete the challenge. Her husband is trying to help her walk out. We were using the projector for this with the screen so that we could see what she was looking at.

1 Like

Thanks for the information! What are you liking for HDMI over CAT6? Are they powered or passive? Not sure if I should run HDMI cables or CAT6.

1 Like

I’m using passive for the run from the receiver to the Projector. These use dual cables, and I’ve had absolutely no issues with them.
For the gaming PC, I have my central display set up as follows:
Video from PC to HDMI Splitter (works flawlessly). HDMI Splitter output 1 to central display. Output 2 to active HDMI over Ethernet adapter (single cable run) to the receiver in the closet.

I’m having issues with the active unit. It requires power on both ends and it randomly cuts out on me and gets hot. Sometimes the video signal will renegotiate and I’ll get 1080i instead of 1080p, or it will start a video scrolling pattern on the projector… I’ll be replacing this active unit with more of the passive dongles.

We have no issues with the passive units. No video or audio delay problems, and everything runs great for us.

With everything running through the receiver, this is what I plan to use, and I’m going to seek a refund on the active unit.

To give you an idea of how many of these I have:
Video from PC to Receiver
Video from Receiver to TV
Video from Receiver to Projector
Video from behind TV to Receiver (for adding a game console whenever the mood strikes)

I’d run Ethernet and use those. I have four sets of them, and the two sets I’m using haven’t caused me any issues.

This is great information. Again, thanks for sharing all of the detail…it really helps. Knowing that each unit requires two cables really helps with wiring…will definitely run more cat6 than originally planned, along with HDMI cables. I tested one HDMI cable at 40ft or so and it worked fine…although the HDMI input and output need to be correctly oriented. Should probably run some fiber while we’re at it…

Have been having some issues with the HDMI over Ethernet devices, and started doing some tracking of the issue.

I’d get HDMI drop outs, static in the image, “negative” flashes, where the color would look like a negative.

I tracked it all back to the Denon AVR-790.
Doing some research into this, it appears that the AVR-790 had a flaw with the HDMI processor system. Sometimes a factory firmware flash to the unit would resolve this, but it had to be done by Denon and the cost is 2-300. Sometimes, the board itself was the culprit inside of the receiver, and would need to be replaced. To the tune of 3-400 dollars.

It turns out, I’m one of the three or four people in the world who have never encountered this issue (not really that low a number, but gives you an example of how prolific the problem was). The receiver is 8 years old and has served me well, but I can relegate it to whole home audio duties and use the Harmony integration with SmartThings to manage the unit without relying on video…

The wife granted permission to purchase a new receiver without giving me a budget, but expecting the cost to be what I paid for this AVR-790 when I purchased it as a new in box clearance item in 2009 for 650…

So, of course, I went way over that and racked up yet more debt by picking up the Marantz SR5011 unit (LOVE it) and slapping that in the rack.

Most of the HDMI issues went away immediately. The new unit supports dual simultaneous HDMI output, so rather than run a splitter on the output side to hit both television and projector, I just run the video direct.

I still get “negative” flashes on the television, and the quality via projector and TV is a bit wonky when using the HTPC source, but I suspect that is more an issue with the HDMI cable from the PC to the receiver, as I do not get issues when running from my PC across the room over a single Cat6 Active HDMI/Ethernet adapter.

Now that I have a network enabled receiver I’m working on integrating it within SmartThings and Alexa so that I can issue voice commands and automate announcements throughout the house.

I officially have too much time on my hands…

As of yesterday my projector and projection screen are now tied into SmartThings using the URI switch handler. I can even control it as part of a group or scene, and Alexa is able to turn the movie theater experience on and off.

A good friend of mine spent some time finishing up the first part of an HTTP to Serial API bridge for Raspberry Pi to allow serial control of devices such as televisions/projectors/audio distribution systems and more. Basically, if it can handle a serial command, you can pass it to the device via a HTTP GET call. You can even query the device status (if the device supports it) to see what it’s current status is.

Until a generic Device Handler can be built within SmartThings, the URI switch handler is providing a one-way power control of the projector, which in turn triggers the screen to lower from the ceiling.

Ideally, in the end, I’d like to get a Device Handler that supports polling for status whenever a button is pressed or every 60 seconds or so to see where the projector status is at. Additionally, since any command can be passed by serial, including remote button presses, I’d like the DTH to be able to control every aspect of the system. A generic one that allows you to define what functions you want on the display within the SmartThings app would be great, but that’s down the road…

My plan is to automate the screen (12v trigger) from the projector, and use a Harmony hub to manage the BenQ projector. Harmony does a decent job allowing you to add ST lights and plugs to the remote, so the plan is to run everything from the Harmony Elite remote. High wife acceptance that way as our upstairs AV room uses the same setup. We’ll see how that works.

That’s a pretty solid plan, and the hub should work great for that.

We ran into some unexpected issues with our arrangement recently, and it has led to some frustration.

The layout of our build necessarily shoves the theater’s audio equipment into the furnace room and out of sight, so the harmony hub mounts in there for line of sight to the front of the HTPC and Receiver. This prevents it from also working for the projector itself, so I’ve had to point the remote at the projector to get it to turn on… A bit of a frustrating experience, but not something I consider a game changer for us. This was expected when we built.

What we did not expect was that the HTC Vive base station units throw out an infrared pattern that seems to prevent the projector from detecting the remote when we point it squarely at the projector. The only way the remote now turns the projector on and off is when I reach up and cup my hand around the IR sensor on the projector. I have to do this on either the front or back sensor. They both pick up the IR flood.

With the Raspberry Pi and the HTTP to Serial bridge (Thanks Dave!), I’m able to turn the projector on and off easily, and now I’m working to tie the projector into the Harmony system using the Harmony’s ability to make HTTP calls to items.