After reading several posts and watching videos, I still can’t figure out how my home is wired and how to get this 3 way switch to work. I’m strongly hoping that I do not need to open up the recessed lights. If anyone with a better understanding could help, I’d greatly appreciate it. Here is the situation:
Overall: One Master, One Add On, Two Lights
Master Wires:
2 White Wire Bundle, not used in the dumb master installation. Identified as Neutral.
1 Red Wire, used in the dumb master installation. In testing, when the Black Line wire was connected to the Red wire, a current was sent to the Red wire on the Add On switch. Identified as Traveler.
3 Black Wires, all used in the dumb master installation. 2 were attached to screw A and 1 to screw B. Of the two attached to screw A, one is hot (Identified as Line). The other, I’m assuming is the load as it does not seem to pass any current to the Add On switch (Assuming Load). In testing, when the Line was connected to the remaining black wire (screw B) it sends a current to the black wire on the Add On switch (Assuming second Traveler?).
Add On Wires:
1 White Wire, used in the dumb add-on installation. Assuming this Neutral but unsure. In testing, when the Line on the master was connected to the neutral at the master, it still did not pass any current to this white wire.
1 Red Wire, used in the dumb add-on installation. Identified as Traveler.
1 Black Wire, used in the dumb add-on installation. Second Traveler?
When connecting the smart master and add-on, I can get the switches to communicate with each other but cannot get the lights to turn on/off. I’ve had the same result when using the mystery black wire (that I’m assuming to be the traveler) and when capping it off and omitting it from the install. I imagine the problem is one of three things:
Something to do with the White wire on the Add-On.
Something to do with the mystery Black wire on either side
I’ve fried a switch through some improper setup. Since the blue LED and communication between the two switches works, I can’t tell and I’m unsure of how to test to see if the switch is dead (short of installing it somewhere else).
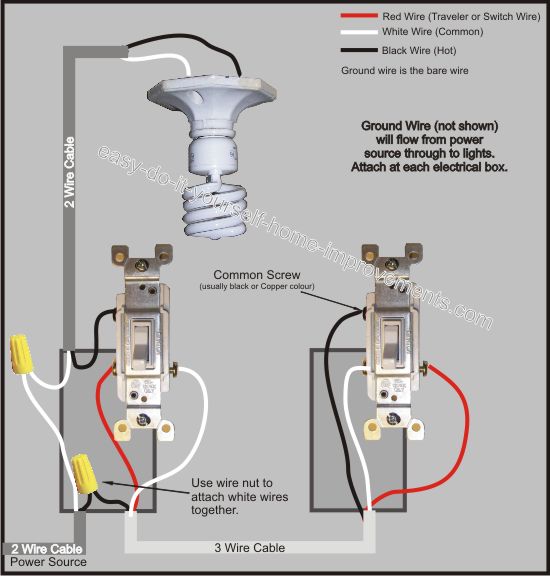
A dumb 3-way uses one wire (may be black) to send line power from switch A to switch B, and switches between the other two (may be white and red) to send power back to switch A. So that wire was not neutral in the original setup, but it will be when you’re done. It sounds like this is what you’re starting with - if not, see if you can identify it in another diagram here and we’ll be able to help you more easily.
In your smart 3-way, you aren’t routing power through the switch, just communications, which only takes two wires.
The wiring in the add-on box is easy: white to neutral, red to traveler, cap the unused black wire.
The two wires on screw A is confusing me - were they both on the same screw or just on the same side / same color screw? I’m going to proceed assuming that you match the image, but if not then we would need to straighten that out first…
At the master box, you can leave the wires from the add-on switch out of it for now and just wire the master: line to line, load to load, neutral jumper to existing neutral bundle. Now if you turn power back on you should have full control of the lights. Once that’s good, bring in the add-on - white to neutral, red to traveler, cap the black wire. Now your add-on behavior should match the master switch.
I had a devil of a time figuring mine out as well. I can’t recall all the details in mine, but here’s what I recall:
it took some work to figure out which old switch was the master for sure, so double check that you’ve identified that right
When I did get it right, I had to join 2 white wires in the add-on box independent of the switch. This is what I was missing during the prior struggle, thus part of the circuit for the white line didn’t have power until I did that.
Watch a video or 3 on how to wire a 3-way switch to really soak the concepts into your brain. COmpare that to what you had in the original dumb switches. Then, see how that relates to what the smart switch wants.
If you have an Ohm meter, you might be able to test your “fried” switch by taking the it(disconnected from everything) and testing the poles.
Worst case, consider getting an electrician. Hop on Nextdoor.com and ask for technical advice and somebody in your neighborhood will chime in. For a beer, you could have this solved, or at least get the good neighbor rate.
@MarkTr First off, thank you for your reply. One of the main issues is that I can’t find an image to help me identify the extra black wire. Your questions had me take a deeper look into the gang box, however. Here are some additional details, along with one correction.
Earlier I mentioned that there was a bundle of 2 white wires in the back of the master gang box. This bundle actually consists of 3 white wires. In the back of the box, 4 sets of wires are going into/from the wall. All of these sets have white, black, and a ground wire. The white wire from 3 of these sets is tied together into a wire nut (neutral). The 4th set, is unique in that it contains a red wire and the white wire from this set is tied into an entirely different wire nut along with a black wire. I’m beginning to suspect that this is where I need to make some sort of change. Here’s an image of the setup that may help explain this setup in the master gang box better. Also, to answer your question, the Line wire and the extra black wire went to the same screw (black).
From your note, it sounded like I can test the Master switch standalone (without installing the add-on). I hadn’t realized this was an option.
As a test, I just connected the Line wire to the wire nut with the white and black wires. The lights cut on, and as expected, the white wire on the add-on side had a current. Thought this might be another clue.
I had similar wiring in my house. Here is how I wired them.
Balck wire connected to white wire should be the load. So connected it to load terminal on master switch.
Line connected to line terminal on master. And extra black wire in ur case I think is extending power to another light or switch. So connect this extra black wire to line terminal along with line wire.
Red traveler wire connected to traveler terminal on master.
White wire that was previously connected to black wire now connected to neutral bundle in the master gang box.
Black traveler second traveller capped off in the master gang box.
Add-on
Red traveler wire connected to traveller terminal
And white neutral connected to neutral terminal.
Black wire capped off.
This should work. Let me know if u have any questions.
All of that seems to make sense, the only part that I am still not clear on is “Connecting the extra black wire to extend power.” In the diagram I posted, there are two black wires that I’m unsure of functionality wise:
“Extra Black Wire” - This wire seems to tie back to the black wire on the add-on side (the one that may get capped). In the original setup, this was tied into the Line via the black screw.
“Load?” - This doesn’t appear to be the load (the capped off black wire seems turns the lights on and is likely the load, just as you’ve noted). Connecting the Line to this wire does absolutely nothing as far as I can tell, yet the wire was used in the initial setup. I have no idea what this is for or where it should go in the new setup. I will mention that I have two recessed lights that are controlled by this switch.
Edit.
What you marked as extra wire is the wire that needs to be capped off. which is the second traveler. You dont need it for this ge switches. Black wire connected to white wire is the load
Glad to hear you’ve gotten it working. You might want to check around and see if anything else nearby has mysteriously stopped working. It seems like you might have an extra set of wires coming into your box - you would expect line, load, and other switch, so the other wires could be a second load, if they’re both run back to the box, or they could be an outlet or other independent device. It wasn’t clear to me if you wound up disconnecting anything other than the black traveler wire…

 Great. Sorry for the confusion.