Hi guys.
This is a project I’ve wanted to do since the Raspberry Pi 3 with built-in WiFi came out. I just turned a couple of RPI3’s into home automation announcers. I thought I would post my experience here as it was time consuming in research but very easy to execute once the research was complete.
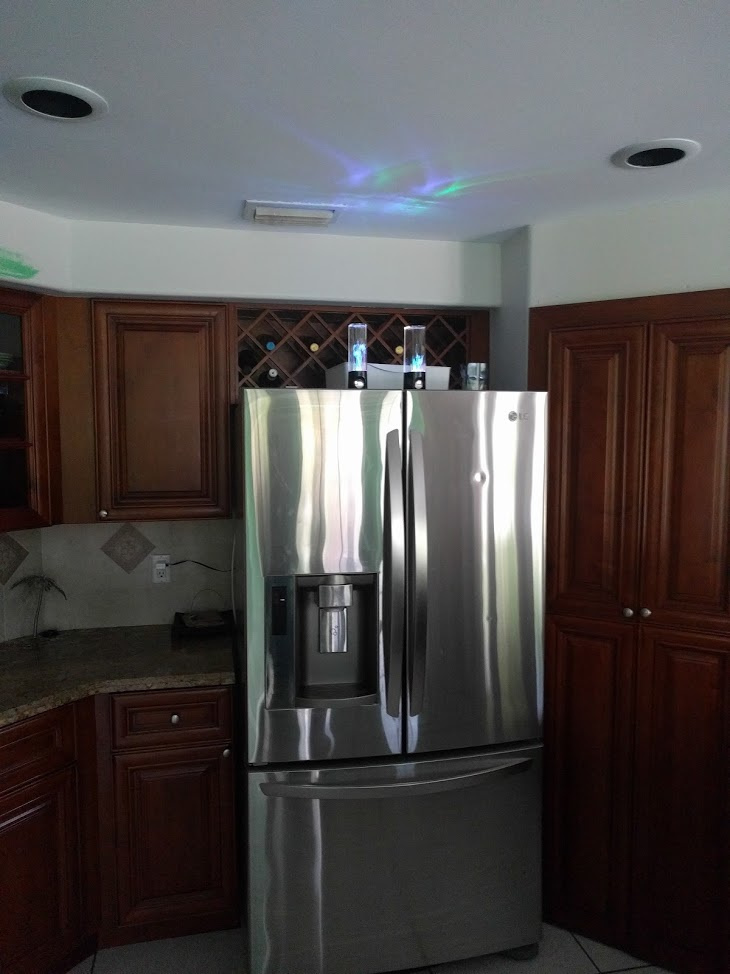
Here’s a picture of the final product. The raspberry pi is hidden behind the OnHub router, but it could be hidden behind the speakers themselves.

I took my notes in Microsoft OneNote but it doesn’t translate to the forums well, so you’ll see below there are code boxes where text should be. I dont want to go through and manually change everything here, so
You will need:
- Raspberry Pi 3 - $35 https://www.amazon.com/gp/product/B01CD5VC92/ref=oh_aui_detailpage_o03_s00?ie=UTF8&psc=1
- Speakers - $25 - https://www.amazon.com/gp/product/B00BZ7MALY/ref=oh_aui_detailpage_o03_s00?ie=UTF8&psc=1
- SDCard - Between $3 to $100, your choice. Boot times between 10 seconds to 30 seconds depending on speed of SDCard. Recommendation: https://www.amazon.com/Silicon-Power-MicroSDHC-Class10-SP016GBSTHBU1V20SP/dp/B00TDBLTWK/ref=sr_1_16?s=pc&ie=UTF8&qid=1474818660&sr=1-16&keywords=micro+sd+card
Installation:
-
Download Raspian Jessie Lite https://www.raspberrypi.org/downloads/raspbian/
-
Install Raspian Jessie Lite https://www.raspberrypi.org/documentation/installation/installing-images/README.md
-
Plug in speakers, network cable and Ethernet
-
At this point you can choose to either ssh into the raspberry pi or hook up a keyboard and HDMI monitor
If you choose to ssh:a. Use your router’s “DHCP Leases” to find the IP address of your newly installed Raspbery Pi
1) Consult your router documentation to find out more information
a) In my case it was 192.168.1.66
b. Execute “ssh pi@192.168.1.66”
1) Use password “raspberry”
If you choose to use a keyboard and monitora. Log in with username pi
b. Password is raspberry

Configuration:
1. Change your password
	a. Execute "passwd" and follow instructions.

2. Establish Wireless Network
	a. Execute "sudo nano /etc/network/interfaces"
		i. Remove all references to "wlan0"
		ii. Replace with
			auto wlan0
			allow-hotplug wlan0
			iface wlan0 inet dhcp
			    wpa-ssid "My Wifi Network"
			    wpa-psk "My Wifi Network Passsword"
		ii. press Ctrl-x, then "y" to exit and save.

	b. Execute "sudo service networking restart"
		i. If that doesnt work, try "sudo systemctl daemon-reload" followed by "sudo service networking restart"
	c. Verify your connection
		i. Execute "Ifconfig wlan0"
			1) Check wlan0 has an "inet addr"
			2) If wlan0 does not have an inet addr after 30 seconds you probably put in the wrong hotspot or password.

3. Establish Static IP via DHCP
	i. Log Into Router
	ii. Set up static DHCP according to the methods for the device
	iii. Reboot the router and the device to ensure the new changes take effect

4. ssh into the raspberry pi via wifi, from a linux computer or install an ssh client such as http://www.putty.org/
		i. ssh pi@192.168.1.252
		ii. Use your new password.

5. Configure pi
	a. Execute "sudo raspi-config"
		i. Expand Filesystem
		ii. Advanced>Audio>Force 3.5mm ('headphone') jack
		iii. Finish > no,  dont reboot now

6. Install VLC
	a. Execute "sudo apt update; sudo apt upgrade -y; sudo apt install -y vlc-nox"

7. Establish your command line and password
	a. Execute "vlc -I http --http-password=YOURPASSWORD --http-host=0.0.0.0 --http-port=8080"
	b. Visit your new website to verify it works, using the password you selected.
		i. in my case: http://192.168.1.252:8080


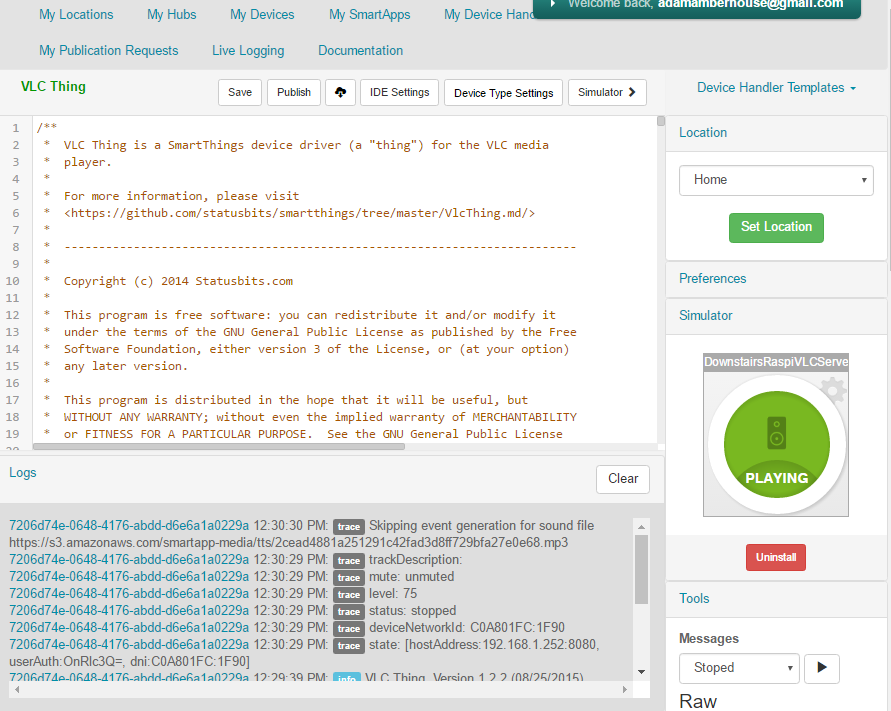
8. Set up SmartThings
	a. My Device Handlers>new
		i. From Code
		ii. Add VLCThing Device Type. See here for more https://community.smartthings.com/t/vlc-thing-a-poor-mans-sonos/5433/8
	b. IDE>Devices
	c. New Device
		i. Give it a name
		ii. Set the IP address as the address for now
		iii. Select VLCThing
		iv. Click create

		v. Preferences (edit)
			1) Enter the IP address.  Mine was 192.168.1.252
			2) Enter the port.  Mine was  8080
			3) Enter your password.  Mine was.... Just kidding, you're not getting my password.

	d. Test the device
		i. Device handlers
		ii. Select your device
		iii. Simulator
		iv. Set location
		v. Select the device
		vi. Install
		vii. Type something in Speech Synthesis
		viii. Click speak
9. Set volume
	a. ssh pi@192.168.1.252
	b. Execute "alsamixer"
		i. Press escape when volume is set
	c. Exeute "sudo alsactl store"

10. Set up VLC to start automatically on reboot
	a. ssh pi@192.168.1.252
	b. Exeucte "crontab -e"
		i. Press enter to select nano as the default editor for crontab
		ii. Go to the bottom of the list
		iii. Enter the @reboot command
			1) @reboot vlc -I http --http-password=YOURPASSWORD--http-host=0.0.0.0 --http-port=8080
	c. Execute "sudo reboot"

That’s all there is to it. If everything worked properly, you now have a $65 home announcement device.
I will now direct you to the BigTalker thread to set it up with events. [OBSOLETE 1.1.6 5/25/16] Big Talker - Talk when events occur
And here’s some visual motivation for you 
Here’s a video of a DeviceType I worked on, with the VLCThing operating in the background
 Really nice, love the clean look and finish of the setup in your stairway. What chassis did you put your pi in? Looks very cool.