So, I wrestled a bit with creating a Virtual (or Simulated) switch with a special characteristic: It needed to send an ON or OFF event even if it SmartThings thought its state was already ON or OFF. The pushbutton capability with an isStateChange: “True” is the right way to do this.
I’m posting this for the Newbies… The experienced folks will say, “Duh.” But I think it’s important to have some simple examples.
Here are the basic steps:
Use your Smartthings Integrated Development Environment (http://graph.api.smartthings.com" and create a new device handler. You can just paste this directly into a blank handler:
metadata {
    definition (name: "Virtual Switch 2", namespace: "paulmullen", author: "Paul Mullen") {
    capability "Switch"
}

// simulator metadata
simulator {
}

// UI tile definitions
tiles {
	standardTile("Switch", "device.switch", width: 2, height: 2, canChangeIcon: false) {
		state "on", label: 'On', action: "switch.off", icon: "st.Lighting.light13", backgroundColor: "#00AA00"
		state "off", label: 'Off', action: "switch.on", icon: "st.Lighting.light13", backgroundColor: "#AAAAAA"
	}
	standardTile("OnButton", "device.button", width: 1, height: 1, canChangeIcon: false) {
		state "pushed", label: 'On', action: "switch.on", icon: "st.Kids.kid10"
	}
	standardTile("OffButton", "device.button", width: 1, height: 1, canChangeIcon: false) {
		state "pushed", label: 'Off', action: "switch.off", icon: "st.Kids.kid10"
	}
	main "Switch"
	details(["Switch","OnButton","OffButton"])

}
}

def parse(String description) {
}

def on() {
sendEvent(name: "switch", value: "on", isStateChange: "true")
}

def off() {
sendEvent(name: "switch", value: "off", isStateChange: "true")
}
This creates three tiles as shown below.
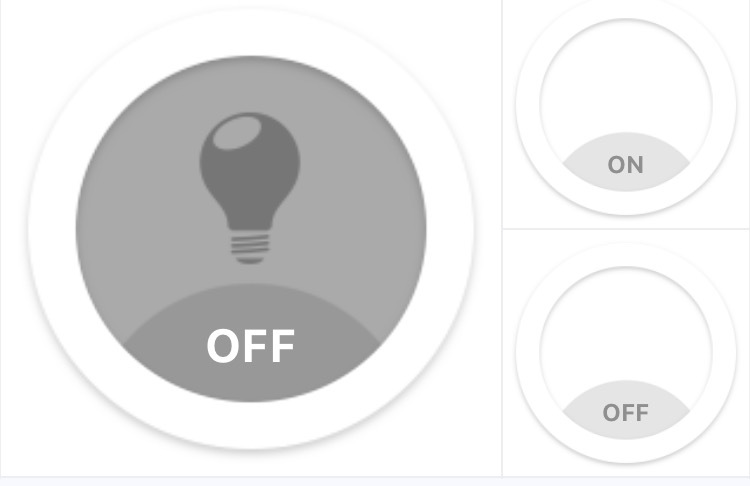
The big one at the left is a normal on/off switch. The smaller ones to the right are “momentary” push buttons. Even if the switch is already off, you can use the OFF push button to send another OFF event.
Why would you do this? In my case, I have a system in which people can make changes to the state of devices outside of Smartthings. This is common when you’re integrating an older technology system with Smartthings. So sometimes reality gets out of synch with the virtual twin in the Smartthings fantasy world.
Now all you have to do is create a switch and use this as the device handler.
- In the IDE, go to
My Devices. - Add a new device
- Fill in the form. Here are some sample values
Name * = Whatever you want to call this switch
Label = Can be the same as the label
Zigbee Id This is arbitrary, but should not be similar to other devices in your system.
Device Network Id * This is arbitrary, but should not be similar to other devices in your system.
Type * = OK , here is where you want to pick the device handler you created above. It is called “Virtual Switch 2” and you will probably find it at the bottom of the list.
Version * = Published
Location = The name of your location… will be the same as your other devices.
Hub = The name of your hub
Group = You can leave this blank
- Click on
Createand you’re good to go.
Of course, now you’ll want to hook this up to a SmartApp to do something with the switch, but that’s for another post.