Dan, That’s awesome. You’ve really done some amazing work to get this out. Thank you so much!
1 Like
Thanks very much for your reply.
Looking forward to this now.
Dan, this work you have done is exactly what I’ve been looking for; so thank you!!!
I have an Arduino Mega 2560 and an Ethernet Shield W5100 (purchased these 2 after reading your thread and seemed like the best fit – I like staying wired whenever possible)… my alarm panel has door/window contact sensors (maybe 8-10), 1 motion sensor, and 2 smoke detectors (have to check if the smoke detectors are battery powered or not, but I do NOT think so)… I’ve successfully compiled and uploaded your “ST_Anything_Doors_Windows_EthernetW5100.ino” sketch (editing all mandatory lines you commented on) and the IP I set to my Arduino Mega 2560 instantly starting to ping once uploaded!!! So that was a great feeling!!!
So a few basic questions…I’m sure you already went over these… and I apologize if I’ve missed the answer to my questions somewhere along this thread or in your readmes…
Here are my nooby questions (hopefully attached images will help shed some light on my setup)…
- Are the wires in my panel, with resistors attached, my contact sensors? What are the wires without resistors, typically?
- How do I get your smoke detector code into the “ST_Anything_Doors_Windows_EthernetW5100.ino” sketch for upload?
a. Or is this not the way of going about integrating smoke detector alerts? - I created device handlers and devices in Samsung API for Ethernet On/OFF, Virtual Contact Sensor, and also ST_Anything_W5100… what does Ethernet on/off do? When I attempt to toggle Ethernet OFF, from SmartThings app, my W5100 ethernet shield network lights stay on, and I can still ping it… toggling it on/and off seems to do nothing?? Is this not relevant to my endgame of monitoring my home security system through SmartThings with the help of your code and Arduino board? I’m pretty sure I got all the IP / MAC / network config settings right, in your code, because I got constant annoying motion detection alerts when I plugged in, what I thought was my motion sensor wire, into the corresponding pin 35.
I think I may be missing something fundamental…
I need a better understanding of the wiring in these panels and a better way to test each sensor for functionality and labeling purposes
If you have time to write back, hopefully you could point me in the right direction…
Thank you again for all of this work!!! It’s sick!!!


@CRedsand2 - I do not have an old Alarm Panel in my house. I simply have a home that was pre-wired for an alarm system like yours. So, I simply added the magnetic reed switches to my doors, hooked them up to the wiring, and then connected the wires to my Arduino.
Is your goal to replace the old Alarm Panel? Or are you trying to create a parallel system using ST in addition to the old Alarm Panel? This is an important first step in deciding how to proceed.
Second, I am in the process of releasing new Arduino sketches and SmartThings Device Handlers that will greatly simplify this process. Hang tight while I get the code uploaded to my Github repository and find time to update the ReadMe file to help make everything a little more clear.
1 Like
For the Advanced users who prefer to not wait for better documentation and who are willing to provide me with some feedback…
I have uploaded 12 new device handlers and 2 new Arduino sketches to my GitHub repository, along with some revisions to the ST_Anything Arduino library. These changes implement SmartThings new Composite Device Handler feature (i.e. Parent/Child Device Handlers) which allow more than one of each ST Capability in a single DH without requiring a Miltiplexer SmartApp to translate between the Arduino DH and the Virtual DH’s. In fact, no virtual devices are needed any longer with ST_Anything!
SmartThings IDE
I have adopted the ST Github IDE integration for the 12 new Device Handlers to make it much simpler to add them to your ST Account. Add my Github to your IDE using these settings:
Owner = DanielOgorchock
Name = ST_Anything
Branch = master
Or you can still manually copy and paste the new DH’s from (https://github.com/DanielOgorchock/ST_Anything/tree/master/devicetypes/ogiewon)
Please be sure to get all eleven “Child …” and one “Parent …” Device Handlers. Note: At this time I only have support for Ethernet/Wifi based Arduino and ESP8266 based boards. I have not yet implemented a “Parent DH” for the old ThingShield.
Arduino IDE
Be sure to grab the latest copy of the ST_Anything Arduino library and copy it to your …\Arduino\libraries\ folder. I needed to make a few minor changes to support the new DH’s. All of the Arduino code is still 100% backwards compatible with the old DH’s.
Additionally, please download and copy the two new example “ST_Anything_Multiples…” sketches to your local …\Arduino\Sketches\ folder.
ST_Anything_Multiples_ESP8266WiFi.ino is for use on a NodeMCU ESP8266 board (standalone, no Arduino)
ST_Anything_Multiples_EthernetW5100.ino is for use on an Arduino MEGA 2560 with a W5100 shield.
(Note: remember to update the network settings within each of these sketches to allow them to attach to your home network. Do NOT change the name of each of the defined devices. You must follow the standardized naming convention for everything to work correctly. After you get things working as-is, you can start experimenting with how many of each device type you want, what pins to use, etc… For now, just try getting the new example to work.)
Once you have everything installed in the ST IDE, manually add a new device, using the new Parent_ST_Anything_Ethernet DH. Configure it in your phone just like you did previously, setting the MAC Address, IP Address, and Port of your Arduino or NodeMCU board.
Once configured, and the Arduino or NodeMCU board is online, all of the child devices will be automagically created for you within SmartThings. From the THINGS view, you can rename each of the Child Devices as you see fit. From within the Parent, you can see all of the children, but cannot rename them. Just think of the parent as a generic container. Each of the children is what you will have normal SmartApps interact with anyway.
Something to be aware of… sometimes an extra child device will be created. This appears to be caused by a race condition in the ST Cloud. Just delete any duplicate child devices using the ST Phone App. You can even delete all of your child devices and the parent will automagically recreate any missing ones whenever new data is received from the Arduino/NodeMCU board. Pressing the new “Refresh” tile (in the parent DH) will force the Arduino to send the latest data for each of its defined devices. Deleting the parent will delete all of its children as well.
Getting late… more to come later. As always, feedback is welcome!
5 Likes
Dan - Thanks for the reply!
Since I originally started this project to replace alarm system (to avoid paying monthly rates to alarm company) what’s the best way to use this system in parallel using ST? Is this possible? I would LIKE to use in parallel, if feasible…however, if it would be much easier to simply replace alarm panel, that would be fine too (it was my original method of intent anyways). I think the only benefit of using ST, in parallel, to my old system, would be to utilize the already in place keypad panels somehow? What is your advice here?
Really looking forward to your new sketches and device handlers.
Thanks for getting back to me!!
Thanks again,
The new sketches and device handlers are already uploaded to my Github, although the ReadMe file has not been updated yet. See my post just above your latest one here for the details that should get you going.
As for the replace vs parallel, you may be looking at a hybrid if you really want to continue using the old system’s motion and smoke detectors (if even possible at all!) Motion detectors and smoke detectors need power to function properly. This power is probably supplied by your alarm panel. If your smoke detctors are more than 10 years old, they should probably be replaced anyway. Why not look at buying new ones that are z-wave capable which will work with ST and almost every other home automation systems on the market? Z-Wave and Zigbee motion detectors are readily available too.
That then leaves the contact sensors (Door/Windows magnetic reed switches) which are very easy to integrate to ST using my ST_Anything library, associated example Arduino sketches, along with my latest Device Handlers. I would suggest removing the contact sensor wiring from the alarm panel altogether, and then connecting each sensor to Arduino GPIO pins of your choice (1 wire per pin, per sensor.) The other wire from the sensors are then tied together and connected to an Arduino GND pin. These sensors are simply tiny electrical switches which are “open” when the magnet is removed, and “closed” when the magnet is in place. Thus, for testing you can simply attach a jumper wire from the Arduino GND ping to any of the digital input pins you choice in the sketch for your contact sensor devices. Just make sure you follow the naming convention I have defined in the ST_Anything_Multiples_EthernetW5100.ino sketch (i.e. “contact1”, “contact2”, “contact3”, etc…) as these specific names are required for the automatic creation of the child devices by the new Parent device handler.
Dan, I was already a fan of ST_Anything, and believe your new parent/child version will make it a lot easier for users to implement. I will work on migrating to the new version this weekend. If you are open to creating additional child device handlers, my suggestions would be CO detector and voltage measurement. Smoke detector and illuminance measurement are useable for these devices, but integration would be cleaner if the correct capabilities were built in from the start. Do you have plans to implement strobe capability on the alarm child DH?
So… I understand the “Carbon Monoxide Detector” request. That ST Capability looks exactly like a “Smoke Detector” so I could very easily add it to both the Arduino ST_Anything library as well as a new Child Device Handler.
I am a little less certain about the “Voltage Measurement” request. How do people typically use this? As you mentioned, I am thinking that I could simply reuse most of my “Illuminance Measurement” code. It already reads a voltage and scales it accordingly. IF that’s all you need, no problem. I am curious as to exactly what the use case is for voltage measurement is within SmartThings?
I should be able to have these both created within a day or two.
As for the strobe capability for the “Alarm” capability. That should not be too difficult to implement. It will require a new “optional argument” to be added to the EX_Alarm class to allow a user to specify a second Arduino Pin for the strobe light in a addition to siren. If they supply it, the code will make use of it. If not supplied, the siren pin will be used for both siren and strobe. This way the software maintains its backwards compatibility with existing users’ software. How does this sound?
Dan, Your proposed implementations of the CO detector and strobe sound great.
I looked at your “Multiples” example and see that you only have one alarm included. Are multiple alarms supported?
Concerning voltage measurement, my short term need is to monitor backup battery voltage, so your suggestion with scalability would work. It would be useful for additional purposes if it included a means to specify tile display units other than “volts”.
That leads me to thoughts of applications that are not so typical in the realm of SmartThings, but are fairly common for Arduino. The possibilities are endless, so I will give you a generic example that does not stray too far from the home automation theme that most ST users are looking for.
Imagine a generic device that has some combination of sensors and actuators that need to be monitored and controlled. Generic digital I/O can be handled easily with contact sensor and switch device handlers. Generic analog I/O is more difficult, but could be simplified with the addition of device handlers that provide signal scalabilty and abilty to specify units that correspond to whatever the device is actually doing.
Analog input via Arduino analog pins is pretty easy on the hardware side. Analog output is more challenging given the lack of true D/A voltage outputs, but is possible via the PWM outputs that AnalogWrite controls.
Thanks in advance for adding CO, strobe and voltage capabilities.
Any screenshots we can look at?
Thanks
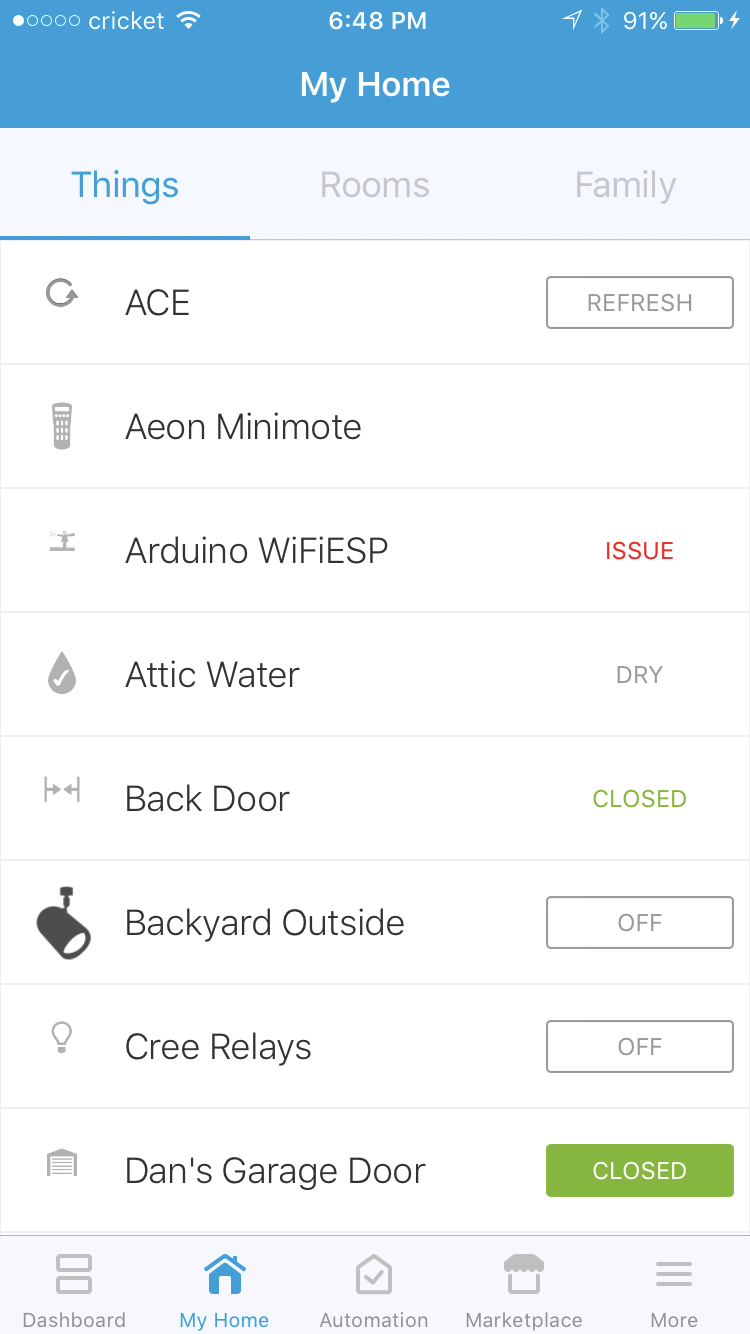
Sure, here are some screenshots.
Creating the ST parent device manually in the ST IDE. I named it ACE for “Arduino Composite Ethernet” and so it would bubble to top of the list for these pictures. A short name is best since the parent’s name becomes a prefix for the children initially.

If you have the ST App open when you add the device above, you will see this pop-up message to remind you to configure the device via the Parent Device’s “Gear” icon.

This is what you will see for the parent device immediately after adding it in the IDE (note, pull down on the screen to force it to refresh the list of devices.
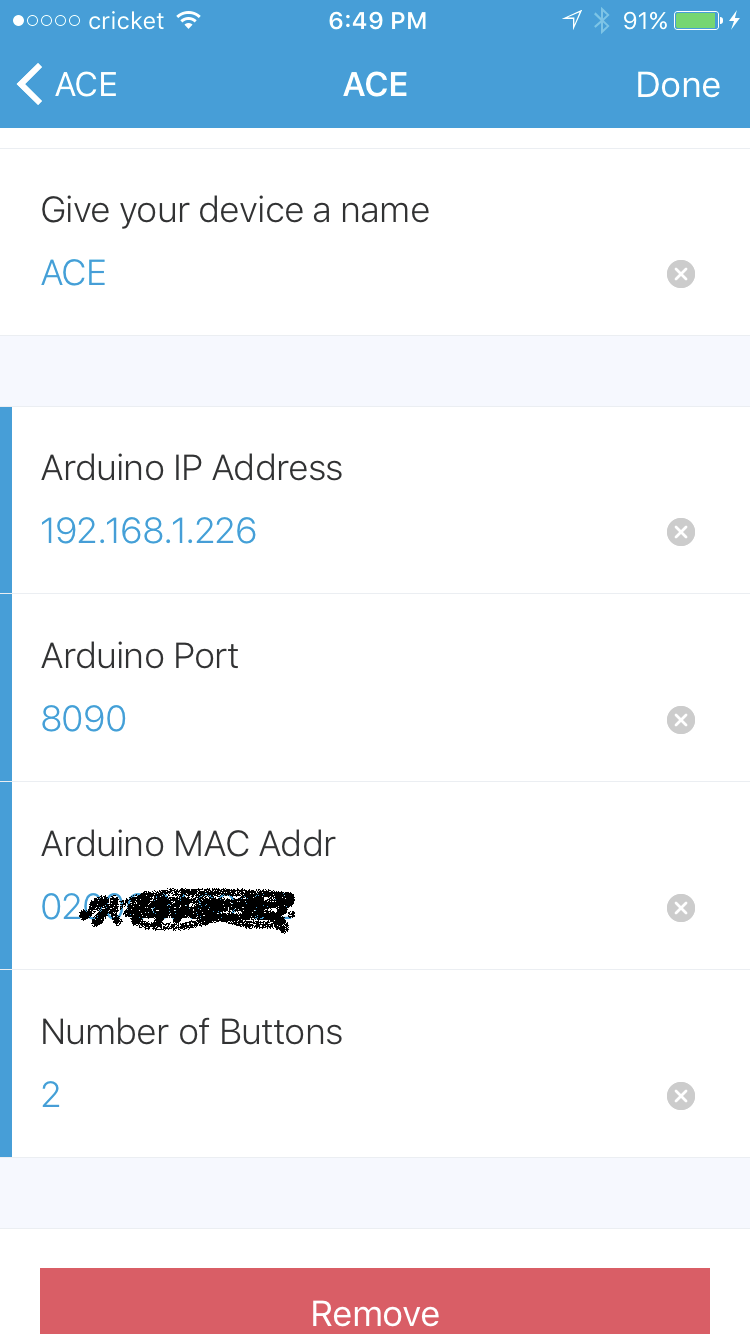
Selecting the parent device you manually added will show you this view of the device. Click on the “Gear” icon in the upper right corner to configure the settings of the device.

Here is the default configuration screen, which allows you to rename the Parent Device (optional) and is where you must define the Arduino device’s IP Address, Port, and MAC Address. This is a one time requirement as deatiled in my ReadMe on my GitHub page.

Here is an example of what it looks like after you enter in the data. Be sure to not use delimiters in your all uppercase MAC address!
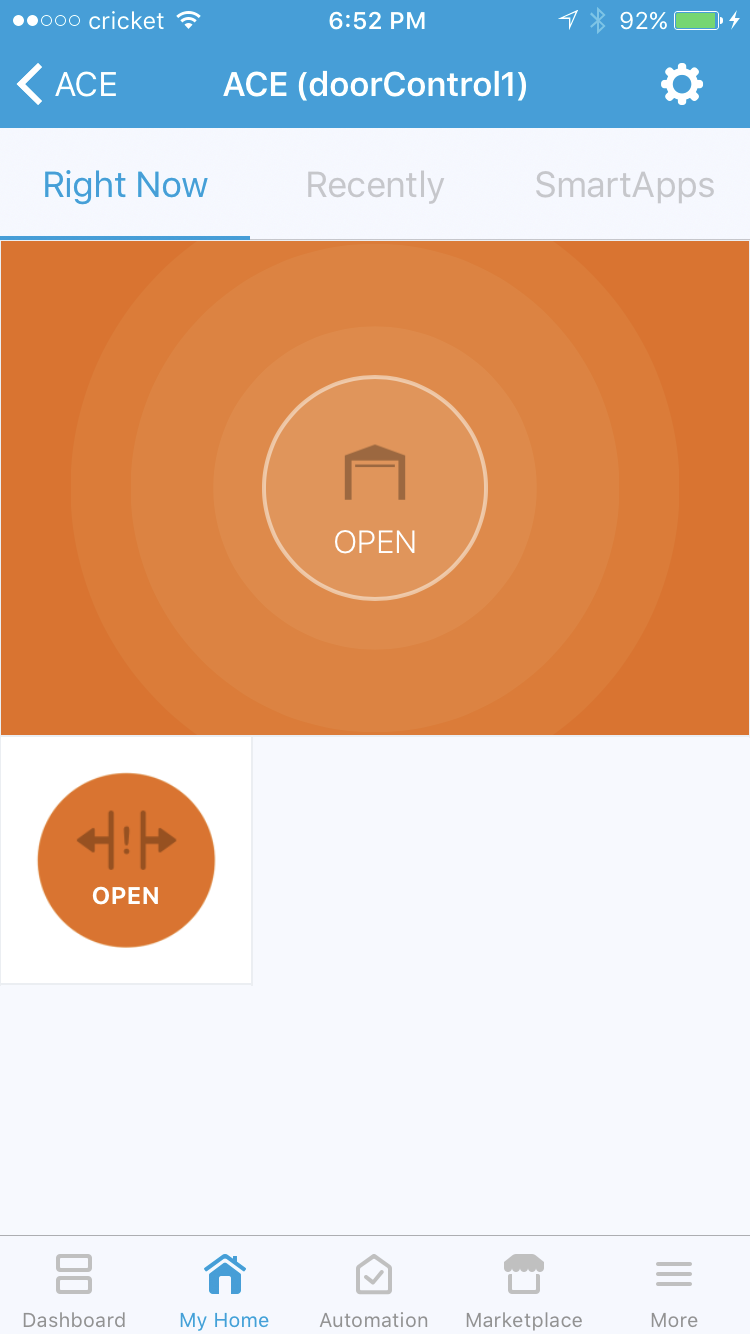
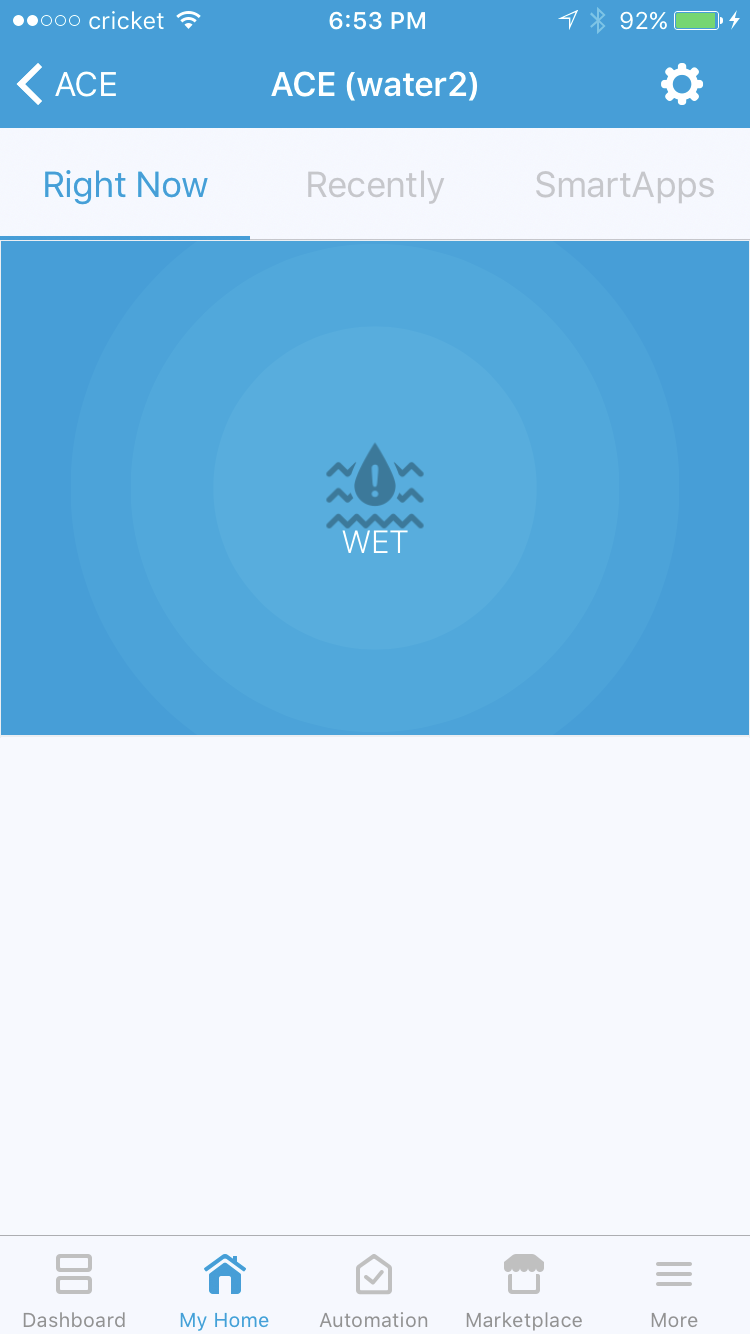
After clicking done, a “Refresh” message will be automatically sent to your Arduino causing it to send the latest values for every device you have defined in your sketch. Note: Use one of the new “ST_Anything_Multiples_****.ino” sketches as a starting point as they show the correct naming convention for defining each device. Do NOT get creative with names in the sketch since the Parent Device Handler requires you to follow the naming convention so it can correctly create child devices. After the refresh completes, pull down on your screen to force the ST App to update. You will then see all of the child devices within the Parent’s detailed view as show in the next three images.
Also, if you go back to the main “Things View”, you will see each of the children as separate devices which you can rename as desired, as well as move to different “Rooms” within you ST layout.


The rest of these images are simple screen shots of a few of the child devices.


Hope this helps explain things a little better. This post also helps me with my ReadMe revisions, so thanks for the request!
1 Like
Jeff,
Thanks for explaining the use case… Battery monitoring is a great example.
As for the question about multiple Alarm devices, the answer is yes. You can have multiples of every child device type.
Also, I do have a Dimmable Switch class within ST_Anything which implements a PWM output. You could easily use this for analog output capability.
Jeff,
I have just added Voltage Measurement and Carbon Monoxide capabilities to my ST_Anything library, the ST_Anything_Multiples_EthernetW5100.ino sketch, Parent DH, and Child DHs. Everything has been uploaded to my github repo.
For voltage measurement, I defaulted the scaling of the AI (0-1024counts) to 0 to 5000mV. You can change this as you see fit, however I do not believe I have ever seen a decimal place in a ST value. Therefore, 0-5V would not provide enough resolution to discern more that 5 distinct voltage levels. Keeping the units in milliVolts, gives you 5000 distinct levels. Again, fee free to tweak as you wish. I tried adding a user definable preference for the units field, but ST apparently does not allow the unit field to be defined at run-time. If you find another way, let me know. Otherwise, you may need to modify the Child Voltage Sensor DH to change the units for your application.
I’ll take a look at adding Strobe to the Alarm device shortly…
Dan
This looks amazing! I hope a troubleshooting question is okay here. I’ve been trying for hours to get it to connect to the router. I’m using a NodeMCU 1.0
I see your library calls ESP8266WiFi.h
I’m using: https://github.com/esp8266/Arduino/tree/master/libraries/ESP8266WiFi
Am I using the wrong library? I couldn’t find a reference for where to grab the proper ESP8266WiFi.h, and it’s not in this repository.
From the looks of it, all of the if’s and while’s in SmartThingsESP8266WiFi.h are getting skipped.
In the monitor, I see:
Everything: init started
Everything: Free RAM = 46296
MAC Address = [REMOVED]
SmartThingsESP8266WiFI: Intialized
Everything: init ended
Everything: Free RAM = 46128
Everything: adding sensor named illuminance
…
I can confirm my hardware is good, as I just tested it with Blynk and it connected to the router properly.
Thank you!!!
Ken,
Did you add the
http://arduino.esp8266.com/stable/package_esp8266com_index.json
to your Arduino Boards Manager in the Arduino IDE (File->Preferences) ???
This will pull in all of the necessary files to compile for the NodeMCU ESP8266 family of boards. Afterwards, be sure to select the NodeMCU 1.0 (ESP-12E) from the Tools->Board menu.
You should not add any ESP8266 libraries manually to your …\Arduino\libraries folder.
Dan
Wow Dan, Very impressive.
Hey if your taking request, I have some enhancements for you to consider…some ideas to make ST_Anything even more awesome…as if that’s even possible.
Basic Web page for ST_Anything devices: I’m thinking about what @erocm1231 did with the ESP8266 LED controller. It has a basic web page that can be used for control and updates. Actually, having just the Firmware update capability would be great as then we could do OTA updates. The Controller page would just be a list of the created ST_Anything devices.
Another option is just to have OTA updates using Arduino. I looked into it but haven’t been able to figured it out. Seems like what they do is have a unique command that puts it in OTA update mode. The input parser looks for a special string that then calls the OTA update code that allows the new code to be overlaid. (The new code also has this OTA code for next time.) Seems like this could be almost completely hidden as a special class in your ST_Anything infrastructure.
Again, just some thoughts for you to consider. (I know that I still owe you my Sprinkler codes, and they are coming really.)
Thanks again.
Dan, Thanks for adding these capabilities. Your speed of response is amazing. I am in the process of setting it up and will do some bench testing. I will try to provide feedback within the next day. Using mV instead of V is OK for the voltage sensor. I frequently use that strategy on time sensitive Arduino calculations because integer math is faster than floating point math.
One item for you to ponder: I have always scaled 0-5000mV to 0-1023 because decimal 1023 = binary 1111111111. I believe 1023 is the highest value that can be read via AnalogRead. The difference is small and probably negligble for most ST purposes.
1 Like