[OBSOLETE] Russound Multi-Zone Controller Integration

Purchased a Russound CAA66 multi-zone audio controller a while back to manage all the audio zones in the house. Does the job and works great, especially with the various inputs I have setup. Wanted to tie this into something bigger so jumped on ST v2 with the hopes that it would be supported. Got the hub and quickly realized there was no good integration option… so set out to get this done myself. This is my first device integration and I’m hooked.

Provides integration over RS-232 to Russound (or Monoprice) multi-zone controller (CAA66, CAM66, CAV66, etc) with the following features:

  • Supports default 6 zones and 6 sources
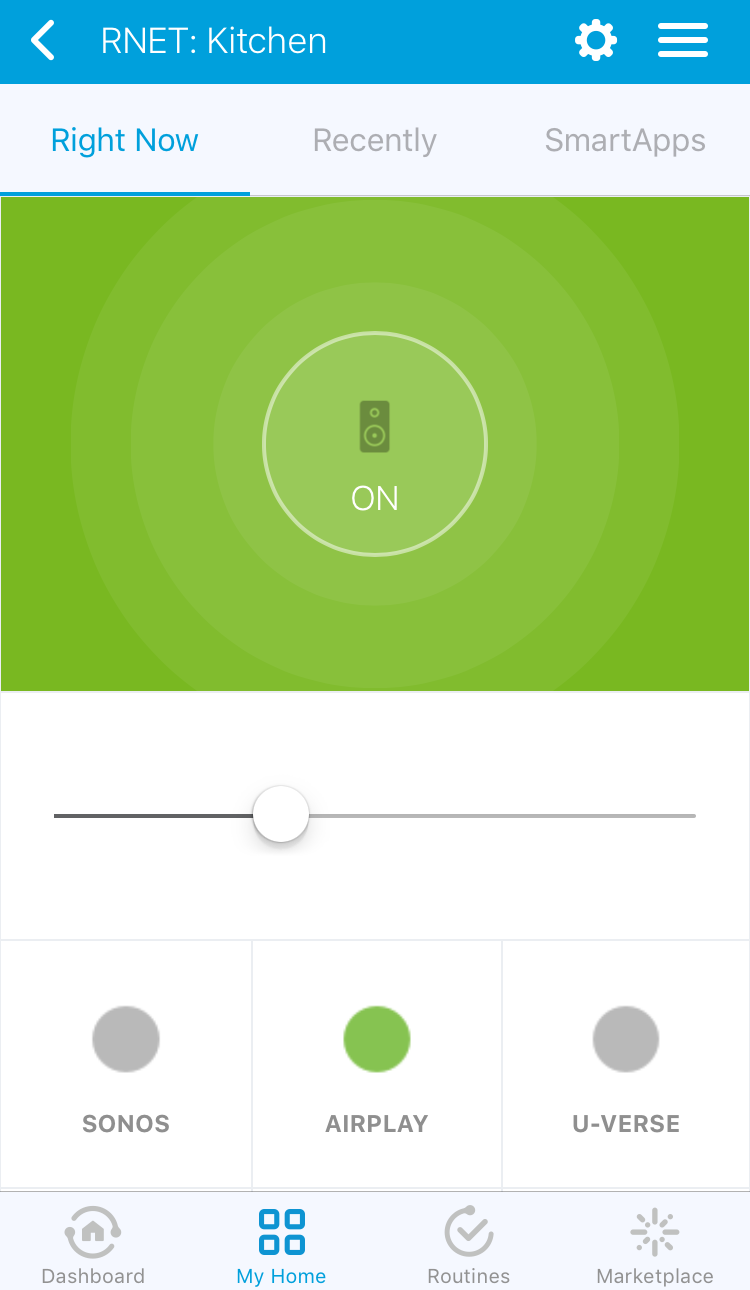
  • Ability to view the status of all zones
  • Ability to turn zones ON/OFF
  • Ability to activate/assign a source to a zone
  • Ability to set volume level in a zone
  • Ability to set bass and treble level in a zone
  • Ability to set loudness option in a zone
  • Ability to control multiple zones with Party Mode
  • Ability to turn off all zones

And the following requirements / dependencies:

** Update 03/12/2021 **

  • The short story is that this integration is NO LONGER BEING MAINTAINED; please feel free to clone the repo and carry it forward!
  • The long story is that ever since ST rolled out the new app and basically broke support for tons of integrations (including this one), I waited, waited and tried many times to find a good enough solution for all of us to enjoy. Unfortunately that never came and I decided earlier this year to explore other home automation options… and I found one that fits the bill perfectly… Home Assistant. The system is stable, flexible and growing in the way all of us had hoped ST would. The great news about Home Assistant is that there are tons of integrations available, including support for this one: Russound RNET - Home Assistant. Note: if you have a serial connection to your Russound, then you will need to do this: Control Russound CA-66 on HassOS with RNET using Ser2net and Portainer - Share your Projects! - Home Assistant Community.
    For those of you who are worried about your Z-Wave/Zigbee devices, what I have done is continue to use the ST Hub as the Z-Wave/Zigbee bridge and use the Home Assistant - SmartThings integration to control everything. I can’t tell you how happy I have been with the Home Assistant platform, capabilities, community, everything… it’s pretty amazing. If you’re like me and frustrated with the current status of ST, give it a look… you won’t be disappointed. It’s been a lot of fun!

Update 04/16/2017

  • Added support for C-series Russound controllers, including the MCA-C3, MCA-C5, etc.

Connecting to a Serial Device
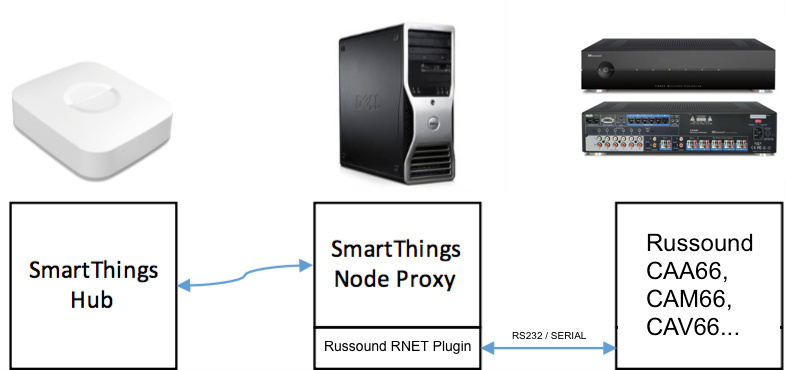
Realized that I needed a good framework to offer outside integration with SmartThings, so decided to write a proxy service in Node, making local LAN integration with SmartThings easier, offering async update support, as well as the flexibility to connect to devices via USB, serial, etc which are not natively supported by SmartThings. Connectivity to the Russound multi-zone controller is provided by a plugin to the proxy service (SmartThings Node Proxy) - basic schematic of how this is wired together is provided below. Mode details on the proxy service, how to get it installed and configured in under 5 mins is available here: GitHub - redloro/smartthings: SmartThings home automation services, apps and devices

SmartThings Hub <-> SmartThings Node Proxy <-> Russound RNET plugin <-> RS-232 serial <-> Russound controller

Installation

Since the Russound RNET SmartApp communicates with the audio controller via the SmartThings Node Proxy, make sure that you have the proxy and the Russound RNET plugin installed and working before adding the SmartApp and Devices to SmartThings.

  1. SmartThings Node Proxy + Russound RNET plugin installed and configured on a machine; machine is connected with RS-232 serial cable to Russound controller
  2. Create a new SmartApp and use this code: smartthings/russound-rnet.groovy at master · redloro/smartthings · GitHub
  3. Create a new Device Handler and use this code: smartthings/russound-zone.groovy at master · redloro/smartthings · GitHub
  4. Add the Russound RNET SmartApp from the SmartThings marketplace
  5. Configure the SmartApp
  • SmartThings Hub: REQUIRED
  • SmartThings Node Proxy: REQUIRED to connect to the SmarThings Node Proxy
  1. Done! Note that all the zones defined in config.json will be loaded 10 seconds after the SmartApp is configured and all the devices should show up under your Things. If the zones/devices do not show up, simply open the SmartApp again and hit done to force a refresh of the zones/devices.

Enjoy…

FAQ
Going to cover a couple questions here to hopefully aid others in their quest to get this setup.

  • Do you have an installation video?
    Why as a matter of fact I do… SmartThings Node Proxy - YouTube

  • What the heck is Node?
    Node is awesome! https://nodejs.org

  • What the heck is JSON?
    JSON… pronounced like the name Jason (JAY-sun) is also awesome… http://www.json.org/

  • Why do I need SmartThings Node Proxy?
    If you want to direct connect your Russound to SmartThings you need STNP. It connects to the Russound with a RS232/serial cable and establishes a bi-directional link with the SmartThings Hub. So all traffic stays on your local LAN and communications between your Russound and the Hub happen in near-realtime.

  • How does SmartThings Node Proxy connect with the Russound and the SmartThings Hub?

  • What do I need to do to get this running?

  1. Forget about SmartThings for a second… we’ll come back to that.
  2. First things first, let’s get SmartThings Node Proxy installed, configured and working.
  3. Identify a host machine on your network that can run NodeJS
  4. Download and install NodeJS from here: https://nodejs.org
  5. Download SmartThings Node Proxy and place in a target folder on your machine (ie. /home/smartthings-nodeproxy)
  6. Create a subfolder called plugins (ie. /smartthings-nodeproxy/plugins)
  7. Move rnet.js from avail_plugins to your new plugins folder
  8. Copy the contents of config.json.sample and paste them here: http://jsonmate.com/
  9. Edit the document so that it matches your configuration… remove all comments (anthing starting with //) and then click “Beautify”.
  10. Create a new file named config.json in your SmartThings Node Proxy folder
  11. Copy the contents of the json document into config.json
  12. Install dependencies by running: npm run install:rnet -OR- npm run install:mpr-sg6z
  13. Fire up the server by typing: npm run start
  14. Make sure that it connects with the Russound and you should see a connection message; if you have existing keypads you will also see events as you control your Russound from the keypads
  15. Now we can move on to setting up the SmartApp and Devices in SmartThings…
  • How do I know it’s running?
    When you start SmartThings Node Proxy you should see something like the following:
$ node server.js
SmartThings Node Proxy listening at http://:::8080
Loaded plugin: rnet
Connected to RNET: /dev/cu.usbserial-A102MMGZ
  • What’s all this nonsense about restart.me and forever??
    You can honestly ignore all that if it doesn’t work or you are having issues getting it run. restart.me is a script that I created to make starting/restarting the service easy, but it may only run on specific operating systems. forever is a Node module that allows you run a Node application continuously… sort of like a service.

  • But how do I run SmartThings Node Proxy unattended or guarantee that it runs on startup?
    While I don’t have a solution to that here, there are many solutions available online for wrapping a Node app into a service that auto-starts, etc. and it all depends on your host operating system. Google is your friend: http://bfy.tw/8Qp9. For Windows users, the simplest is to probably create a shortcut to “node server.js” and put that in your startup folder.

  • What are all these password and code fields in the config.json?
    Good question and I’m often left wondering the same… like what the heck was I thinking when I wrote this?? But here it is…

  • authCode is a passcode you set for the SmartThings Node Proxy to prevent unauthorized access to SmartThings Node Proxy from anybody/anything who could be snooping around your local network and happen to stumble upon SmartThings Node Proxy listening on port 8080. It’s not Ft Knox but it’s not meant to be… just a basic passcode to keep everyone out. NOTE: this is the passcode you have to use during the SmartApp configuration to allow the SmartApp to communicate with SmartThings Node Proxy.

5 Likes

Here are a couple screenshots of the app in action, showing active/inactive zones, each zone has volume control, source control, loudness control and the ability to turn off all zones:

Thank you for this. I installed Smartthings a couple of months ago and just did a search on if I can somehow integrate my Russound system with it (and found your post). Yesterday I did a search to see if I could integrate my wired alarm system (I can) and am now following up on getting that up and running. Until yesterday, I had no idea that Smartthings had the ability to connect to these systems.

1 Like

@marx your welcome and let me know if you run into any issues…

@redloro I am not certain I can get this working for me. I would be running this on a Windows machine and I’ll have to look into it further. I do have Python installed (as it was required for the install I just completed for my alarm system), I now understand about authorization codes and secret keys, and it looks like I’d have to install Node for Windows. But, I am unsure on how to execute some of the commands in your documentation. In any case, I am going to try.

(As a side note, I see you have an integration set up with Envisalink and Honeywell Vista. This is a project I just completed using a different method. I was able to set it up and I am able to Arm / Disarm via the Smart Home Monitor. But the zones don’t always report back correctly with the method I use - which I believe is due to the nature of the Vista Panel).

@redloro, I installed Node and stated the process for Node Proxy installation. After issueing the command ‘npm install’ I got a string of errors. This was at the bottom:

npm ERR! serialport@1.7.4 install: node-pre-gyp install --fallback-to-build
npm ERR! Exit status 1
npm ERR!
npm ERR! Failed at the serialport@1.7.4 install script ‘node-pre-gyp install --fallback-to-build’.
npm ERR! This is most likely a problem with the serialport package,
npm ERR! not with npm itself.
npm ERR! Tell the author that this fails on your system:
npm ERR! node-pre-gyp install --fallback-to-build
npm ERR! You can get information on how to open an issue for this project with:
npm ERR! npm bugs serialport
npm ERR! Or if that isn’t available, you can get their info via:
npm ERR!
npm ERR! npm owner ls serialport
npm ERR! There is likely additional logging output above.

Any advice on this?

Looking forward to the next step, I need edit config.json with an oauth code and secret key. Don’t I need to have a Smartapp installed first? If so, what Smartapp?

Sorry for my ignorance, and thank you

@marx no worries… we’ll get you setup and after that, you can take a look at the Honeywell connector I also built, which should resolve your issues with zones not reporting back correctly… [RELEASE] Honeywell / Ademco Vista 20P Integration

So I put in a dependency on the serialport package version 1.7.4 because there was an issue with the latest release that wouldn’t work right on OSX… but you can give the latest package a shot. Try the following and let me know how it goes:

  1. Edit package.json and remove the line "serialport": "^1.7.4"
  2. Manually install serialport by typing the following from the command line (in the same folder as the Node Proxy project): npm install serialport
  3. Re-run: npm install

Let me know how that goes…

Let’s first get SmartThings Node Proxy running and talking to the Russound;

  • Edit your config.json by first removing all the comments and then setting the relevant fields (this is just an example for a Russound only configuration):
{
  "port": 8080,
  "authCode": "secret-key",
  "rnet": {
    "serialPort": "/dev/usbser",
    "sources": [
      "Sonos",
      "Airplay",
      "Apple TV",
      "Source 4",
      "Source 5",
      "Source 6"
    ],
    "controllerConfig": {
      "type": "discover",
      "zones": [
        {"zone": 0, "name": "Family Room"},
        {"zone": 1, "name": "Kitchen"},
        {"zone": 2, "name": "Living Room"},
        {"zone": 3, "name": "Patio"},
        {"zone": 4, "name": "Dining Room"},
        {"zone": 5, "name": "Office"}
      ]
    }
  }
}
  • Set port to where you want SmartThings Node Proxy to listen
  • Set authCode to some value that you will set later to secure comms between SmartThings and the proxy
  • No OAUTH and secret key…
  • We’ll get the SmartApp and devices setup once you’ve got the proxy running

Let me know how it goes.

I think we’re looking good. I made the updates you mentioned and then tried to dissect the restart.me command. It took a while, but I finally figured out that on Windows I would just execute the command “Node Server.js”.

I confirmed access via the browser on another machine.

I went ahead and installed the Smartapp and Device Handler, though I am still waiting on the USB/Serial cable, so there is no connectivity between the server and Russound. I noticed an error and updated the Serial Port name to COM3 in the config file.

This is current output:

smartthings-nodeproxy>node server.js
SmartThings Node Proxy listening at http://:::8080
** NOTICE ** Envisalink settings not set in config file!
Loaded plugin: envisalink
Loaded plugin: rnet
Connected to RNET: COM3
Detected serial ports: [“COM3”]
** NOTICE ** Envisalink settings not set in config file!
::ffff:192.168.0.35 GET /subscribe/192.168.0.35:39500
::ffff:192.168.0.35 GET /plugins/rnet/discover
{“type”:“discover”,“zones”:[{“zone”:0,“name”:“Kitchen”},{“zone”:1,“name”:“Master Bedroom”},{“zone”:2,“name”:“Living Room”},{“zone”:3,“name”:“Dining Room”},{“zone”:4,“name”:“Office”},{“zone”:5,“name”:“Master Bath”}]}
Completed controller discovery
::ffff:192.168.0.35 GET /subscribe/192.168.0.35:39500
::ffff:192.168.0.35 GET /plugins/rnet/zones/4
::ffff:192.168.0.35 GET /plugins/rnet/zones/0
::ffff:192.168.0.35 GET /plugins/rnet/zones/5
::ffff:192.168.0.35 GET /plugins/rnet/discover
{“type”:“discover”,“zones”:[{“zone”:0,“name”:“Kitchen”},{“zone”:1,“name”:“Master Bedroom”},{“zone”:2,“name”:“Living Room”},{“zone”:3,“name”:“Dining Room”},{“zone”:4,“name”:“Office”},{“zone”:5,“name”:“Master Bath”}]}
Completed controller discovery
::ffff:192.168.0.35 GET /plugins/rnet/zones/2
::ffff:192.168.0.35 GET /plugins/rnet/zones/3
::ffff:192.168.0.35 GET /plugins/rnet/zones/1
::ffff:192.168.0.35 GET /plugins/rnet/zones/4
::ffff:192.168.0.35 GET /plugins/rnet/zones/0
::ffff:192.168.0.35 GET /plugins/rnet/zones/5
::ffff:192.168.0.35 GET /plugins/rnet/zones/2
::ffff:192.168.0.35 GET /plugins/rnet/zones/3
::ffff:192.168.0.35 GET /plugins/rnet/zones/1
** NOTICE ** Envisalink settings not set in config file!

Zones did not appear, but I removed/re-configured the app and then they all popped up! (Maybe I had a setting wrong). The sources just show up a source1, source2, etc…

When I turn Zones on/off in the app I see that reflected on the server.

I’ll update my progress after installing the cable on Wednesday.

Thanks again!!! This is great!

Great to hear… you’ll want to make sure that you configure the right serial port and drivers when your USB/serial cable arrives.

Yeah sometimes they don’t appear the first time around, and you have to wait 5-10 seconds or go back into the App config and then they’ll show.

The sources are hardcoded as Source1, Source2, etc but you will see the source name (as defined in your config.json) in the red box in the image below once SmartThings fixes a bug they introduced in the last version… this is something that worked before and broke in the last version. They’ve acknowledged this and will be fixed in the next version.

Another thing you can do, is actually change the hardcoded values for the Source names in the Device Handler code… these will be the label for each state… this is something I did… for instance change lines 74-77 from:

    standardTile("0", "device.source0", decoration: "flat", width: 2, height: 2) {
      state("off", label:"Source 1", action:"source0", icon:"https://raw.githubusercontent.com/redloro/smartthings/master/images/indicator-dot-gray.png", backgroundColor:"#ffffff")
      state("on", label:"Source 1", action:"source0", icon:"https://raw.githubusercontent.com/redloro/smartthings/master/images/indicator-dot-green.png", backgroundColor:"#ffffff")
    }

To:

    standardTile("0", "device.source0", decoration: "flat", width: 2, height: 2) {
      state("off", label:"Sonos", action:"source0", icon:"https://raw.githubusercontent.com/redloro/smartthings/master/images/indicator-dot-gray.png", backgroundColor:"#ffffff")
      state("on", label:"Sonos", action:"source0", icon:"https://raw.githubusercontent.com/redloro/smartthings/master/images/indicator-dot-green.png", backgroundColor:"#ffffff")
    }

Let me know how it goes when you get your cable!

1 Like

Thanks again @redloro for all the work you did on this! Unfortunately for me, the (old) laptop I planned on running Node Proxy on is dead. I was able to test the Russound integration using another laptop and it works perfectly! But, until I get a replacement laptop I need to place the Russound piece of my Smartthings integration on hold for now.

In the interim, I installed Node Proxy on my file server (which is nowhere near my Russound machine) and am running it to control the Honeywell system.

Will this method work on my Russound MCA-C5 controller? If yes, is there a way to connect other than using a RS-232 serial connection (like telnet or ssh)? If not what piece of hardware can I buy to set up this proxy connection (like a raspberry Pi with a rs-232 serial connection or something similar other than a laptop)

Yes - it should… according to Russound their RNET protocol is backwards compatible. You may need to be on the latest firmware for the MCA-C5 and may need to configure some settings to allow it to talk RNET.

Technically yes - the MCA-C5 supports IP based comms, but this specific plugin was designed to communicate over a serial connection. If you want control over your existing IP connection, someone would need to update/replace this plugin such that it can communicate with the device over IP instead of serial and uses the RIO protocol instead of the RNET protocol.

Absolutely… the current version can be used with a Raspberry PI. Any piece of hardware that can run NodeJS, has a USB port and drivers for a USB-to-Serial cable should work. We’ve got this working with a Mac, Linux and Windows machines.

Let us know if you have any questions!

Thanks for this @redloro! I’m just starting out with SmartThings, and this was the first customization project I tackled. I’ve got this running on a Raspberry Pi connected to my CAM6.6, and it’s all running very well . It’s (slightly) integrated with my Sonos Connect, and I can now efficiently control the system automatically and/or remotely. I’ve been wanting something like this for my Russound for years!

One thing I’m running into is having the Smart App accurately report current zone status. My family is used to turning the system on or off from the control panels in each room. When they do that the power status isn’t updated in the Smart App. Do you know if it’s possible to have the current status automatically updated in the Smart App? It looks like there’s something in the device handler that’s supposed to do it, but if so then it doesn’t work for me.

Have you explored incorporating any of the other Russound capabilities (e.g. Bass, Treble, Balance, Party Mode, etc.)?

@ducttape glad to hear you’ve got things working… I was in the same boat and actually tried a bunch of other options including Vera and Indigo but did not like the platform or ecosystem.

To answer your questions… yes to all of them but let’s break them down.

The RNET plugin is designed to handle status updates from any source and notify SmartThings/SmartApp, but I didn’t have any panels to test so did not write the code to handle this in the plugin. What I’d need from you is a debug log from the ST Node Proxy showing a bunch of activity from the panels. I can use that to add the required code to the plugin so that current and accurate status is always captured in the SmartApp. Shoot me a PM and I’ll help you get the debug log, etc.

The RNET plugin supports all of the above, but I excluded them from the Device Handler on purpose just to keep it simple. I can share another version of the Device Handler with all these options present and let you tweak it as you like.

This looks like great stuff. I’m going to be forking it to work with the Monoprice 6-channel Amp. Hopefully I can apply a good amount of this work to my project.

@tcjennings great to hear… I would expect it to be similar? Wanted to play with one as it’s got a similar look to the Russound and also a RS232 port. Let me know if you’ve got any questions and keep us posted on your progress!

That was easier than I thought! The Monoprice amp’s control interface has nothing in common with RNET but I was able to get a plugin written for your SmartThings Node Proxy. The Device and SmartApp required mostly trivial changes. Overall I’m impressed with the STNP as a platform. I’ve got a Vista 20p alarm panel, so I might use STNP for that too instead of one of the other alarm server forks.

I have a few more tweaks to make, after which I’ll make a pull request, @redloro.

Cheers!

@tcjennings that’s awesome… glad to hear things worked out… looking forward to your contrib!

One question: You put an AllOff command on each zone, I’m guessing that’s just a convenience thing where RNET may have a “all off” command but you haven’t modeled the core chassis as a Device. So you’ve just put AllOff on each zone, where it’ll do the same thing regardless of from whence it’s called. Is that about right?

I’ve rearranged just a couple of things so the pull might take some merging depending on how much you want to keep:

  • Put plugins in ./avail_plugins/ with the expectation that user will copy (or better, link), needed plugins into ./plugins.
  • Rename config.json->config.json.sample and add config.json to .gitignore; since config.json doesn’t work without editing anyway + keeps personal configs out of repo.
  • Bumped node serialport req to 2.0.2 since 1.7.4 doesn’t build on RPi.