I got it working…
I followed these instructions, to a ‘T’:

And flashed with Arduino running under Windows Parallels on my mac, rather than Mac Arduino.
Weird!
I got it working…
I followed these instructions, to a ‘T’:
And flashed with Arduino running under Windows Parallels on my mac, rather than Mac Arduino.
Weird!
This looks promising.
Can you show or describe how you connect the manual switch?
What booster did you get?
I’m using the MT3608. It’s a pretty popular chip for the cheap adjustable boosters you can get from amazon or ebay. I have a breakout board coming so I can fine-tune the circuit and reduce my power consumption. The circuit as it is now works well and is charging fine but I’m worried about the ~6-8 months of clouds we get here in Seattle, and I want to reduce the size of the solar panels as much as I can. I’m hoping to be able to finalize my circuit design in about 2 weeks.
Hi, I got this working as a test on one of my blinds last night. Thanks for the code and inspiration!
I’m using a nodeMCU and Futaba 3003 with a 5mm to 8mm flexible shaft coupler.
So nobody is using an extra manual switch with this?
I just wanted to see how you guys wire it.
I am but I’m using a different platform altogether. I’ll make a separate post one my setup is fully up and running.
Im trying to edit the code and change the static ssid and password so that it can use the
wifimanager code
but when I change the code lines I get errors and it starts to want to remove the server code. Any suggestions? Here is what I got thats not working
#include <ESP8266WiFi.h>
#include <WiFiClient.h>
#include <ESP8266WebServer.h>
#include <ESP8266mDNS.h>
#include <DNSServer.h> //Local DNS Server used for redirecting all requests to the configuration portal
#include <WiFiManager.h> //https://github.com/tzapu/WiFiManager WiFi Configuration Magic
#include <Servo.h>
MDNSResponder mdns;
ESP8266WebServer server(80);
Servo myservo;
int pos = 0;
int state = 0;
int prevstate = 0;
int dirc = 0;
int servoPin = D3; //CHANGE TO WHATEVER PIN YOUR USING
String webPage = "";
void setup(void) {
webPage += "<h1>ESP8266 Web Server</h1><p>Blinds <a href=\"open\"><button>OPEN</button></a> <a href=\"close\"><button>CLOSE</button></a></p>";
delay(1000);
Serial.begin(9600);
delay(500);
Serial.println("Blind Startup Sequence");
delay(500);
Serial.println();
Serial.print("Connecting to ");
WiFiManager wifiManager;
wifiManager.autoConnect("blackjack");
Serial.println();
Serial.println("WiFi connected");
Serial.println("IP address: "); Serial.println(WiFi.localIP());
if (mdns.begin("esp8266", WiFi.localIP())) {
Serial.println("MDNS responder started");
}
server.on("/", []() {
server.send(200, "text/html", webPage);
});
server.on("/open", []() {
server.send(200, "text/html", webPage);
Serial.println("HTTP OPEN COMMAND RECEIVED");
dirc = 0; // direction for servo to run
state = 2; // sets current state
});
server.on("/close", []() {
server.send(200, "text/html", webPage);
Serial.println("HTTP CLOSE COMMAND RECEIVED");
dirc = 180; // direction for servo to run
state = 1; // sets current state
});
server.begin();
Serial.println("HTTP server started");
}
void servo_move() {
Serial.println("State Change. Rotating Servo");
if ( dirc == 180) {
myservo.attach(servoPin); // energize servo
delay(50);
for (pos = 0; pos <= 90; pos += 1) { // goes from 0 degrees to 90 degrees in steps of 1 degree CHANGE 90 TO MATCH ANGLE OF TILT DESIRED
myservo.write(pos); // tell servo to go to position in variable 'pos'
delay(30); // waits 30ms between each degree to slow rotation speed
}
delay(50);
myservo.detach(); // movement finished so detach servo to conserve power
}
else if (dirc == 0) {
myservo.attach(servoPin); // energize servo
delay(50);
for (pos = 90; pos >= 0; pos -= 1) { // goes from 90 degrees to 0 degrees in steps of 1 degree CHANGE 90 TO MIRROR ANGLE OF TILT DESIRED ABOVE
myservo.write(pos); // tell servo to go to position in variable 'pos'
delay(30); // waits 30ms between each degree to slow rotation speed
}
delay(50);
myservo.detach(); // movement finished so detach servo to conserve power
}
Serial.println("Returning to main loop");
return;
}
void loop(void) {
if (state != prevstate) {
Serial.println("State change!");
servo_move();
}
prevstate = state;
server.handleClient();
}My first “production” board is currently installed and undergoing testing. Once it passes I’ll create a few more boards and deploy them in a couple more blinds.
A quick list of features:
If this current board works out then I’ll put together a post with details.
Sounds great. Looking forward to hearing more.
Did this post happen somewhere else? got a link?
Of course as soon as I opened my big mouth I started having issues with
charging and power consumption. I’m debugging now
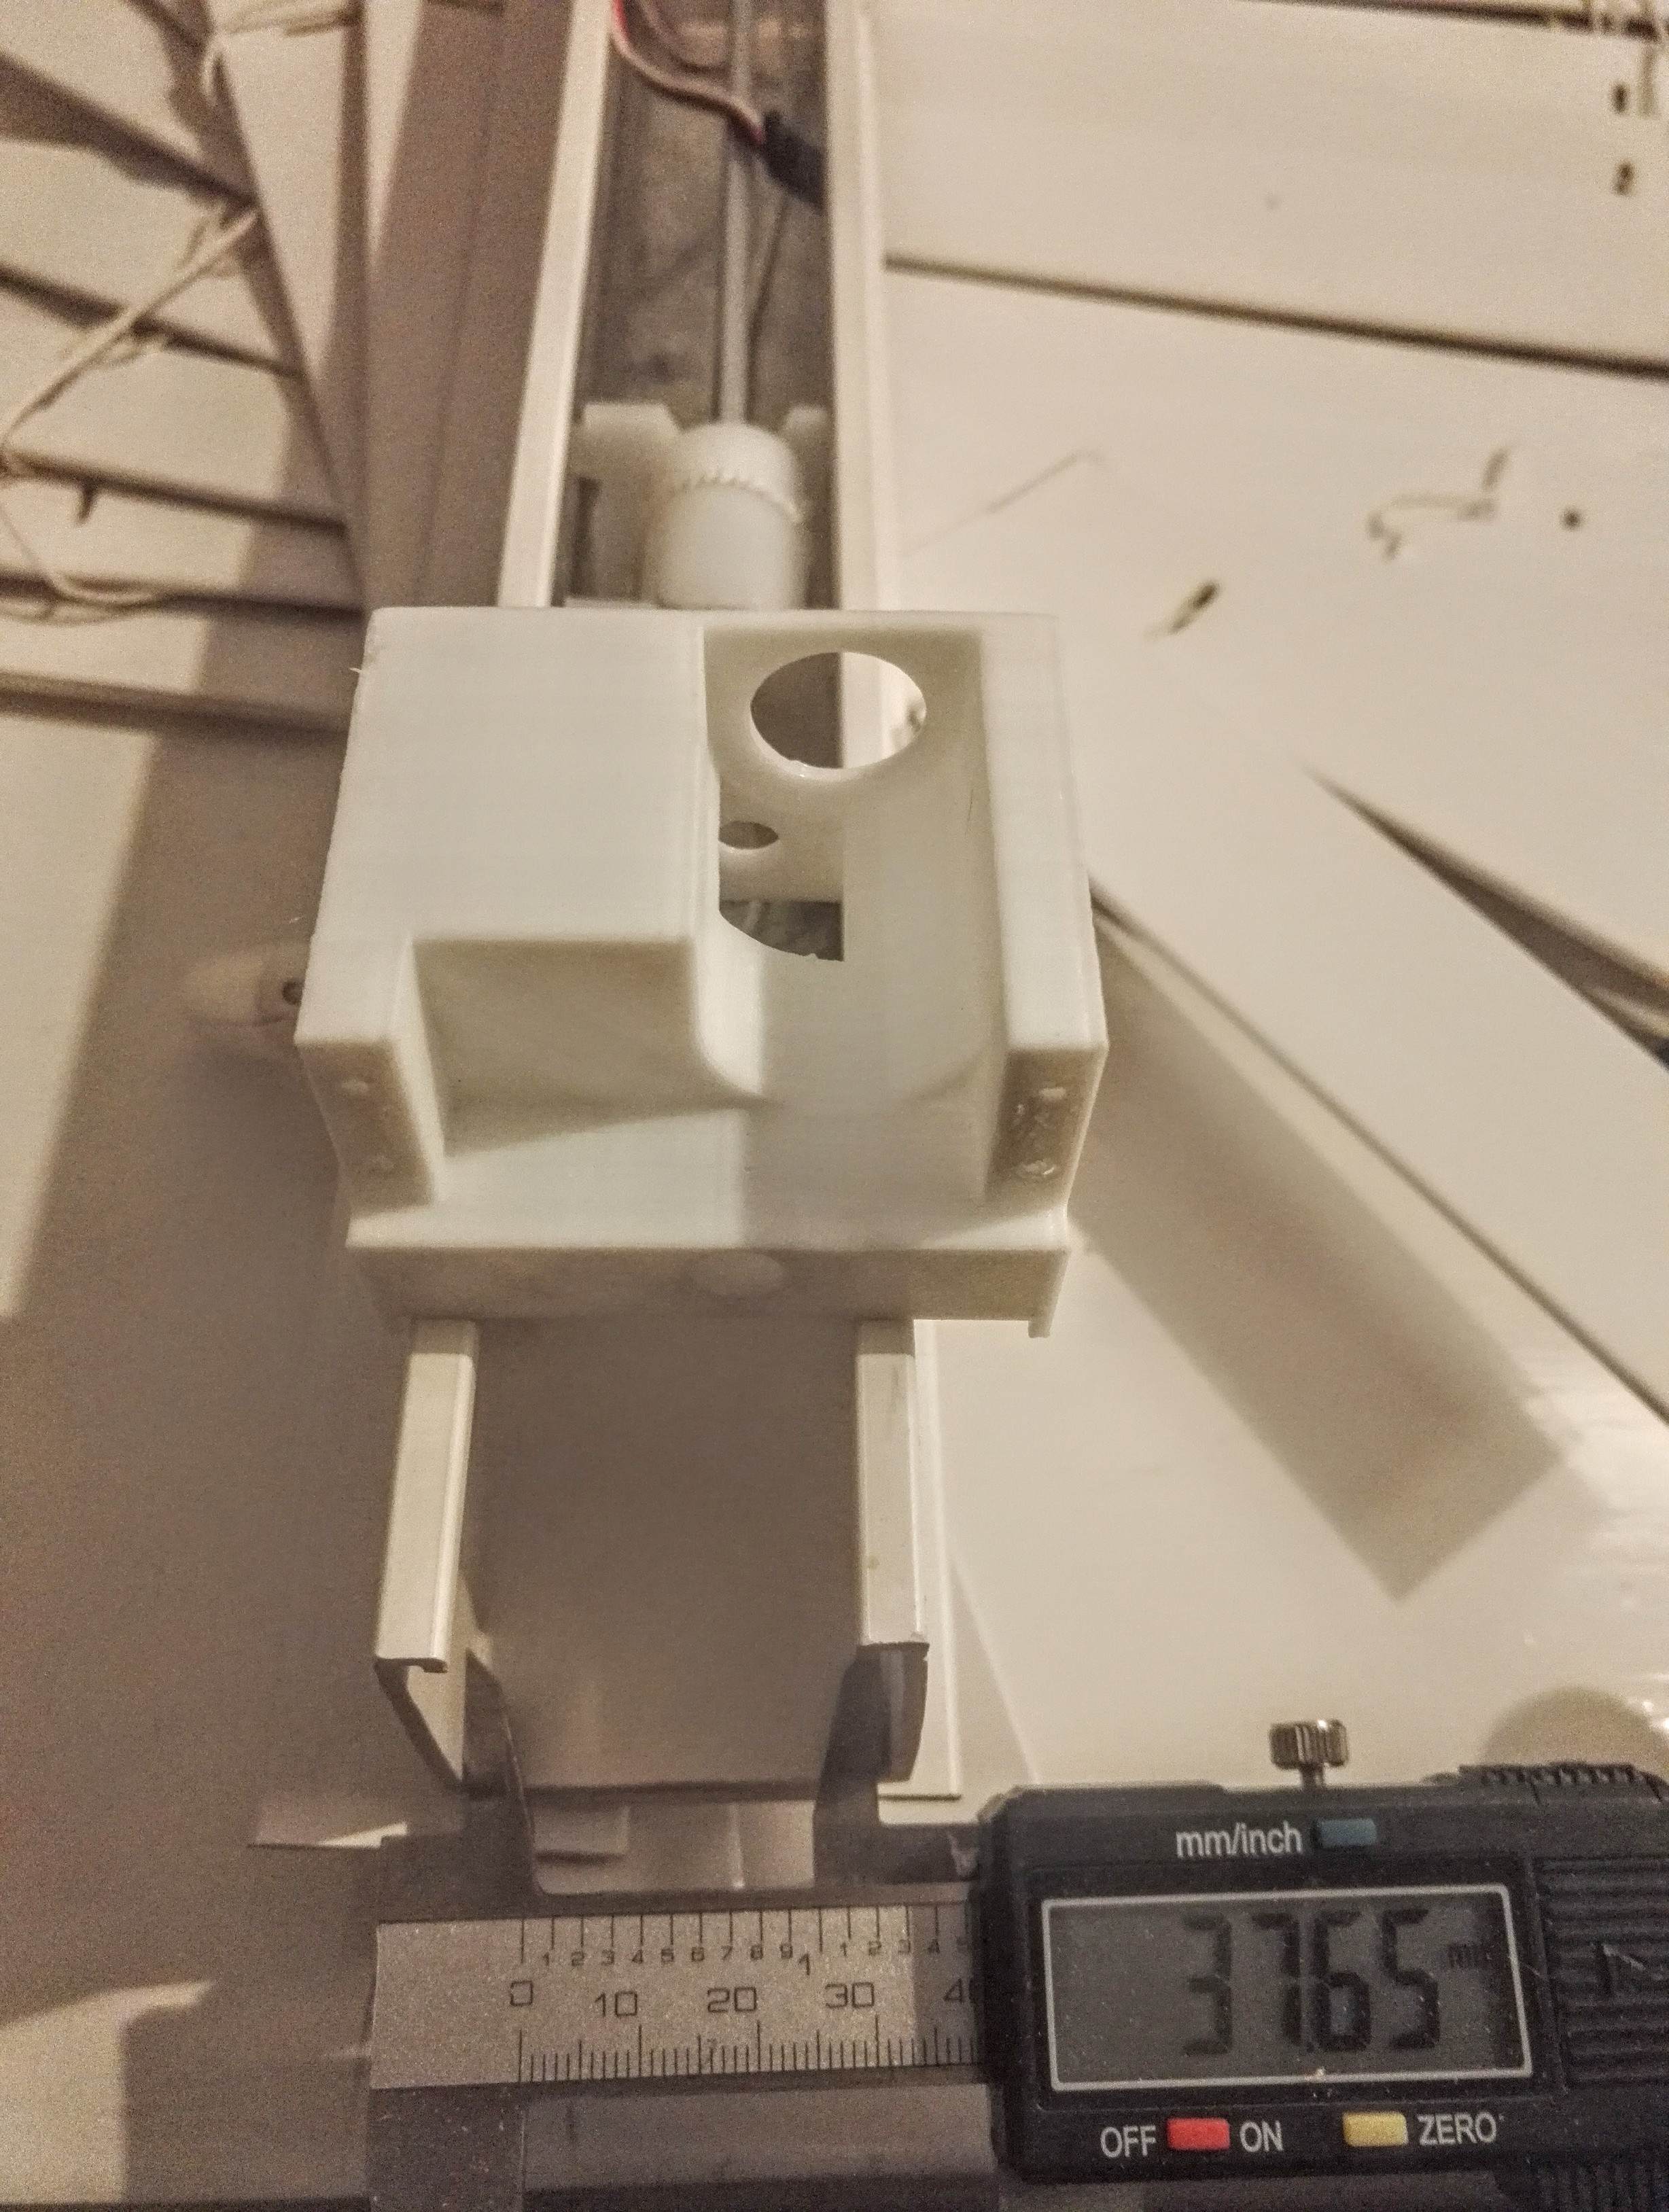
@jetpuff great work with the 3d printed gearbox.
I’m trying to upgrade my Heath Robinson style blind servo mount with your gearbox, but my blinds have 37.5mm internal width - so it doesn’t fit.
See photo.
I’ve got a bunch of these blinds at home, and in the UK it’s a popular size. Would be great to have a printable gearbox to fit.
I have tried editing the STL in tinkercad but have got nowhere.
Any suggestions? Can you help please, or are you able to offer the source 3D design file?
Thanks
Thanks for all your time and effort on this project!
I just finish installing the sketch and device handler. I started testing and I notice that SmartThings Tile doesn’t update when I send a command using the webpage (the servo does moves to the correct position). Also, ST doesn’t update if I use the “manual” switch attached to GPIO12 to move the position. Lastly, if the ST switch is “Closed” and I change the percentage using the slider, the ST switch doesn’t turn to “Open” but the Servo moves to the correct percentage.
Is that the correct behavior? Any way we can always keep ST updated with the actual position of the blinds?
Thanks in advance.
Thank you for all the hard work.
i have got the chip up and running and copy and pasted the groovy code into a device handler. but after that i cant seem to get to the next step if any one could help that would be awesome thanks
I finally made a post about my solution, check it out:
Ok finally got it working and made a qiuck write up to hopfully save peoples time here goes nothing
1)Log In to Smartthings => My Device Handler
Click on to the Create New Device Handler top right of the page
2)GO to
Open the file esp8266-adjustable-blinds-beta.groovy
click raw copy all then paste it in to the smartthings Device Hander uder the tabe From Code
Click the Create button then Click Save, Then Publish for me
3)Go to My Devices => New Device
Details
Name - What ever u want for a name
Lable -
zigbee -
Device Network id - unique Id that none of the other devices have it will change once created
Type - Scrole down to ESP8266 - Adjustable Blinds Beta
Publish - Publish
Locations - yours
Hub - yours
Click Create
4)Now on to the setup Of the ESP8266 This site helps out
Thanks to Jepuf For the hard work
If i am missing Anything please feel free to add to it.
Thanks for this. Now I know what to do with this servo that my friend gave me. I guess it does meet the minimum requirements for such mechanism. 
I’m using @blebson version of the gear box because I want to include the paddle switch for manual control (for wife approval). However, I’m using the esp8266 with your code because I’m new to this world and it seems a little over my head to get that hub setup. My question is, I noticed that your code includes a reference to a manual control through GPIO12 or D6 pin. I’m afraid I’ll short my board out if I try my solution and I’m wrong but do I connect one side of an (ON)-OFF-(ON) momentary paddle switch to ground and the other side to voltage (off the board somehow?) and then run the middle wire to the D6 pin so that it opens or closes depending on whether D6 sees voltage or ground? By the way, I’ve got your setup working already through the D3 pin already and it’s great! Thank you so much for putting this together. It’s a dream project for me to learn all this. I even bought a 3D printer this week. Thanks again for any help!