Overview
At SmartThings we want to provide tooling to allow developers to get their device integrations working in the SmartThings app. These changes will allow an integrator to move from using custom commands and attributes to custom capabilities.
DTH Migration For Custom Capabilities
In order to follow along with the example set forth in this guide, you will want to have the CLI set up, so make sure that you take this step first.
You can download the CLI here from the releases tab and read more about it in the README.
It is also recommended that you familiarize yourself with the concepts:
Walkthrough
We are going to walk through a simple example of updating our Device Type Handler (DTH) so that devices installed with the DTH will be easily controlled and displayed in the SmartThings app. The flow will go as follows:
- Convert custom commands and attributes in our DTH to custom capabilities.
- Create custom capabilities through the SmartThings CLI
- Create a capability presentation through the SmartThings CLI for each new capability.
- Update your DTH to use your new custom capabilities
- Generate and create a Device Configuration based on the structure of your DTH
- Publish your DTH with updated keys to link your devices with the new presentations.
Note The last step of publishing your DTH will automatically update the devices installed with this DTH. This step can however be repeated if you decide you would like to change the presentation of your device.
Note Although you can configure the automations section in these entities, the mobile client cannot yet display these. This support is being built into the mobile client, and should be available later this year. If you do configure your automations view now however, once support becomes available, it will just show up for you automatically once the mobile client work is complete.
Designing your Custom Capabilities
When looking at your DTH, you should design your custom capabilities around encapsulating functionality and related data into logical units. In many cases, this will flow from the way your DTH makes use of custom commands and attributes.
Example: Custom Color Temperature
Taking a look at the example DTH file Simulated RGBW Bulb, we can take this simulated bulb device and create our custom capability.
For our case, we will create a single custom capability called “Completion Temperature”.
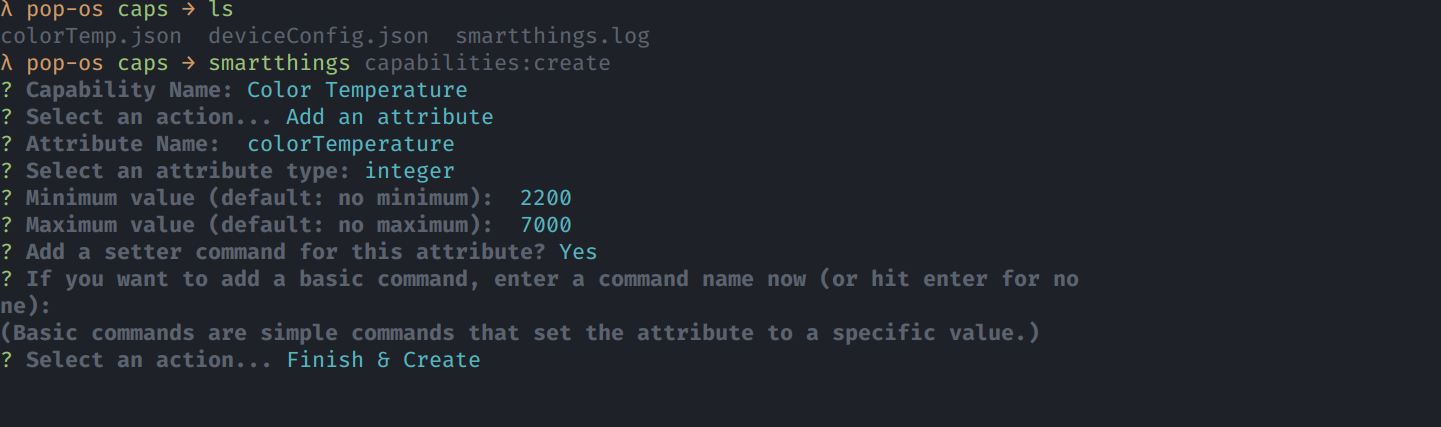
This capability will have one integer type attribute called colorTemperature with a minimum of 2200 and a max of 7000, and a setter command, which is offered by the CLI during attribute creation.
Creating Custom Capabilities

Using the CLI, we can create our new capabilities.
$ smartthings capabilities:create
Here is what the CLI interaction looks like creating the custom capability.
Now the CLI will ask you a series of questions about your new capability.
When choosing a capability name, as we stated above, we have chosen “Color Temperature”. When this is specified as the name, the ID will become <your namespace>.colorTemperature. Your namespace will be automatically generated based on your user credential, so do not worry about needing to specify a namespace.
If the command succeeds you will see a screen like this
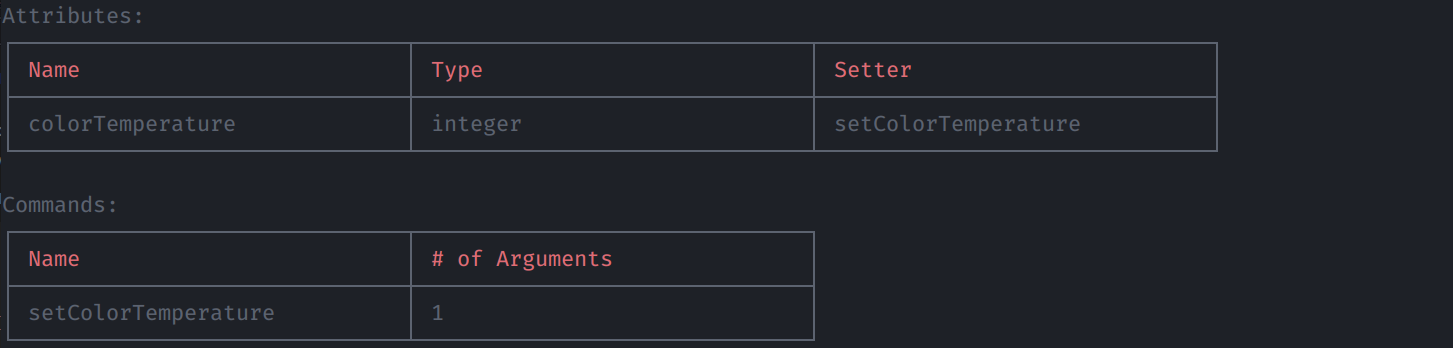
NOTE: I did not include the capability ID, but you should copy that for later.
Creating Capabilities Presentations
Once we have our capability created, we will move onto creating the capability presentation.
Here is the payload for the capability presentation we are going to build for our new capability:
{
    "dashboard": {
        "states": [
            {
                "label": "{{colorTemperature.value}} {{colorTemperature.unit}}"
            }
        ],
        "actions": [],
        "basicPlus": []
    },
    "detailView": [
        {
            "label": "Color Temperature",
            "displayType": "slider",
            "slider": {
                "range": [
                    2200,
                    7000
                ],
                "step": 1,
                "command": "setColorTemperature",
                "unit": "colorTemperature.unit",
                "value": "colorTemperature.value"
            }
        }
    ],
    "automation": {
        "conditions": [
            {
                "label": "Color Temperature",
                "displayType": "slider",
                "slider": {
                    "range": [
                        2200,
                        7000
                    ],
                    "step": 1,
                    "value": "colorTemperature.value",
                    "unit": "colorTemperature.unit"
                }
            }
        ],
        "actions": [
            {
                "label": "Color Temperature",
                "displayType": "slider",
                "slider": {
                    "range": [
                        2200,
                        7000
                    ],
                    "step": 1,
                    "command": "setColorTemperature",
                    "unit": "colorTemperature.unit"
                }
            }
        ]
    },
    "id": "<XXXXXX YOUR NAMESPACE XXXXXXX>.colorTemperature",
    "version": 1
}
Once we have completed the creation of our capability presentation JSON file, we will use the CLI to post this presentation to the appropriate API.
The payload here is relatively complex, so I’m not going to go over every individual field. For that documentation:
- Copy the payload into a file called “colorTemperature.json”
- Modify the id: at the end of the file with your namespace
- Run the command in the folder where you created the colorTemperature.json file
$ smartthings capabilities:presentation:create <XXXX NAMESPACE XXXX>.capabilityName 1 -j -i=colorTemperature.json
Updating DTH to use Custom Capabilities
Now that we have created our capability presentation, we are ready to make the first modification to our DTH. Log in to the graph IDE.
-
Log into graph IDE (IDE: https://account.smartthings.com/)
-
Browse to
My Device Handlerson the top navigation bar. -
Create a device handler from code using the rgw-bulb code at the top of the tutorial.
-
Remove commands and attributes which were encapsulated in your custom capability. Update direct references to your custom attributes and instead reference them through
{capabilityId}.{attributeName}.

- Save and publish your DTH
Note Make sure to grab the Id of your DTH, as it will be necessary for the next step. While you are viewing your DTH, the UUID in the URL bar will be your DTH Id. This will be necessary for the next step.
Generate / Post Device Configuration
Now that you have updated your DTH code with your custom capabilities, we want to create the configuration that will define how the entire device is displayed.
We have provided an endpoint that can generate a basic device configuration for you that will ensure that all of your capabilities show up in each of 3 main views (dashboard, automation, detail view). Most of the device configuration’s purpose other than an ability to show or hide capabilities from particular views is to override display defaults from the capability presentations it composes.
The CLI will make this call for generation of the device config, and here is what the API returned:
presentation:device-config:generate <XXX YOUR DTH ID XXXX> --dth -o=deviceConfig.json -j
This will output your device config to a file called deviceConfig.json
{
    "mnmn": "SmartThingsCommunity",
    "vid": "4a0d8ad7-cde5-32a4-bb0f-ded0b291fca0",
    "type": "dth",
    "dpInfo": null,
    "iconUrl": null,
    "dashboard": {
        "states": [
            {
                "component": "main",
                "capability": "switch",
                "version": 1,
                "values": [],
                "visibleCondition": null
            },
            {
                "component": "main",
                "capability": "switchLevel",
                "version": 1,
                "values": [],
                "visibleCondition": null
            },
            {
                "component": "main",
                "capability": "refresh",
                "version": 1,
                "values": [],
                "visibleCondition": null
            },
            {
                "component": "main",
                "capability": "colorTemperature",
                "version": 1,
                "values": [],
                "visibleCondition": null
            },
            {
                "component": "main",
                "capability": "tomorrowlocket43669.colorTemperature",
                "version": 1,
                "values": [],
                "visibleCondition": null
            }
        ],
        "actions": [
            {
                "component": "main",
                "capability": "switch",
                "version": 1,
                "values": [],
                "visibleCondition": null
            },
            {
                "component": "main",
                "capability": "switchLevel",
                "version": 1,
                "values": [],
                "visibleCondition": null
            },
            {
                "component": "main",
                "capability": "refresh",
                "version": 1,
                "values": [],
                "visibleCondition": null
            },
            {
                "component": "main",
                "capability": "colorTemperature",
                "version": 1,
                "values": [],
                "visibleCondition": null
            },
            {
                "component": "main",
                "capability": "tomorrowlocket43669.colorTemperature",
                "version": 1,
                "values": [],
                "visibleCondition": null
            }
        ]
    },
    "detailView": [
        {
            "component": "main",
            "capability": "switch",
            "version": 1,
            "values": [],
            "visibleCondition": null
        },
        {
            "component": "main",
            "capability": "switchLevel",
            "version": 1,
            "values": [],
            "visibleCondition": null
        },
        {
            "component": "main",
            "capability": "refresh",
            "version": 1,
            "values": [],
            "visibleCondition": null
        },
        {
            "component": "main",
            "capability": "colorTemperature",
            "version": 1,
            "values": [],
            "visibleCondition": null
        },
        {
            "component": "main",
            "capability": "tomorrowlocket43669.colorTemperature",
            "version": 1,
            "values": [],
            "visibleCondition": null
        }
    ],
    "automation": {
        "conditions": [
            {
                "component": "main",
                "capability": "switch",
                "version": 1,
                "values": [],
                "visibleCondition": null
            },
            {
                "component": "main",
                "capability": "switchLevel",
                "version": 1,
                "values": [],
                "visibleCondition": null
            },
            {
                "component": "main",
                "capability": "refresh",
                "version": 1,
                "values": [],
                "visibleCondition": null
            },
            {
                "component": "main",
                "capability": "colorTemperature",
                "version": 1,
                "values": [],
                "visibleCondition": null
            },
            {
                "component": "main",
                "capability": "tomorrowlocket43669.colorTemperature",
                "version": 1,
                "values": [],
                "visibleCondition": null
            }
        ],
        "actions": [
            {
                "component": "main",
                "capability": "switch",
                "version": 1,
                "values": [],
                "visibleCondition": null
            },
            {
                "component": "main",
                "capability": "switchLevel",
                "version": 1,
                "values": [],
                "visibleCondition": null
            },
            {
                "component": "main",
                "capability": "refresh",
                "version": 1,
                "values": [],
                "visibleCondition": null
            },
            {
                "component": "main",
                "capability": "colorTemperature",
                "version": 1,
                "values": [],
                "visibleCondition": null
            },
            {
                "component": "main",
                "capability": "tomorrowlocket43669.colorTemperature",
                "version": 1,
                "values": [],
                "visibleCondition": null
            }
        ]
    }
}
We are going to modify the device config to show the switch on the dashboard and everything else on the details page.
- We removed everything but switch for the dashboard
- We removed the stock color temperature
{
    "mnmn": "SmartThingsCommunity",
    "vid": "4a0d8ad7-cde5-32a4-bb0f-ded0b291fca0",
    "type": "dth",
    "dpInfo": null,
    "iconUrl": null,
    "dashboard": {
        "states": [
            {
                "component": "main",
                "capability": "switch",
                "version": 1,
                "values": [],
                "visibleCondition": null
            }
        ],
        "actions": [
            {
                "component": "main",
                "capability": "switch",
                "version": 1,
                "values": [],
                "visibleCondition": null
            }
        ]
    },
    "detailView": [
        {
            "component": "main",
            "capability": "switch",
            "version": 1,
            "values": [],
            "visibleCondition": null
        },
        {
            "component": "main",
            "capability": "switchLevel",
            "version": 1,
            "values": [],
            "visibleCondition": null
        },
        {
            "component": "main",
            "capability": "refresh",
            "version": 1,
            "values": [],
            "visibleCondition": null
        },
        {
            "component": "main",
            "capability": "colorTemperature",
            "version": 1,
            "values": [],
            "visibleCondition": null
        },
        {
            "component": "main",
            "capability": "tomorrowlocket43669.colorTemperature",
            "version": 1,
            "values": [],
            "visibleCondition": null
        }
    ],
    "automation": {
        "conditions": [
            {
                "component": "main",
                "capability": "switch",
                "version": 1,
                "values": [],
                "visibleCondition": null
            },
            {
                "component": "main",
                "capability": "switchLevel",
                "version": 1,
                "values": [],
                "visibleCondition": null
            },
            {
                "component": "main",
                "capability": "refresh",
                "version": 1,
                "values": [],
                "visibleCondition": null
            },
            {
                "component": "main",
                "capability": "tomorrowlocket43669.colorTemperature",
                "version": 1,
                "values": [],
                "visibleCondition": null
            }
        ],
        "actions": [
            {
                "component": "main",
                "capability": "switch",
                "version": 1,
                "values": [],
                "visibleCondition": null
            },
            {
                "component": "main",
                "capability": "switchLevel",
                "version": 1,
                "values": [],
                "visibleCondition": null
            },
            {
                "component": "main",
                "capability": "refresh",
                "version": 1,
                "values": [],
                "visibleCondition": null
            },
            {
                "component": "main",
                "capability": "tomorrowlocket43669.colorTemperature",
                "version": 1,
                "values": [],
                "visibleCondition": null
            }
        ]
    }
}
Once you are happy with your device configuration, you may use the CLI to post the JSON file to the API.
$ smartthings presentation:device-config:create -j -i deviceConfig.json

Note make sure that you keep the MNMN and the VID fields from your device config handy, because we will need to update your DTH to use these fields
Publish DTH with updated display keys
Now you simply need to take the MNMN and VID from the returned device configuration and add them to your DTH and publish.
To update the vid and mnmn:
- Go back to graph IDE and edit your DTH again
- In the
definitionnear the top of the DTH file, either modify existing fields calledvidandmnmn, or add them.
Example
/**
 *  Copyright 2017-2018 SmartThings
 *
 *  Device Handler for a simulated mixed-mode RGBW and Tunable White light bulb
 *
 *  Licensed under the Apache License, Version 2.0 (the "License"); you may not use this file except
 *  in compliance with the License. You may obtain a copy of the License at:
 *
 *      http://www.apache.org/licenses/LICENSE-2.0
 *
 *  Unless required by applicable law or agreed to in writing, software distributed under the License is distributed
 *  on an "AS IS" BASIS, WITHOUT WARRANTIES OR CONDITIONS OF ANY KIND, either express or implied. See the License
 *  for the specific language governing permissions and limitations under the License.
 *
 *  Author: SmartThings
 *  Date: 2017-10-09
 *
 */
import groovy.transform.Field

// really? colorUtils is missing black?
@Field final Map      BLACK = [name: "Black", rgb: "#000000", h: 0, s: 0, l: 0]

@Field final IntRange PERCENT_RANGE = (0..100)

@Field final IntRange HUE_RANGE = PERCENT_RANGE
@Field final Integer  HUE_STEP = 5
@Field final IntRange SAT_RANGE = PERCENT_RANGE
@Field final Integer  SAT_STEP = 20
@Field final Integer  HUE_SCALE = 1000
@Field final Integer  COLOR_OFFSET = HUE_RANGE.getTo() * HUE_SCALE

@Field final IntRange COLOR_TEMP_RANGE = (2200..7000)
@Field final Integer  COLOR_TEMP_DEFAULT = COLOR_TEMP_RANGE.getFrom() + ((COLOR_TEMP_RANGE.getTo() - COLOR_TEMP_RANGE.getFrom())/2)
@Field final Integer  COLOR_TEMP_STEP = 50 // Kelvin
@Field final List     COLOR_TEMP_EXTRAS = []
@Field final List     COLOR_TEMP_LIST = buildColorTempList(COLOR_TEMP_RANGE, COLOR_TEMP_STEP, COLOR_TEMP_EXTRAS)

@Field final Map MODE = [
    COLOR:	"Color",
    WHITE:	"White",
    OFF: 	"Off"
]

metadata {
    definition (name: "Custom Bulb Capability", namespace: "<XXXX YOUR NAMESPACE XXXX>", author: "You", mnmm: "SmartThingsCommunity", vid: "ec7c523c-c1b3-3449-a227-a9a85d583e72") {
        capability "Health Check"
        capability "Actuator"
        capability "Sensor"
        capability "Light"

        capability "Switch"
        capability "Switch Level"
        capability "Color Control"

       // Remove this
       // capability "Color Temperature"

       // Add This
        capability "<XXXX YOUR NAMESPACE XXXX>.colorTemperature"
        capability "Refresh"
        capability "Configuration"

        attribute  "colorTemperatureRange", "VECTOR3"

        attribute  "bulbMode", "ENUM", ["Color", "White", "Off"]
        attribute  "bulbValue", "STRING"
        attribute  "colorIndicator", "NUMBER"
        command    "simulateBulbState"
    }
......
}
Note that the VID is a hashed value based on the contents of your device type and device configuration, so as you modify your device config, the value of this key may change. This is the key that the mobile app will use to find your device configuration.
Once your DTH is published with the final MNMN and VID from the returned device config, the devices using this DTH should already have been updated with the new keys, and the device presentation should be available for the phone to use.
Note The device presentation is the entity that the phone uses to display your device. The device configuration is a slimmed down input that the presentation service uses to construct the final presentation, which is a full description for how the devices of this type are to be displayed, including all of the capability presentation information and any values you’ve overridden in your device configuration.
For more information on device integrations and other details of the SmartThings Platform, see the SmartThings Developer Documentation