Creating Drivers for Z-Wave Devices with SmartThings Edge
SmartThings Edge is our new architecture for Hub Connected devices that uses Device Drivers to execute commands locally on SmartThings Hubs. In this tutorial you will learn how to create a SmartThings Edge Driver for a Z-Wave device - the Aeotec Z-Wave MultiSensor 6.
Prerequisites
- Samsung Account
- Any version SmartThings Hub with firmware version 38.x or greater
- Set up the SmartThings CLI according to the usage section in the repository.
You will be using the CLI to interact with and publish drivers. If you need instructions on installing the CLI you can find them here [Install CLI Tutorial Link].
Edge Drivers are written in Lua, an easy-to-use scripting language. If you are not familiar with Lua, here are some good resources to get you started:
PRO TIP: set up your IDE to allow for autocompletion and enable the type hints provided by the library.
Video Tutorial

Written Guide
Crafting your Driver
Package Structure
The structure of your Driver can change based on the type of device (e.g., LAN devices do not have fingerprints). Driver packages are commonly organized into the following hierarchy with the logic of your driver residing in the src folder.
package
├── config.yaml
├── profiles
│        ├── { Profile Name }.yaml
│        └── { Other Profile Name }.yaml
├── fingerprints.yaml (Zigbee/Z-Wave)
└── src
         ├── init.lua
         ├── file1.lua
         ├── file2.lua
         └── <folder>
           ├── init.lua
           └── file3.lua
Config.Yaml
config.yaml is the package definition file. Here you define the package name and package key. Each of your package key names needs to be unique within your developer account.
name: 'Z-Wave Aeotec Multisensor'
packageKey: 'zwave-aeotec-multisensor'
permissions:
  zwave: {}
Profiles Directory
A Device Profile defines a Device and its features (e.g., Capabilities) on the SmartThings Platform. The profiles directory allows your driver package to support more than one type/model of device. Each type of device must be defined in its own .yaml file.
For example, this driver package uses a single fingerprint for the four different models of the Aeotec MultiSensor (see Fingerprints.yaml) as all have the same capabilities. However, we could separate them to assign a different profile to each one of them.
Note we are setting up the motion clear time as a custom preference.
# ./profiles/aeotec-multisensor-profile.yml
name: aeotec-multisensor-pr
components:
- id: main
  capabilities:
  - id: motionSensor
    version: 1
  - id: illuminanceMeasurement
    version: 1
  - id: temperatureMeasurement
    version: 1
  - id: battery
    version: 1
  - id: healthCheck
    version: 1
  categories:
    - name: MotionSensor
metadata:
  deviceType: MotionSensor
  ocfDeviceType: x.com.st.d.sensor.motion
  deviceTypeId: MotionSensor
preferences:
  - name: "motionClearTime"
    title: "Set Motion Clear Time"
    description: "PIR time in seconds (default 240)"
    required: false
    preferenceType: integer
    definition:
      minimum: 10
      maximum: 3600
      default: 240
  - name: "motionSensorSensitivity"
    title: "Set Motion sensor sensitivity"
    description: "0-5 where 0 disables the sensor (default 5)"
    required: false
    preferenceType: integer
    definition:
      minimum: 0
      maximum: 5
      default: 5
If a device model had a different configuration (capabilities, metadata, etc.), we would create another profile like the one below where the capability “Temperature Measurement” was removed.
# ./profiles/aeotec-multisensor-profile2.yml
name: aeotec-multisensor-2
components:
- id: main
  capabilities:
  - id: motionSensor
    version: 1
  - id: illuminanceMeasurement
    version: 1
  - id: battery
    version: 1
  - id: healthCheck
    version: 1
  categories:
    - name: MotionSensor
Preferences.lua
motionClearTime is a custom preference that will configure the Z-Wave parameter 3. We can then refer to this custom variable in other areas of the code.
local preferences = {
  motionSensorSensitivity = {parameter_number = 4, size = 1},
  motionClearTime = {parameter_number = 3, size = 2}
}

return preferences
Fingerprints.yaml
In order to correctly onboard Zigbee and Z-Wave devices, you must include the Fingerprints with the Driver. In the Fingerprint, you are binding a Device Type to a Device Profile. These will allow the Hub to apply the correct Profile to your hardware.
In fingerprints.yaml, you should define all of the hardware variants supported by the package
Example Fingerprint:
zwaveManufacturer:
  - id: "Aeotec/ZW100-X"
    deviceLabel: Aeotec MultiSensor 6
    manufacturerId: 0x0086
    productId: 0x0064
    deviceProfileName: aeotec-multisensor-pr
SRC Directory
The src directory contains the Lua code and any supporting files specific to your driver. Here you will define the device command handlers, event handlers, discovery services, and any other helper functions that may be required.
Uploading Your Driver to SmartThings
Once you wrap development of your driver, you can upload the driver from the source directory on your workstation.
On the command prompt at the location of the driver you created, enter the following commands:
smartthings edge:drivers:package [PROJECTDIRECTORY]
The output of this command will be the Driver Id, Name, Package Key and Version.

Next, create a channel for your driver
smartthings edge:channels:create

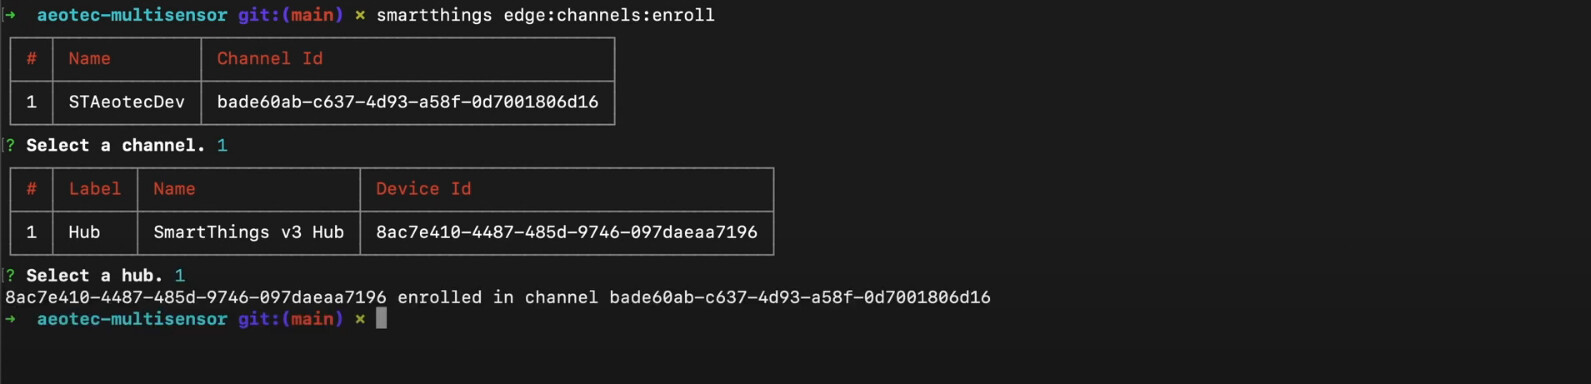
Enroll your driver into the channel
smartthings edge:channels:enroll
Assign your driver to the corresponding channel
smartthings edge:channels:assign

If the package was successfully created, you can call the command below and follow the on-screen prompts to install the Driver in your Hub :
smartthings edge:drivers:install

You should see the confirmation message: “Driver {driver-id} installed to Hub {hub-id}”
Onboarding your New Device
- Use your network router to locate and copy the IP Address for your Hub.
- From a computer on the same local network as your hub, open a new terminal window and run the command to get the logs from all the installed drivers.
smartthings edge:drivers:logcat
-
Open the SmartThings App and go to the Location where the Hub is installed.
a. Select Add (+) > Device
b.Tap on “Scan nearby” (If you have more than one, select the corresponding Hub as well) -
Put your device in pairing mode; the specifications will vary by manufacturer (for the Aeotec MultiSensor 6, press the device’s action button once).
-
Keep the terminal view open until the “infoChanged” lifecycle event is received and the driver starts getting the REPORT commands from the device.
Example Output

If your Device paired correctly and the Driver was applied, you should not see any errors in the logs. You can validate this by opening the SmartThings app and controlling and/or viewing all of the devices Capabilities (e.g., motion or change the temperature).
Distributing your Driver with Channels
With SmartThings Edge, you can use Driver Channels to publish and distribute your driver to others. Here are steps to get started:
Create Invitation to Share Your Channel
smartthings channels:invitations:create
This will return a unique URL for the web page to accept the invitation.
Joining a Driver Channel / Accessing a Shared Driver
Once a developer invites you to their channel, you can access it with the following steps:
-
Open the URL in a web browser
-
Sign in with your Samsung Account
-
Accept the invitation
-
Invitation web page will redirect to drivers WebPage on Accept
-
Find hub you wish to install the driver to
-
Enroll Hub into Channel
Note: As the developer, you can determine when to update all installations that use your Driver Channel by assigning the new version to the channel.
Delete the device
-
Open the SmartThings App, select the hub where the device was included.
-
Go to menu (three dots symbol) > Z-Wave utilities
-
Select “Z-Wave exclusion” to put the hub in exclusion mode.
-
Click the action button on the device once. You should see a success message on this page and the led of the device should flash.
Additional Notes on Local Execution
Drivers are executed locally on SmartThings Hubs. Automations that use only Edge drivers and local Actions (e.g., time of day) will execute locally.
For more information on SmartThings Edge, stay tuned to our Developer Community and visit developer.samsung.com/SmartThings